

In this third episode of our LocalGov Drupal series of tutorials, we are presenting a step-by-step guide on how to set up version control and GIT with a remote code repository containing your website's codebase.
In this Episode...
In this third tutorial of our LocalGov Drupal series, we'll use the LGD site we built locally to set up Git and a remote code repository. This tutorial can also be used completely independently i.e. for any Drupal (or other CMS) website you have installed locally.
The previous two tutorials we've recently released are also available below and you can use either one to create your first Drupal website locally before returning to this post to continue with the project:
- LocalGov Drupal Tutorial #1: Local Installation with Lando
- LocalGov Drupal Tutorial #2: Local Installation with DDEV
After completing this tutorial, you can move on to LocalGov Drupal Tutorial #4: How to Deploy your Website to the Cloud.
Let's dive into the world of version control, remote repositories and Git branches!
Version Control and Git
Version control is essential in any software development workflow. There are two types of version control:
- Centralized (CVCS) with a central server
- Distributed (DVCS) where each user has a complete copy
Git is a distributed version control system (DVCS) widely used for tracking changes in source code during software development.
Benefits of using Git
The benefits of using Git are the following:
1. Branching and Merging
Git provides robust branching and merging capabilities. Developers can create branches to work on features or bug fixes independently and then merge their changes back into the main codebase. This promotes parallel development and experimentation.
2. Backup and Recovery
Since each developer has a complete copy of the repository, Git acts as a reliable backup mechanism. In case of data loss or mistakes, it is possible to revert to a previous state.
3. History and Traceability
Git maintains a detailed history of all changes, including who made the changes, when, and what was modified. This historical record helps in understanding the evolution of the project and facilitates debugging and auditing.
4. Collaboration
Git allows multiple developers to collaborate seamlessly. Changes can be shared between team members, and conflicts can be resolved efficiently. Online platforms like Bitbucket, GitHub or GitLab enhance collaboration by providing a central repository and additional tools for code review and issue tracking.
All of these platforms function based on similar principles. For the purposes of this project, we are going to use a Bitbucket repository to host our LGD website's code.
5. Open Source and Community Support
Git is open source, and it has a large and active community. This means continuous improvement, widespread adoption, and extensive documentation and support resources.
6. Compatibility
Git is cross-platform and works on Mac OS, Windows, and Linux. This allows teams with diverse operating systems to collaborate seamlessly.
Installing Git Locally
Below, we are providing instructions on how to install Git on Mac, Windows and Linux machines. You can find even more detailed instructions on Atlassian's corresponding documentation page.
Installing Git on a Mac
There are several ways to install Git on a Mac. To find out whether Git is already installed on your machine, open your Terminal and run the following command:
git --versionThe command is basically asking our Mac what the installed version of Git is.
If Git is already installed, the output will be something like the following: git version 2.7.0 (Apple Git-66) (you might have a different version installed on your Mac). If Git is not present, our Terminal will respond with something like the following: command not found: Git.
To install Git on your Mac, there are many methods available and you can find all of them on the corresponding official Bitbucket/Atlassian documentation page. We are covering two popular methods below:
1. Installing Git on a Mac with Git for Mac Installer
The easiest way to install Git on a Mac is via the stand-alone installer:
- Download the latest Git for Mac installer.
- Follow the prompts to install Git.
2. Installing Git on a Mac with Homebrew
In case Homebrew is not already present on your machine, in our previous LocalGov Drupal, Local Installation with DDEV, we've included detailed instructions on how to install it locally.
To install Git with Homebrew, open your terminal and run the following:
brew install gitNo matter the method you used to install Git locally, you can then confirm that the installation was successful by running the git --version command as mentioned above.
Installing Git on Windows
1. Installing Git on Windows with Git for Windows Installer
An easy way to install Git on Windows is via the stand-alone installer:
- Download the latest Git for Windows installer.
- When you've successfully started the installer, you should see the Git Setup wizard screen. Follow the Next and Finish prompts to complete the installation. The default options are usually sensible for most users.
2. Installing Git on Windows with Atlassian Sourcetree
Sourcetree, a free visual Git client for Windows, comes with its own bundled version of Git. You can download Sourcetree here.
To learn how to use Git with Sourcetree (and how to host your Git repositories on Bitbucket) you can follow Atlassian's comprehensive Git tutorial with Bitbucket and Sourcetree here.
Installing Git on Linux
1. Debian / Ubuntu (apt-get)
Git packages are available via apt, the main command-line package manager for Debian and its derivatives. First, we need to update the package index files on the system (which contain information about available packages and their versions):
sudo apt-get updateThen, from your shell, install Git using apt-get:
sudo apt-get install gitAs mentioned above, you can then verify the installation was successful by running the following command:
git --versionNow that Git is installed on your system, this should output something like git version 2.9.2 (the version number might be different when you try this).
2. Fedora (dnf/yum)
Git packages are available via both yum and dnf, the popular package managers for Fedora distributions and you can install Git with either one of them:
sudo dnf install gitor
sudo yum install gitYou can verify the Git installation by running git --version (similarly to other Operating Systems above).
You can find additional ways of installing Git on your Linux distributions on Atlassian's documentation page.
Configuring Git
For configuring the basics of Git on a Mac, use the Terminal. On Windows, you'll naturally have to use the Command Prompt (or Git Bash if during installation you elected not to use Git from the Windows Command Prompt) and on Linux, the Shell (if you have Linux running on your machine, you definitely know what Shell is 🤓).
Now that you've installed Git locally, you can configure your Git username and email using the following commands, replacing John's name and email address with your own:
git config --global user.name "John Smith"
git config --global user.email "john.smith@orionweb.uk"
These details will be associated with any commits that you create from now on, for example when you push code to your remote repository on Bitbucket.
Bitbucket Repository Setup
We have now completed installing Git locally. The next step is, to set up our code repository using Bitbucket (you can use GitHub or GitLab or any other Git platform - the principles are the same).
1. Bitbucket Account
If you don't have a Bitbucket account yet, head over to https://bitbucket.org/ and create one. By creating an account on Bitbucket, your workspace will also be created. A workspace is where you will create repositories, collaborate on your code, and organise different streams of work in your Bitbucket account. This is how the URLs will be formatted for any repositories you create in your workspace: www.bitbucket.org/<workspace ID>/<repo name>.
2. Adding an SSH key to Bitbucket
It’s necessary to store at least one SSH key from your local machine onto your bitbucket account. This ensures that your system is authenticated and you can interact safely with the online repository on Bitbucket. Detailed instructions on managing SSH keys and uploading them to your bitbucket account can be found here on the official Atlassian portal.
3. Bitbucket Project
Every workspace that has projects enabled will have an initial untitled project which contains all the workspace's repositories. Give this initial project a meaningful name so it's easy to distinguish it from other projects you might be adding to your workspace in the future.
You can find detailed instructions on how to create a new Bitbucket project on Atlassian's corresponding documentation page here.
4. Bitbucket Repository
Now that you have your Bitbucket workspace and project set up, it's time to create your first Bitbucket repository. A "create repository" link should be available on your repositories page. Clicking on that link will lead you to a screen like the following:
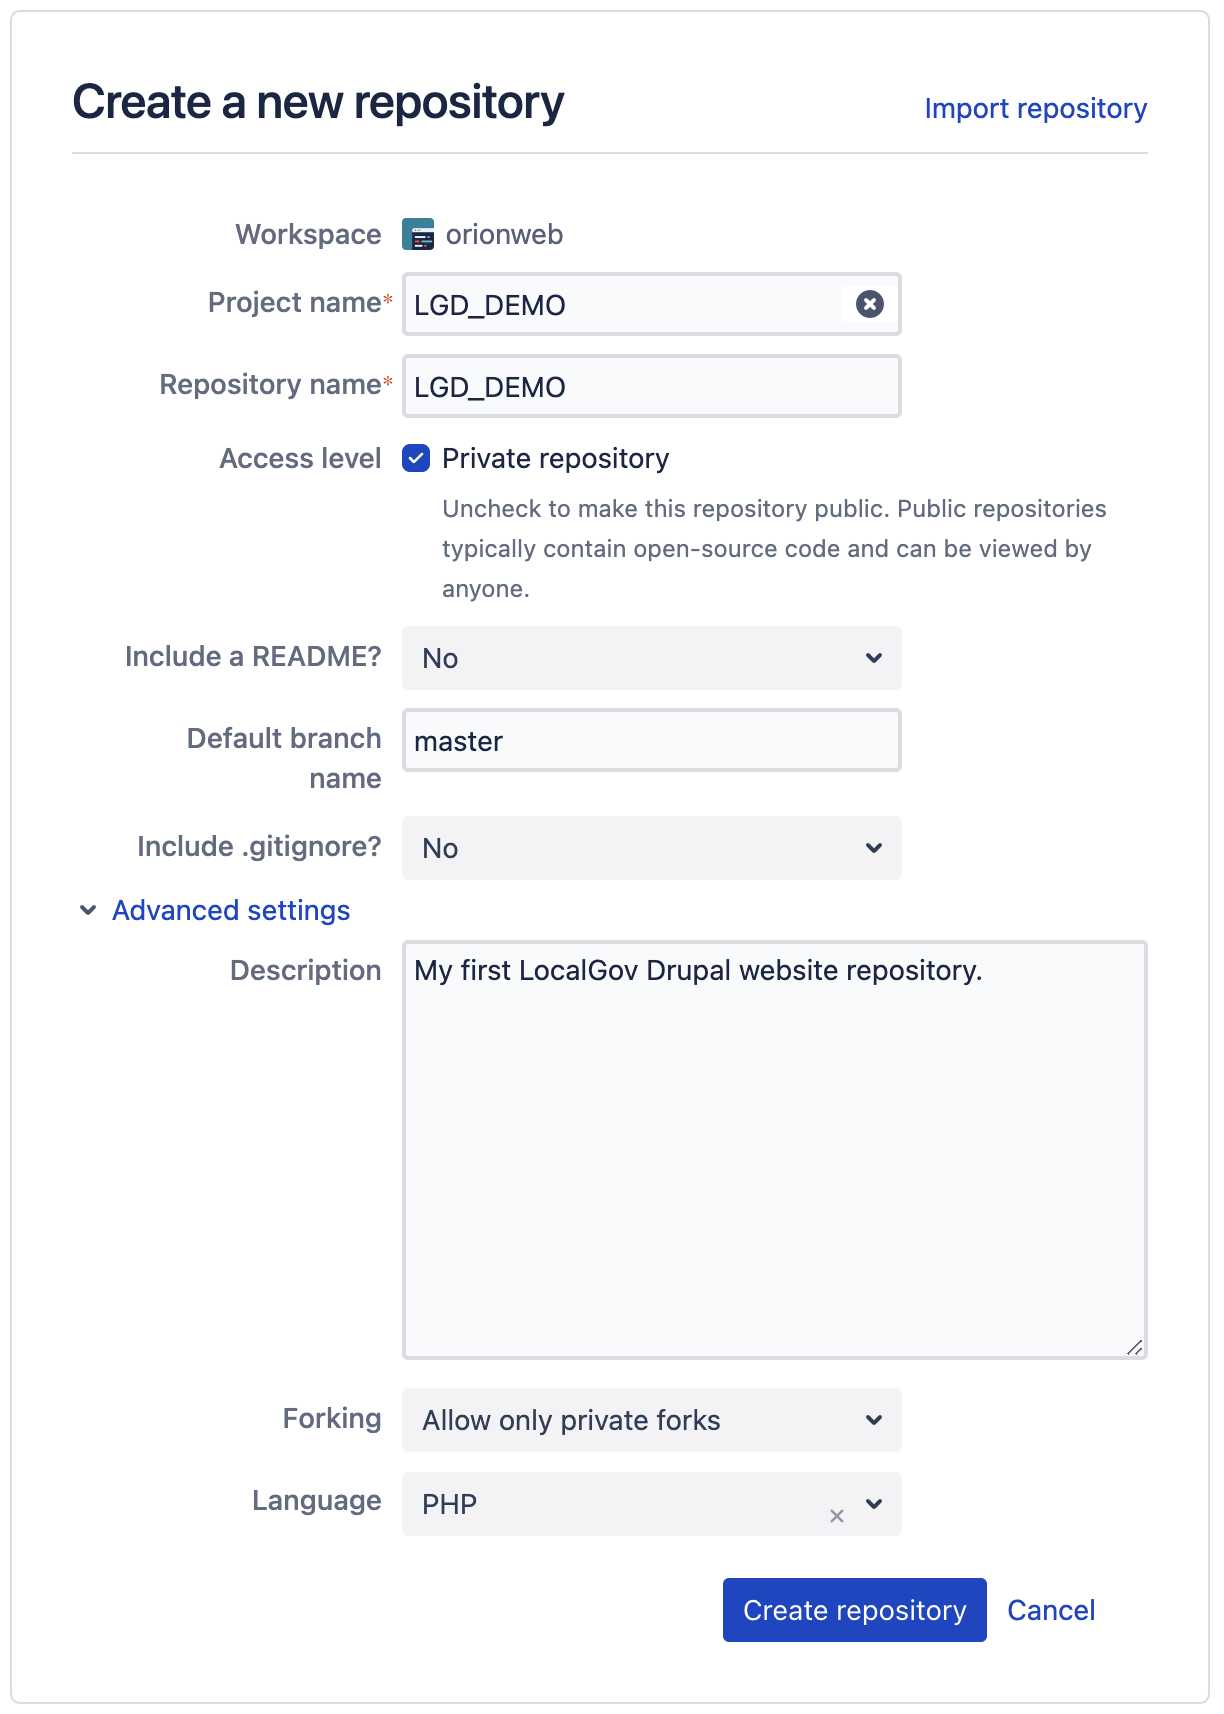
Here's what every setting on this page means:
- Workspace: This is the workspace under which the new project and repository will be created. For the purposes of this tutorial, we are using one of our workspaces, called "orionweb", but this can be anything you have previously defined (see "1. Bitbucket Account" above).
- Project name: You can create a new project or select an existing one.
- Repository name: This will be your code repo's name. Make sure you enter something that makes sense for the project you're working on.
- Access level: Unless we're planning to allow anyone to view or interact with our repo, we don't want it to be publically accessible.
- Include a README: We have selected "No" for this option because our LGD_DEMO project already has a README file. (A README is often the first item a visitor will see when visiting your repository and typically includes information on the project, its maintainers, how users can use it etc.).
- Default branch name: This is the main branch for this repository. The default value is "main" but we have entered "master" as that's usually the name of the primary branch we use for our projects (this is mainly semantics and it doesn't make a great difference to name your primary branch "main").
- Include .gitignore: Our Drupal website comes with its own .gitignore file so we don't need Bitbucket to add one. As explained on the official Git documentation page, a .gitignore file specifies intentionally untracked files that Git should ignore.
- Description: You can add something meaningful to your project here.
- Forking: This option refers to the ability to create a copy of your repository. The selected "allow only private forks" option means that only users you've added to your repository will be able to copy it and create private clones ("forks") of it.
- Language: Drupal uses Symfony, a PHP framework, hence our selection for this field.
After filling in all the fields on the repo creation page and clicking on "Create repository", we land on a page that looks like the following:
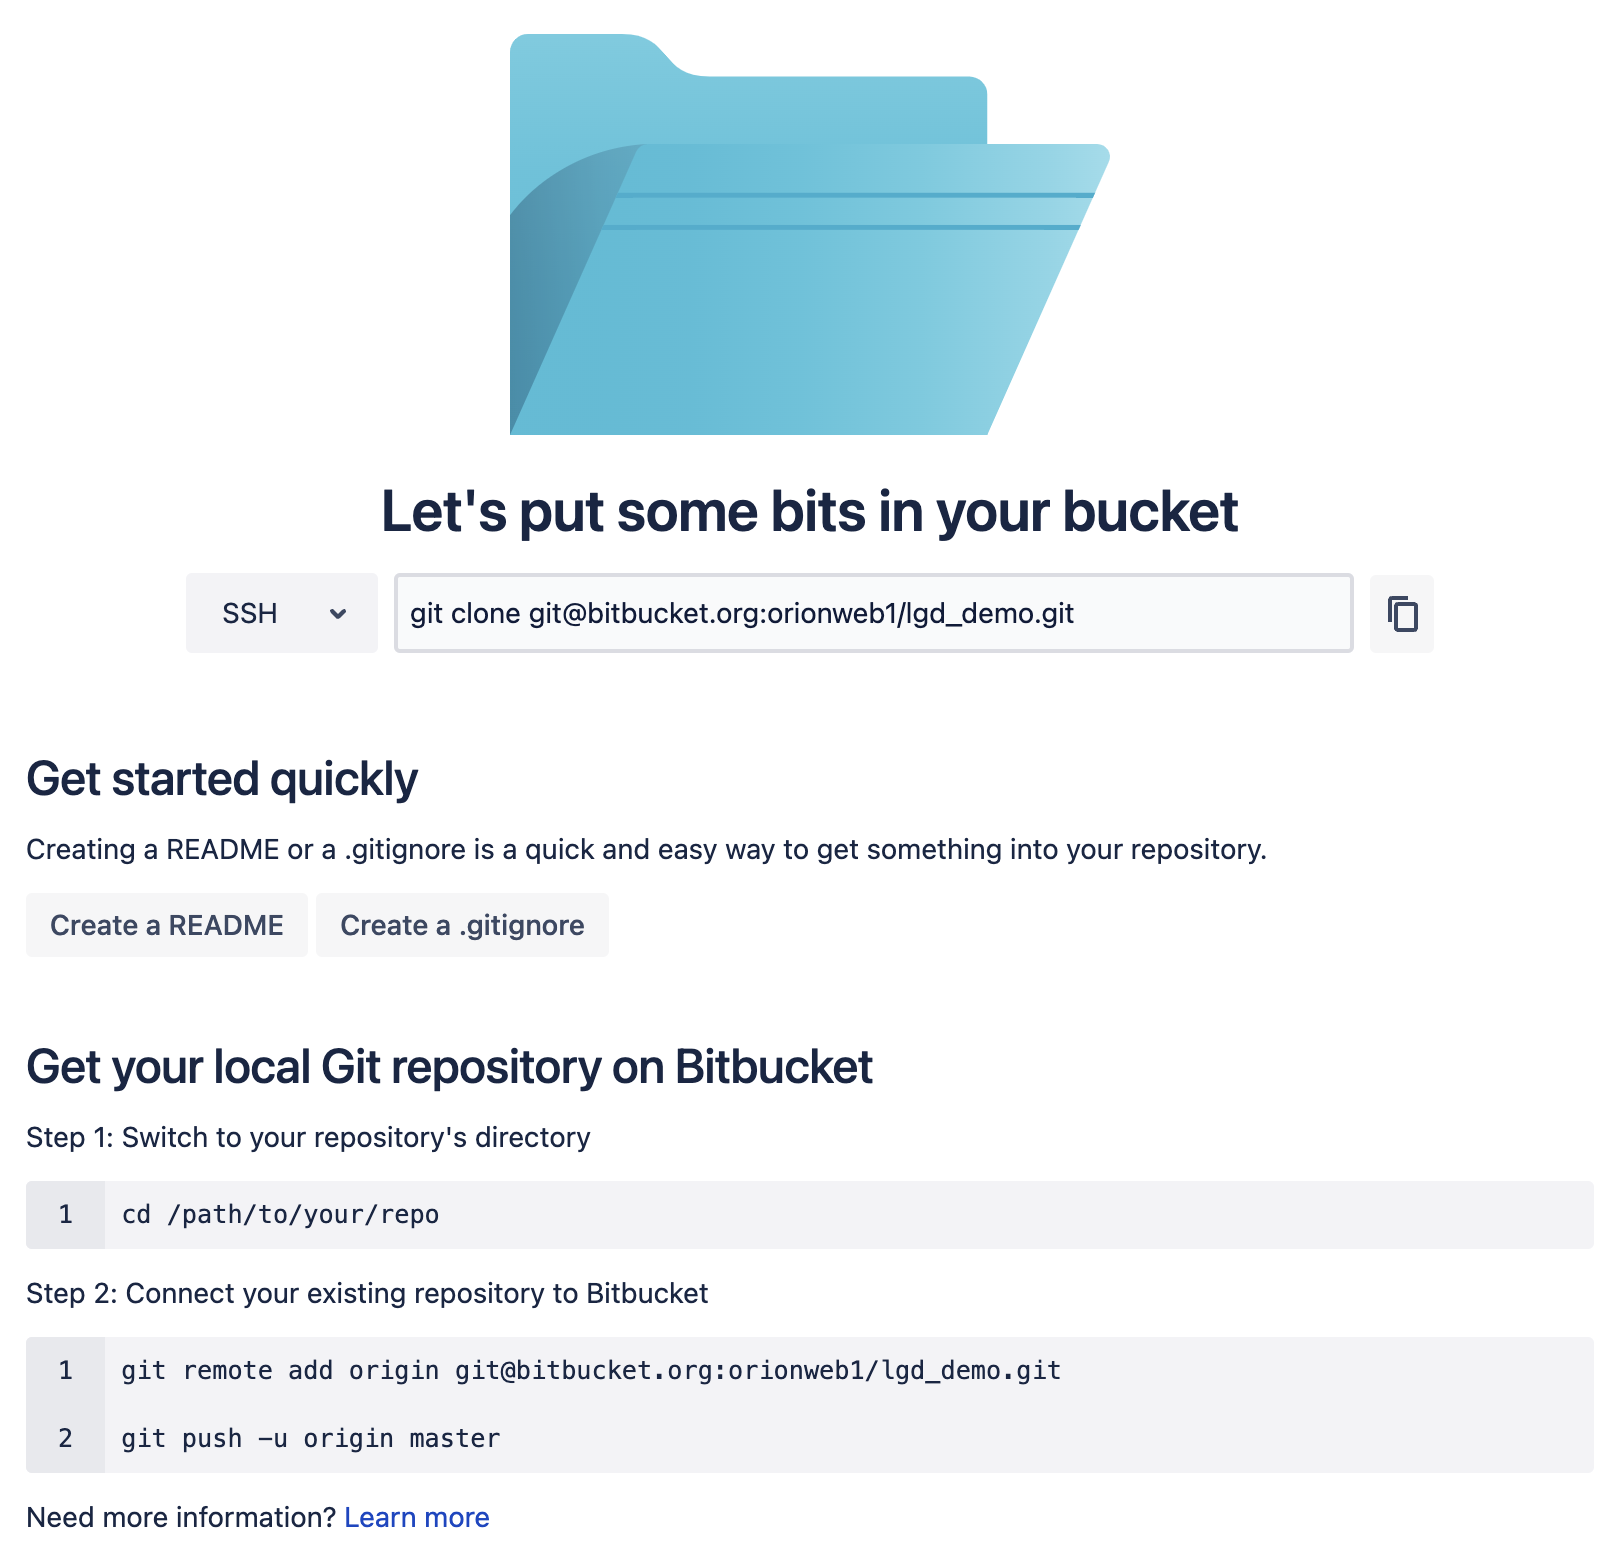
Your new repository is up and running, ready to host your local website! Naturally, the repo is initially empty (technically speaking, it's not completely empty as it contains the absolutely necessary elements that justify its existence!). Read on for the most exciting part of this tutorial: Pushing your new website's code from your local to the new remote repository!
Importing your code to Bitbucket
The "SSH" URL displayed on the repo creation confirmation page above is the unique address of the new repository and it's necessary for cloning the repository locally. We are going to follow the instructions shown on the page to upload our local code to the Bitbucket repo we just created:
First of all, we need to be in our local project's directory. Using your Terminal/Command Prompt/Shell, "change directory" to the folder where your Drupal website resides. On Mac OS, web projects usually live in the Sites folder (and we're using the same LocalGov Drupal project named LGD_DEMO as in the previous two tutorials):
cd ~/Sites/LGD_DEMOWe're finally ready to use Git. The following steps are always essential for pushing our local code to the remote repository we just created:
1. Initialising our Git project:
git initAll Git commands start with git, followed by the action we're after. git init is simply letting (our local) Git know that this is a project we need to add version control to. Running this command inside the project's folder will generate a .git folder in the project's main ("root") folder which, from now on, will contain all the Git history of the project:
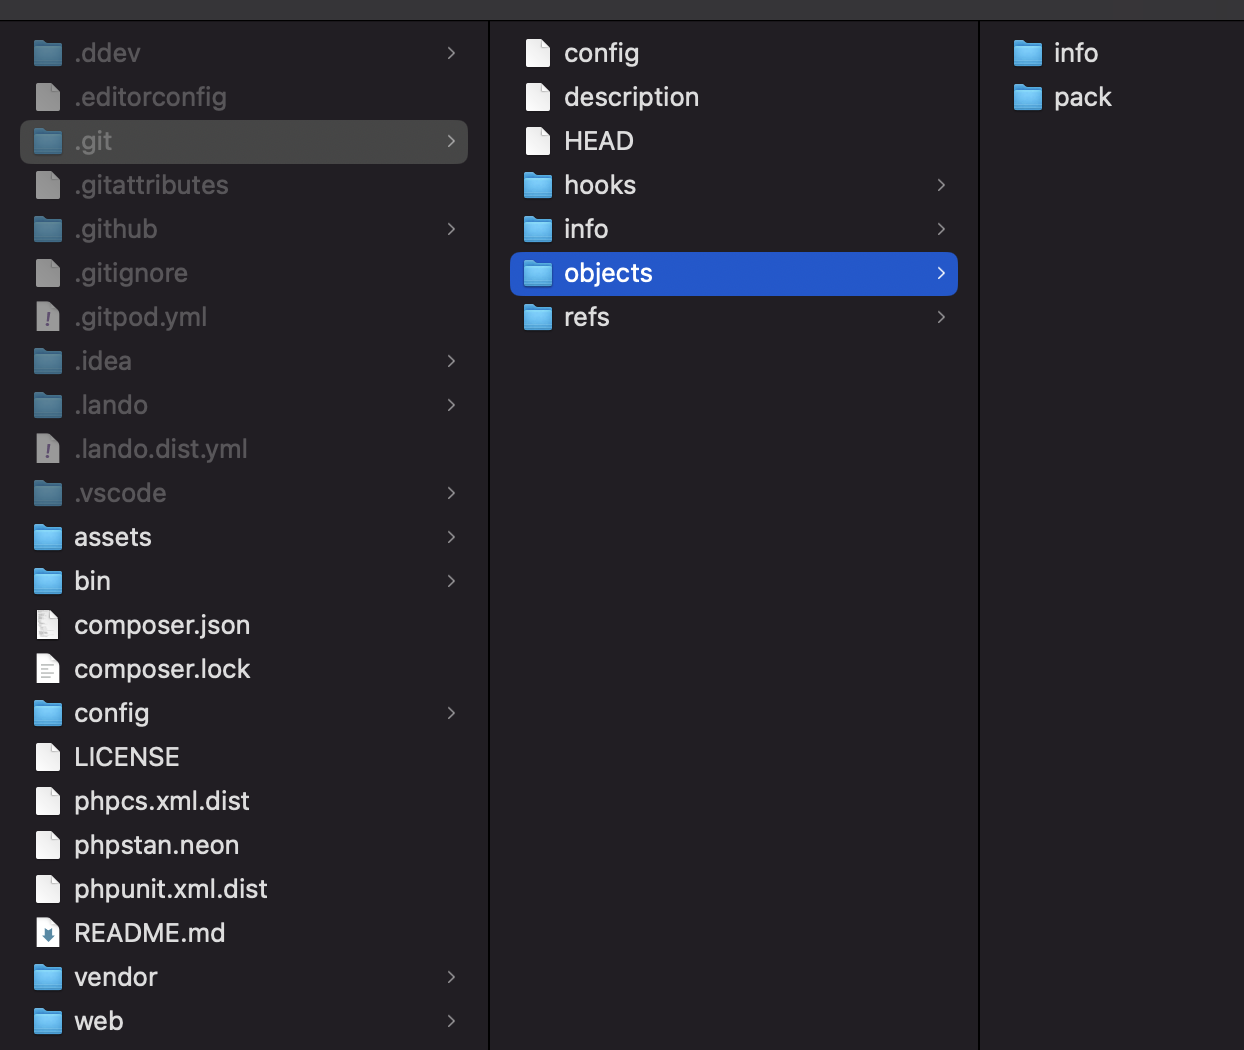
This includes all the previous commits from every user interacting with the project and, as a result, all the different versions of the project since its Git initialisation - A proper time machine! This is extremely useful when we are collaboratively working on a project with other developers and we all need to have a way of knowing what everyone else is doing.
Even when working alone on a project, we can go through the history of our commits and clearly see how the project and its files and folders have evolved over time. All modern Git platforms have become really good at showing the differences between two states of a project (e.g. its current state and any past commit made by any other user) through the use of DIFF visualisations. You can read more about git diff on Atlassian's documentation page.
2. Git - Staging our local files
git add --allThis Git command adds all files to our local Git i.e. it makes Git aware of the files, and most importantly the changes in these files, that need to be tracked.
Other variations of the git add command are possible (for example, we don't always need all changed files to be staged). In this case, we do want to add all our project files to Git. This step precedes the command that actually commits our changes, hence its name, "staging".
3. Git - Committing our staged changes
git commit -m "Initial Commit"The output of this command looks like the following:
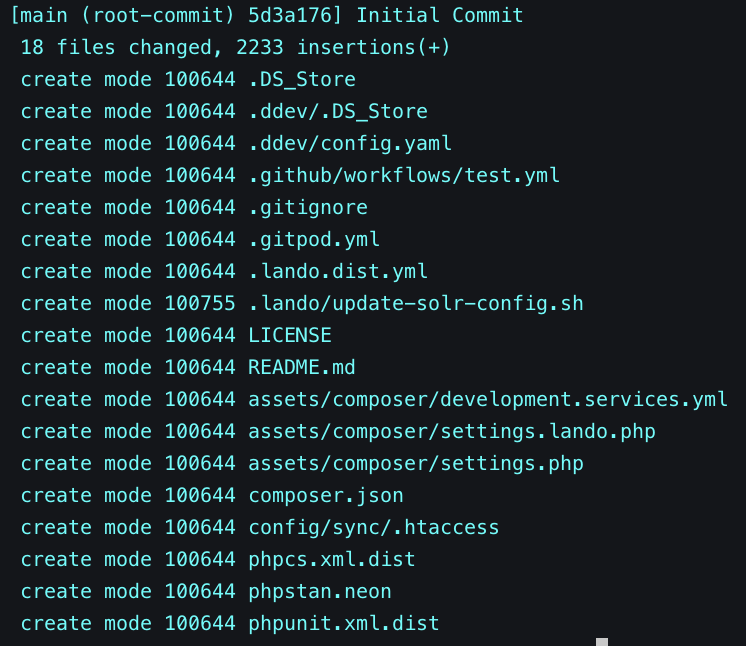
This Git command "locks" our commitment to pushing our (previously staged) changes to our remote repository. It's accompanied by the -m argument which is followed by an actual message.
In our case, the message reads "Initial Commit" but it can be anything you like as long as it's meaningful and descriptive of the changes you are committing.
The commit message we have defined here is kept forever in the Git history (inside the .git directory, as described above).
4. Setting the remote repo URL
git remote add origin git@bitbucket.org:orionweb1/lgd_demo.gitThis step is only required once as it's the first time we are attempting to push code to the online repository and our local Git has no idea about where this remote repository is. By running the git remote add origin {REMOTE_REPO_URL} command, we merely inform our local Git about the unique "address" of the repository.
5. Git-Pushing our local changes to the remote repo
git push -u origin masterThe output of this command looks like the following:
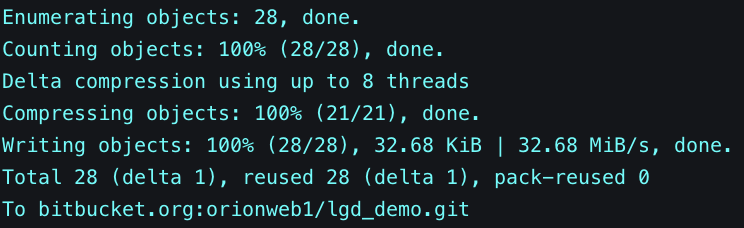
This is the last step in the sequence where our changes are actually "transmitted" online and eventually reach our project's Bitbucket repository.
This command triggers a process that makes the remote project directory and its contents identical to our local one i.e. all our local changes are now reflected on the Bitbucket repository, with absolute precision. On Bitbucket, we can always see the codebase of our project under Source:
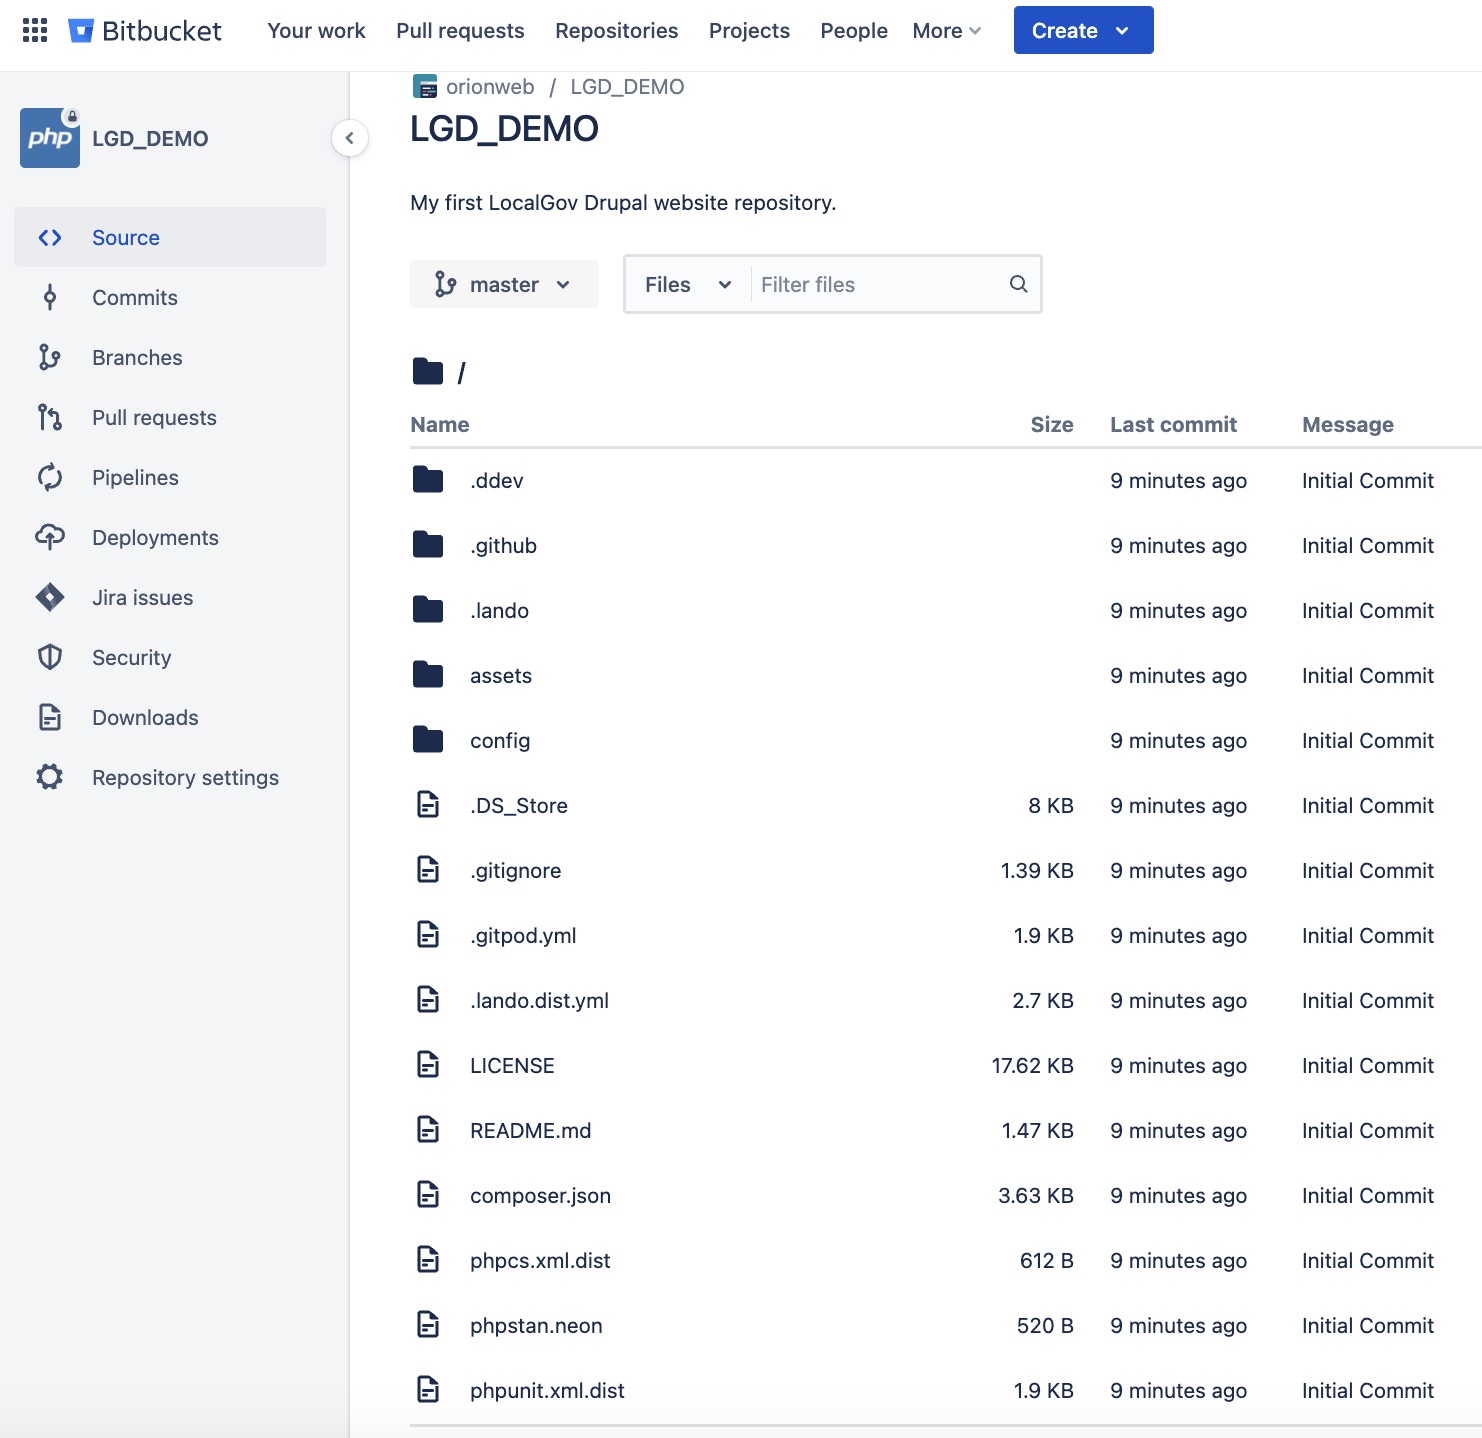
Note that, for the purposes of this tutorial, we've been using the master branch. This is the same branch we have selected to view the source code of our project on the Bitbucket repository in the screenshot above. Atlassian offers a beautiful description of what Git branches are:
Git branches are effectively a pointer to a snapshot of your changes. When you want to add a new feature or fix a bug - no matter how big or how small - you spawn a new branch to encapsulate your changes. This makes it harder for unstable code to get merged into the main code base, and it gives you the chance to clean up your future's history before merging it into the main branch.
Conclusion
You've now managed to create a Bitbucket repository, enable Git on your local project and push your project's codebase to the remote repo - This is not a small accomplishment! From here, you can explore further how Git works as well as Bitbucket's robust features.
In our next episodes, we'll create pages and components for our LocalGov Drupal website as well as set up our cloud hosting environment in preparation for eventually launching our website - Stay tuned!
Let us know what you think of our LocalGov Drupal tutorials, we greatly appreciate any feedback.
ORION WEB can help your Council design and build its brand-new Local Government website or microsite, as well as migrate your legacy site to the LGD platform. Contact us for a free demo of LGD's features - we'd love to discuss your Council's digital strategy!