
In the fourth episode of our LocalGov Drupal series of tutorials, we are presenting a step-by-step guide on how to deploy your website to the Cloud, using Platform.sh. ORION WEB, in partnership with Platform, provides robust web hosting solutions with various levels of managed service and reassuring SLA.
In this Episode...
In this fourth tutorial of our LocalGov Drupal series, we'll use a website we have already built locally and pushed to a Bitbucket GIT repository to go one step further: Deploy it to a real-life Cloud server environment!
This tutorial can also be used independently i.e. for any Drupal (or other CMS) website you are currently working locally and have uploaded to a GIT repository platform (e.g. BitBucket, GitHub, GitLab etc.).
The previous three tutorials we've recently released are also available below and you can use them to create your first Drupal website locally as well as push its codebase to a Bitbucket repository before returning to this post to continue with the project:
- LocalGov Drupal Tutorial #1: Local Installation with Lando
- LocalGov Drupal Tutorial #2: Local Installation with DDEV
- LocalGov Drupal Tutorial #3: Version Control and Code Repository Setup
Let's dive straight into it!
Choosing a Hosting Provider
When choosing a hosting provider for your website, prioritise performance, scalability, uptime reliability and customer support quality. Assess your website's needs, considering traffic, content, and technical requirements. Ensure the provider offers robust security features (including SSL certificates) and regular backups. Evaluate server performance and location for optimal loading times.
While pricing matters, prioritise value over the cheapest option. This systematic approach ensures your decision aligns with your website's unique requirements, fostering a reliable and efficient online presence.
Without over-analysing the pros and cons of major players in the hosting market, for the needs of this tutorial, we'll use platform.sh, a robust and reliable hosting solution for web applications and Content Management Systems like Drupal.
You can read more about ORION WEB's hosting solution here.
Creating a New platform.sh Project
Following the creation of your new account, log in and, on the Console page (console.platform.sh), click on "Create Project":
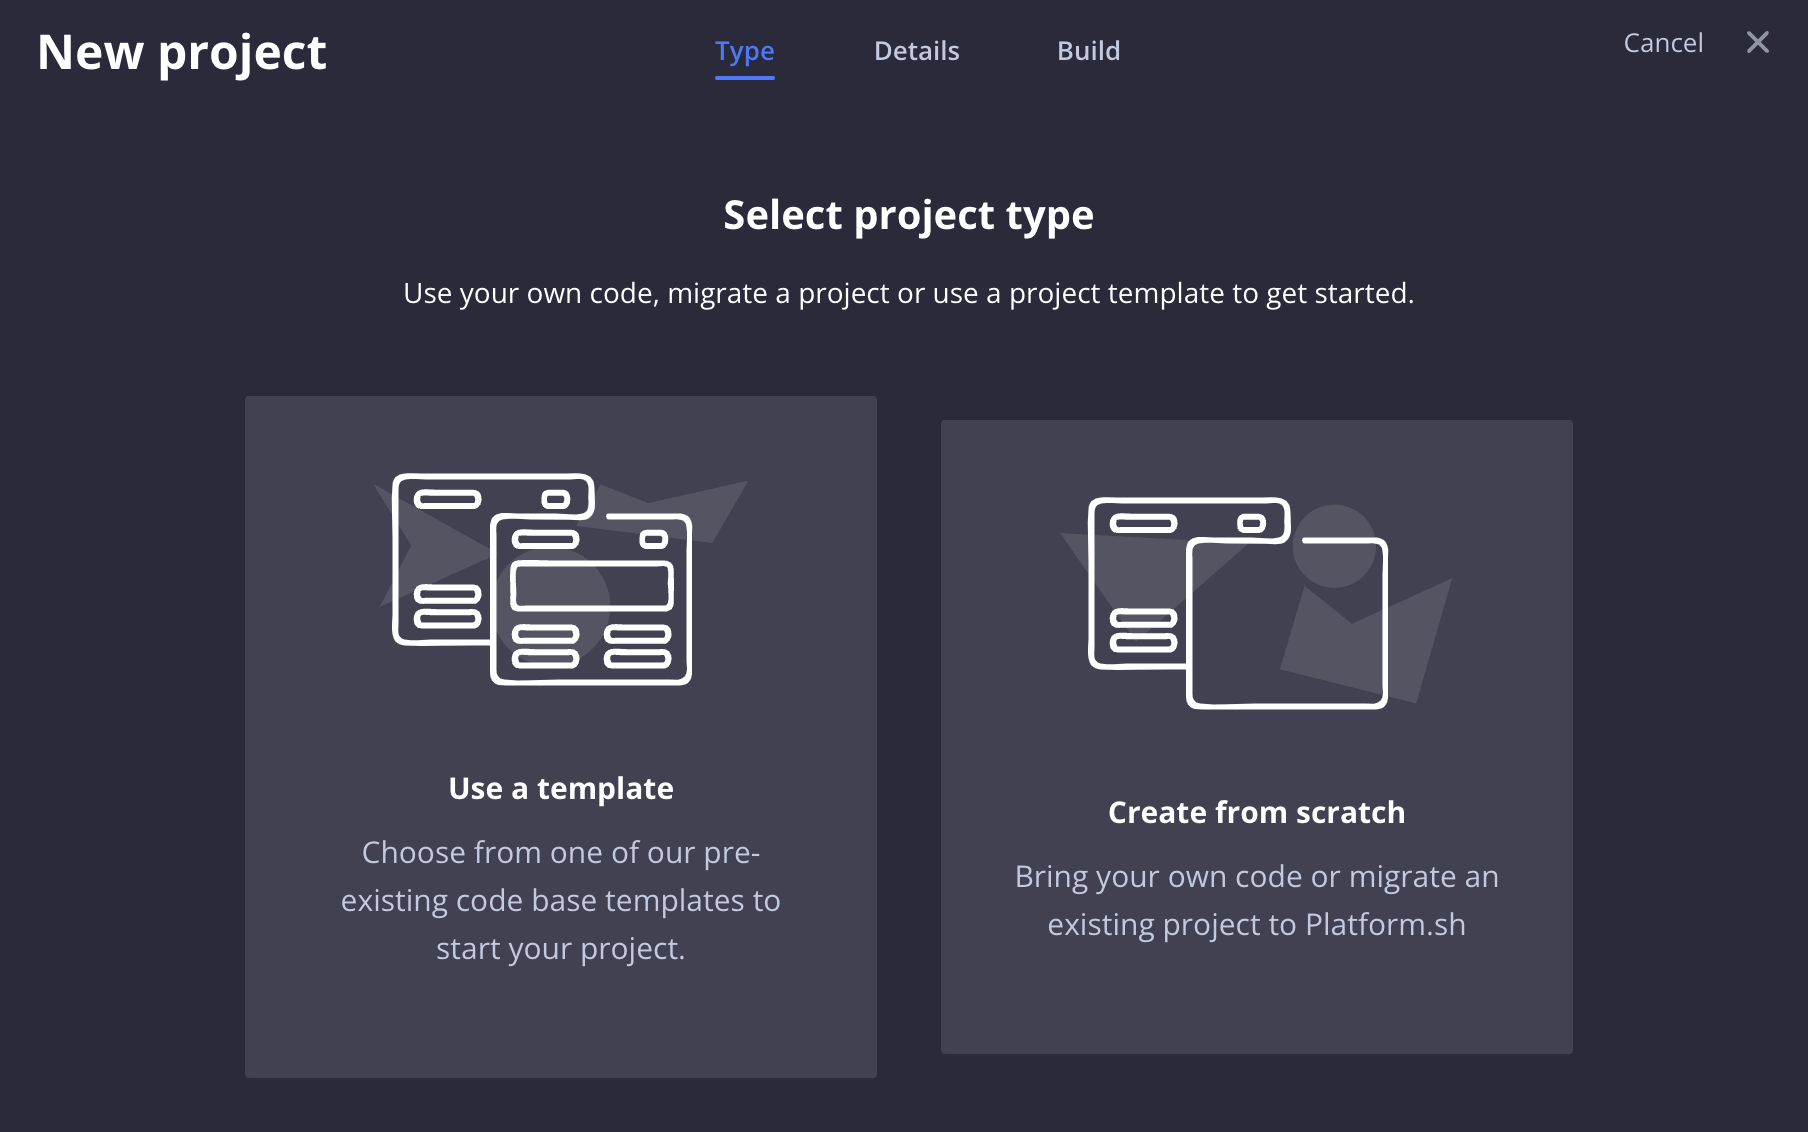
We are going to use the LocalGov Drupal website we've been working on, so the "Create from scratch" option is appropriate here. Clicking on the option leads us to the next screen, "Details":
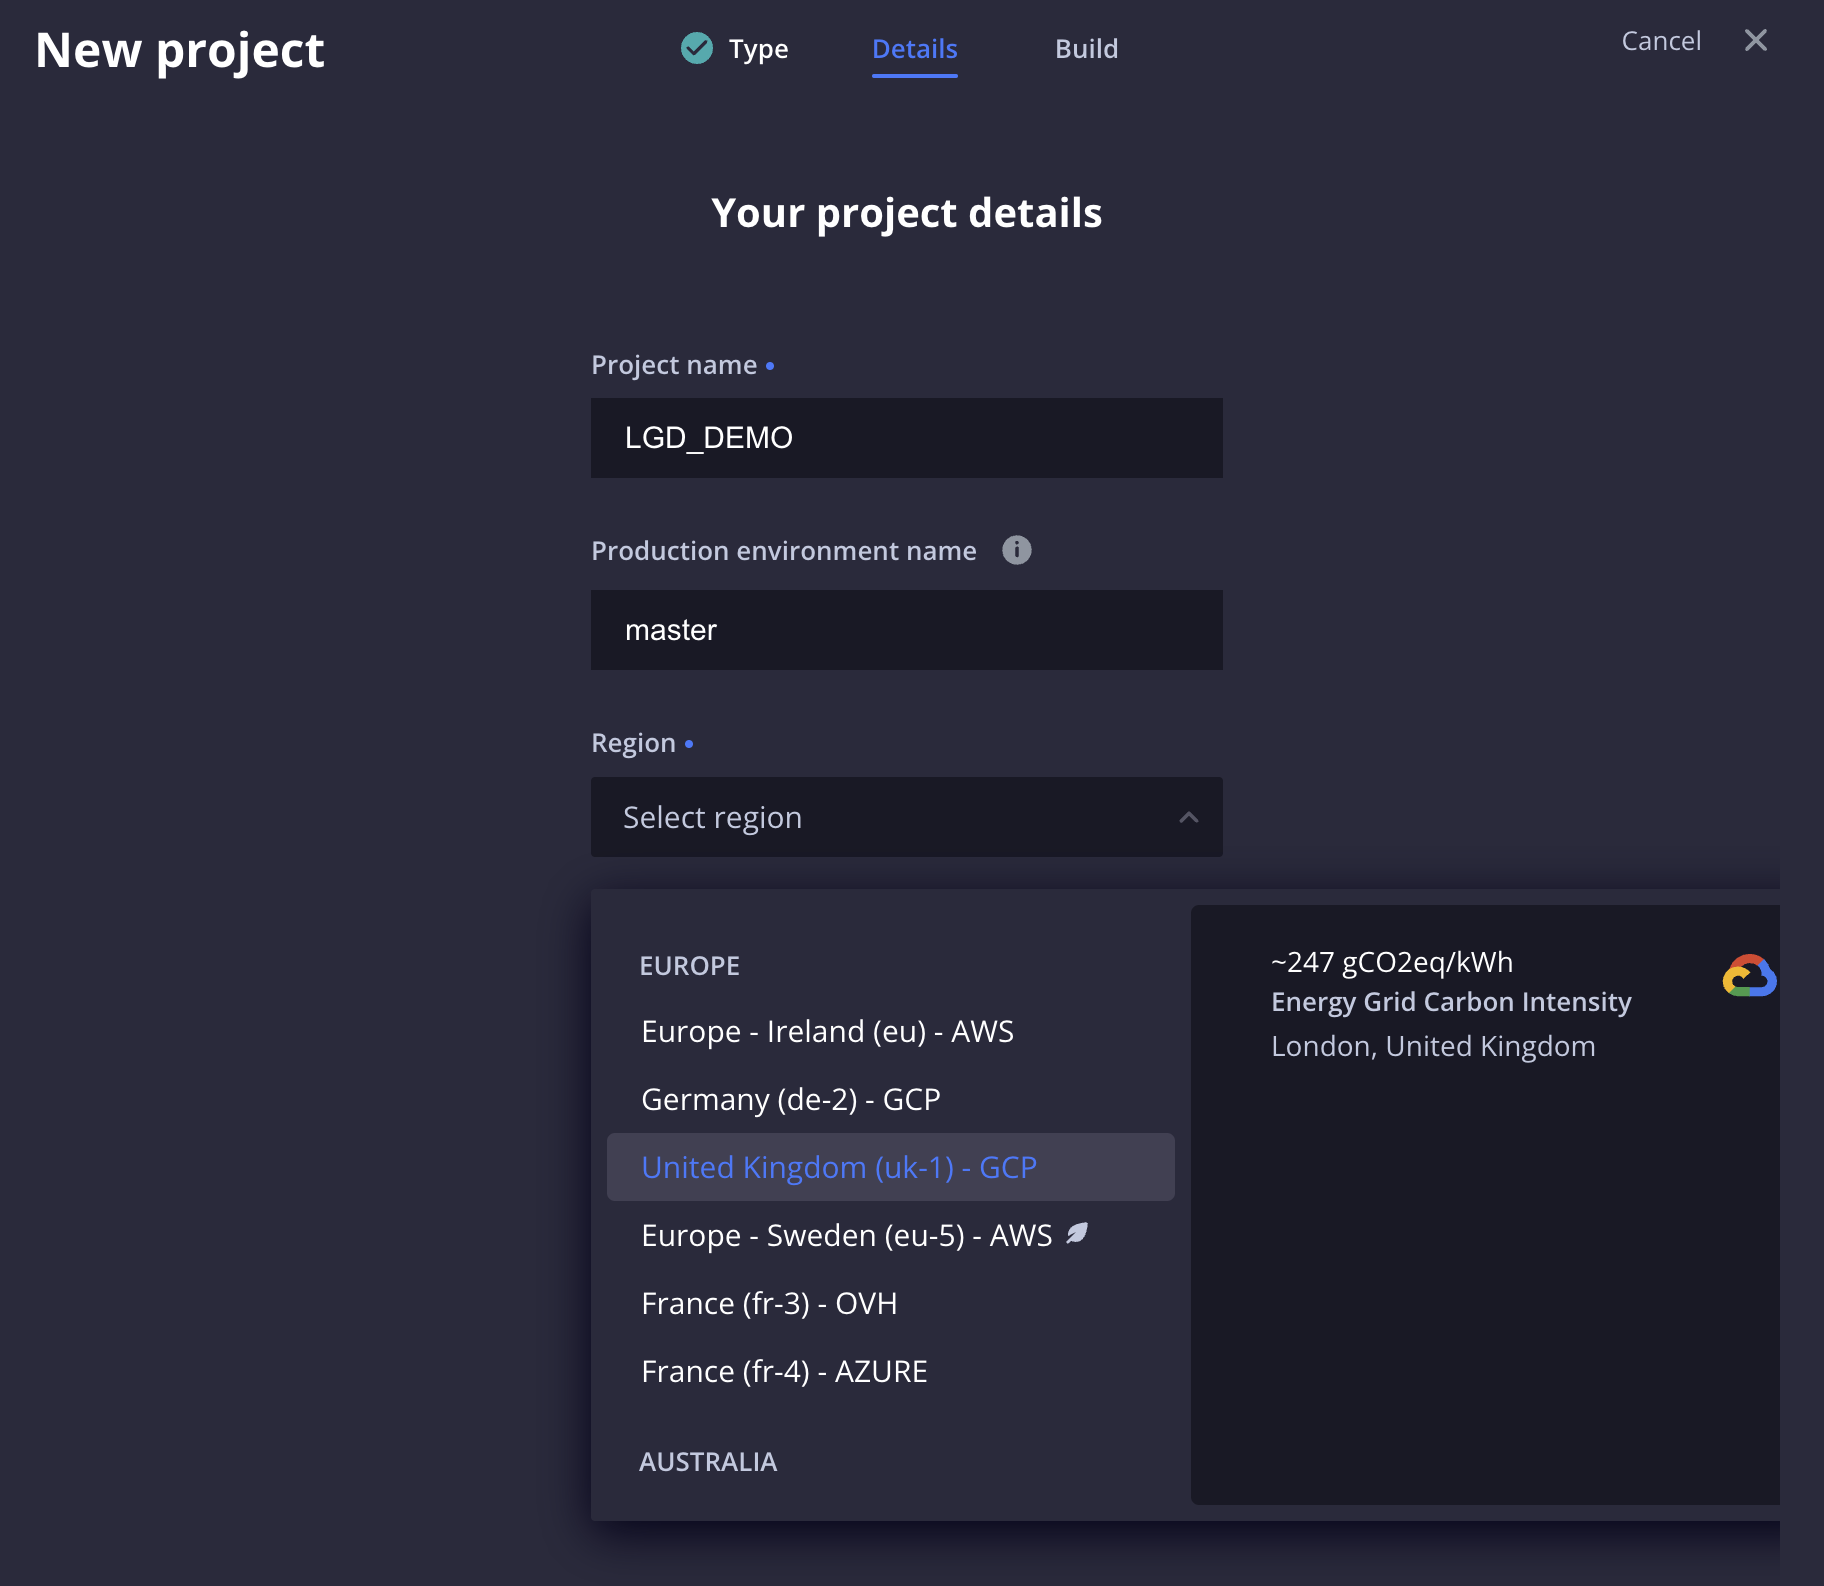
On this screen, we are going to use the following details:
- Project name: LGD_DEMO which is the same exact name we've used on our local website project. You can use any other name for your project.
- Production environment name: The default value here is main but we've entered master which is usually the name of the production branch in our development workflow (main would be fine too).
- Region: You can select any location for your project's servers. In this case, our project mostly appeals to users from the UK so we choose the corresponding option from the dropdown.
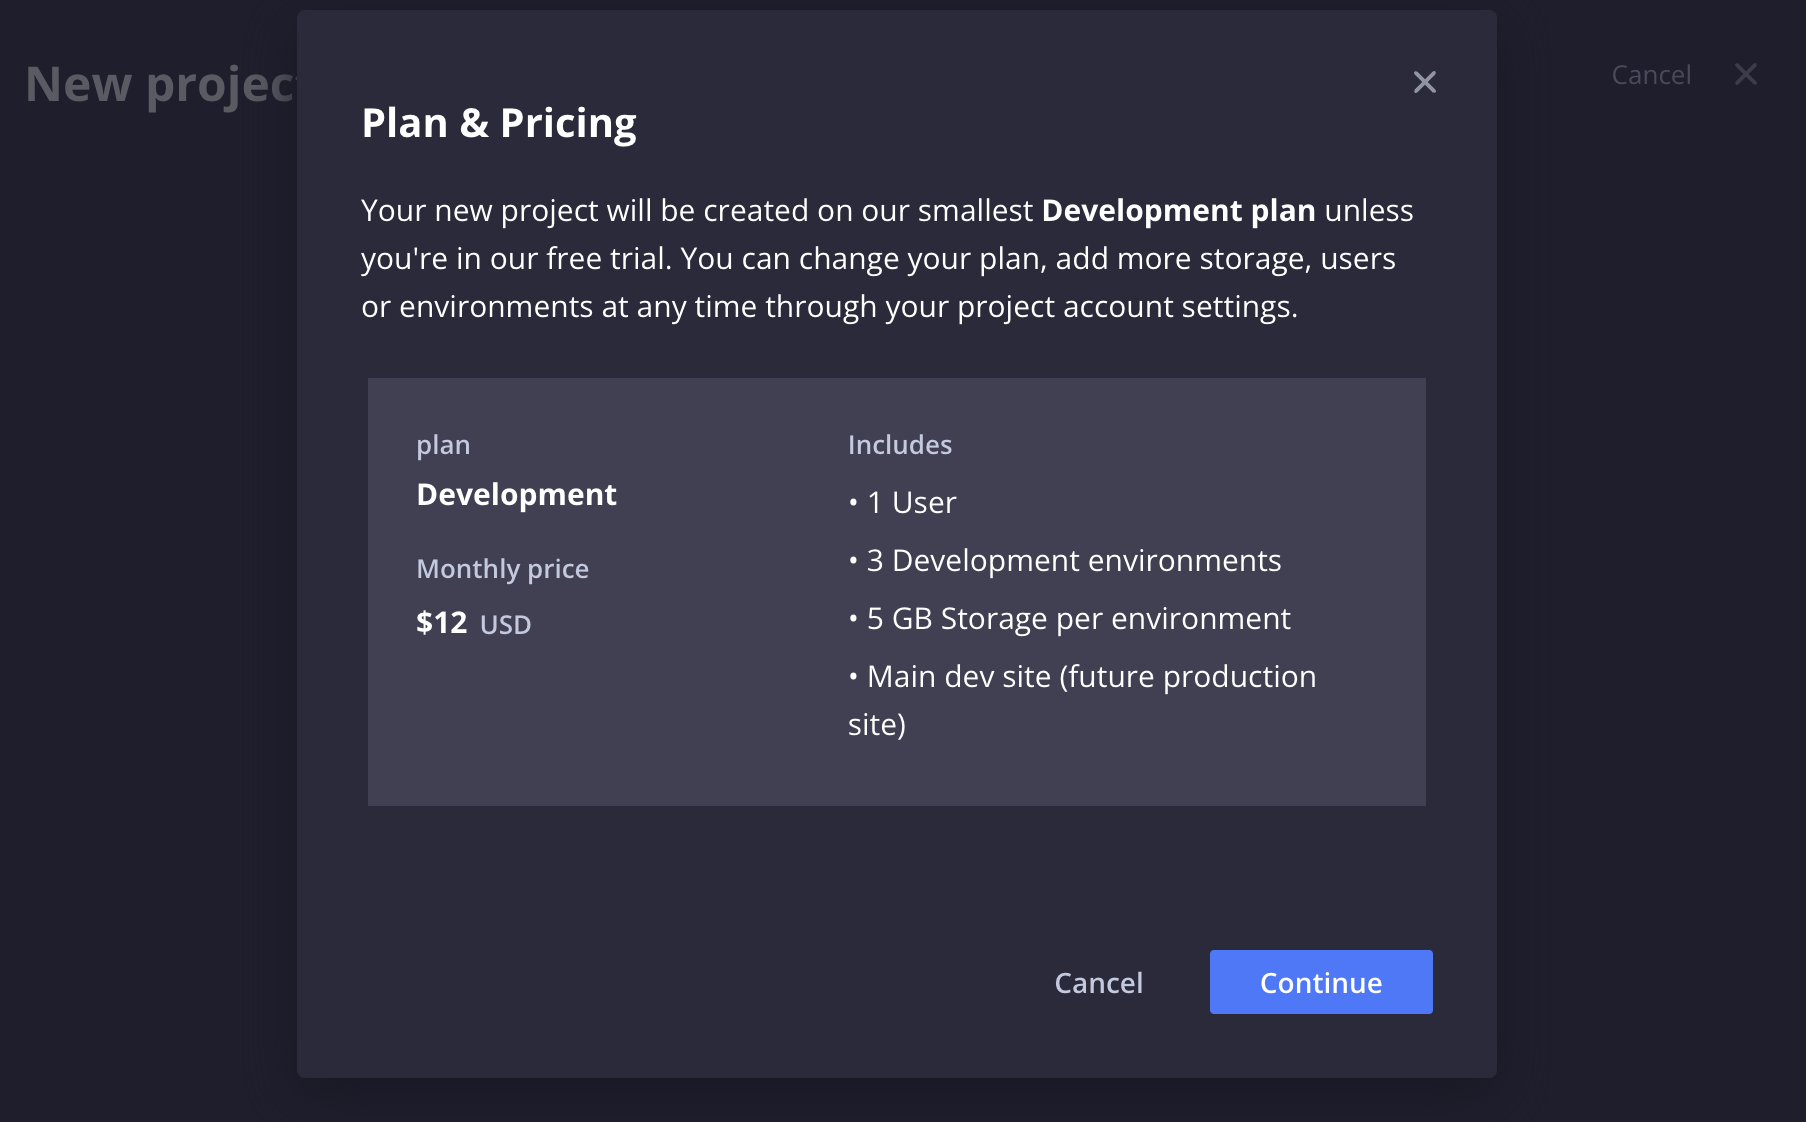
Moving on to the next and final project creation page, we are asked to confirm our selection and also are presented with some useful details about our project's plan (the monthly price might have changed slightly from the time of writing this):
Clicking on "Continue" triggers the deployment of our new project:
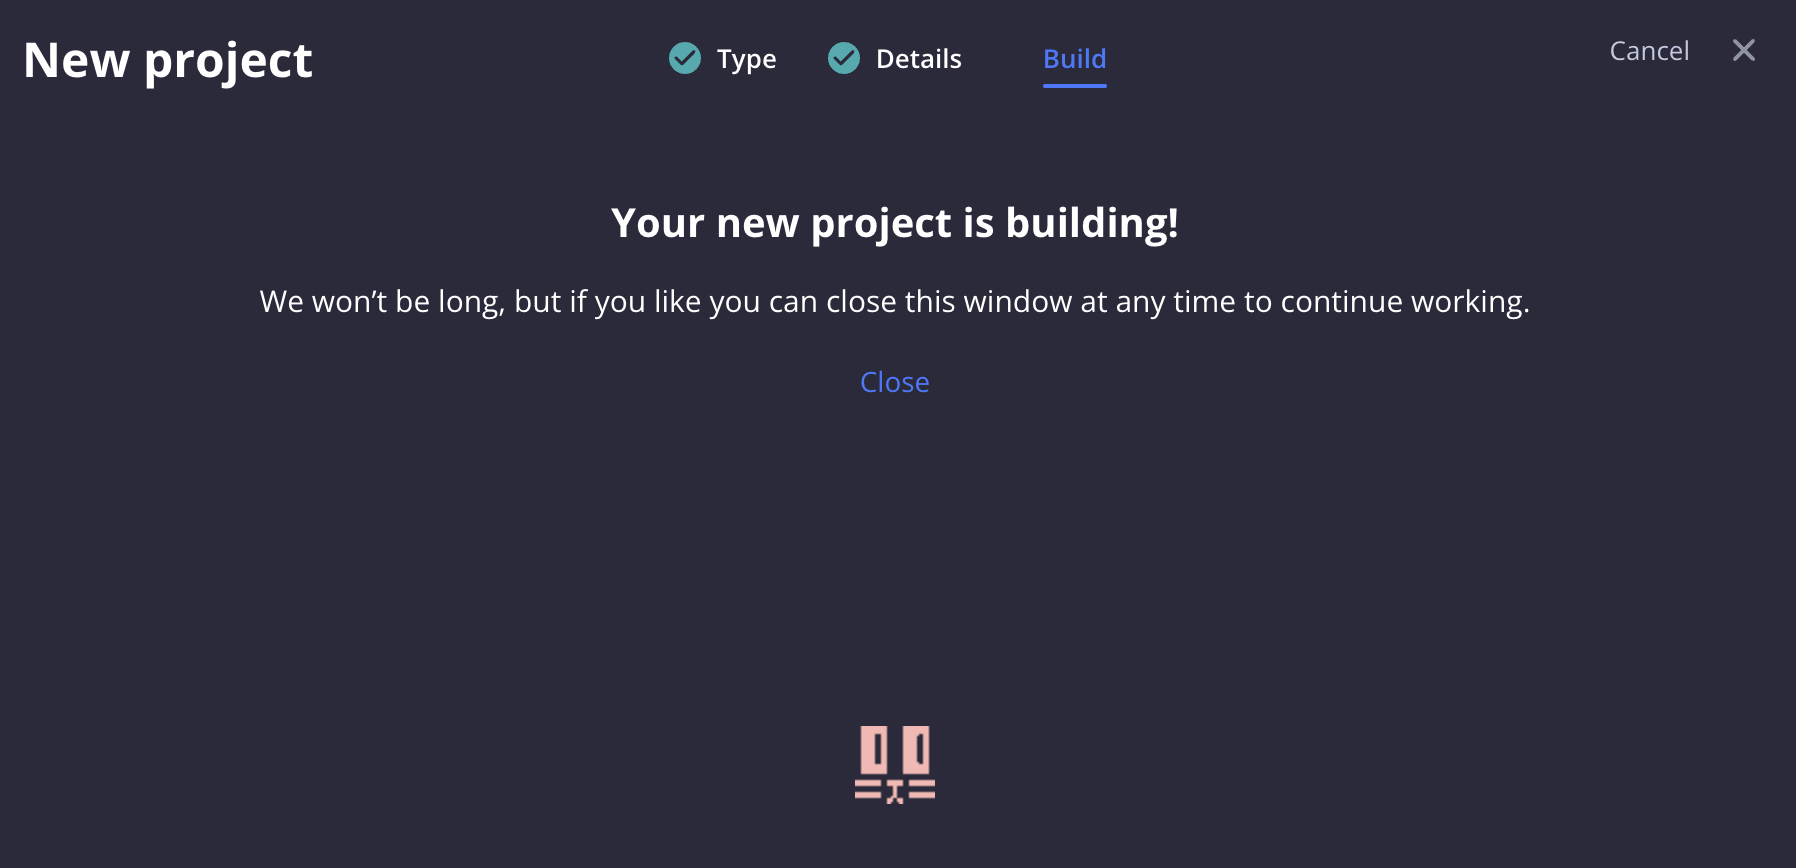
When the process is complete, the project screen loads with detailed information about our new-built project:

In the top right corner of the screen, we can see the project wizard outlining a few steps:
1. Download the CLI
Platform.sh maintains its own Command Line Interface. Installing it allows you to use and manage your Platform.sh projects directly from your Terminal. By clicking on this item, you'll get the following screen:
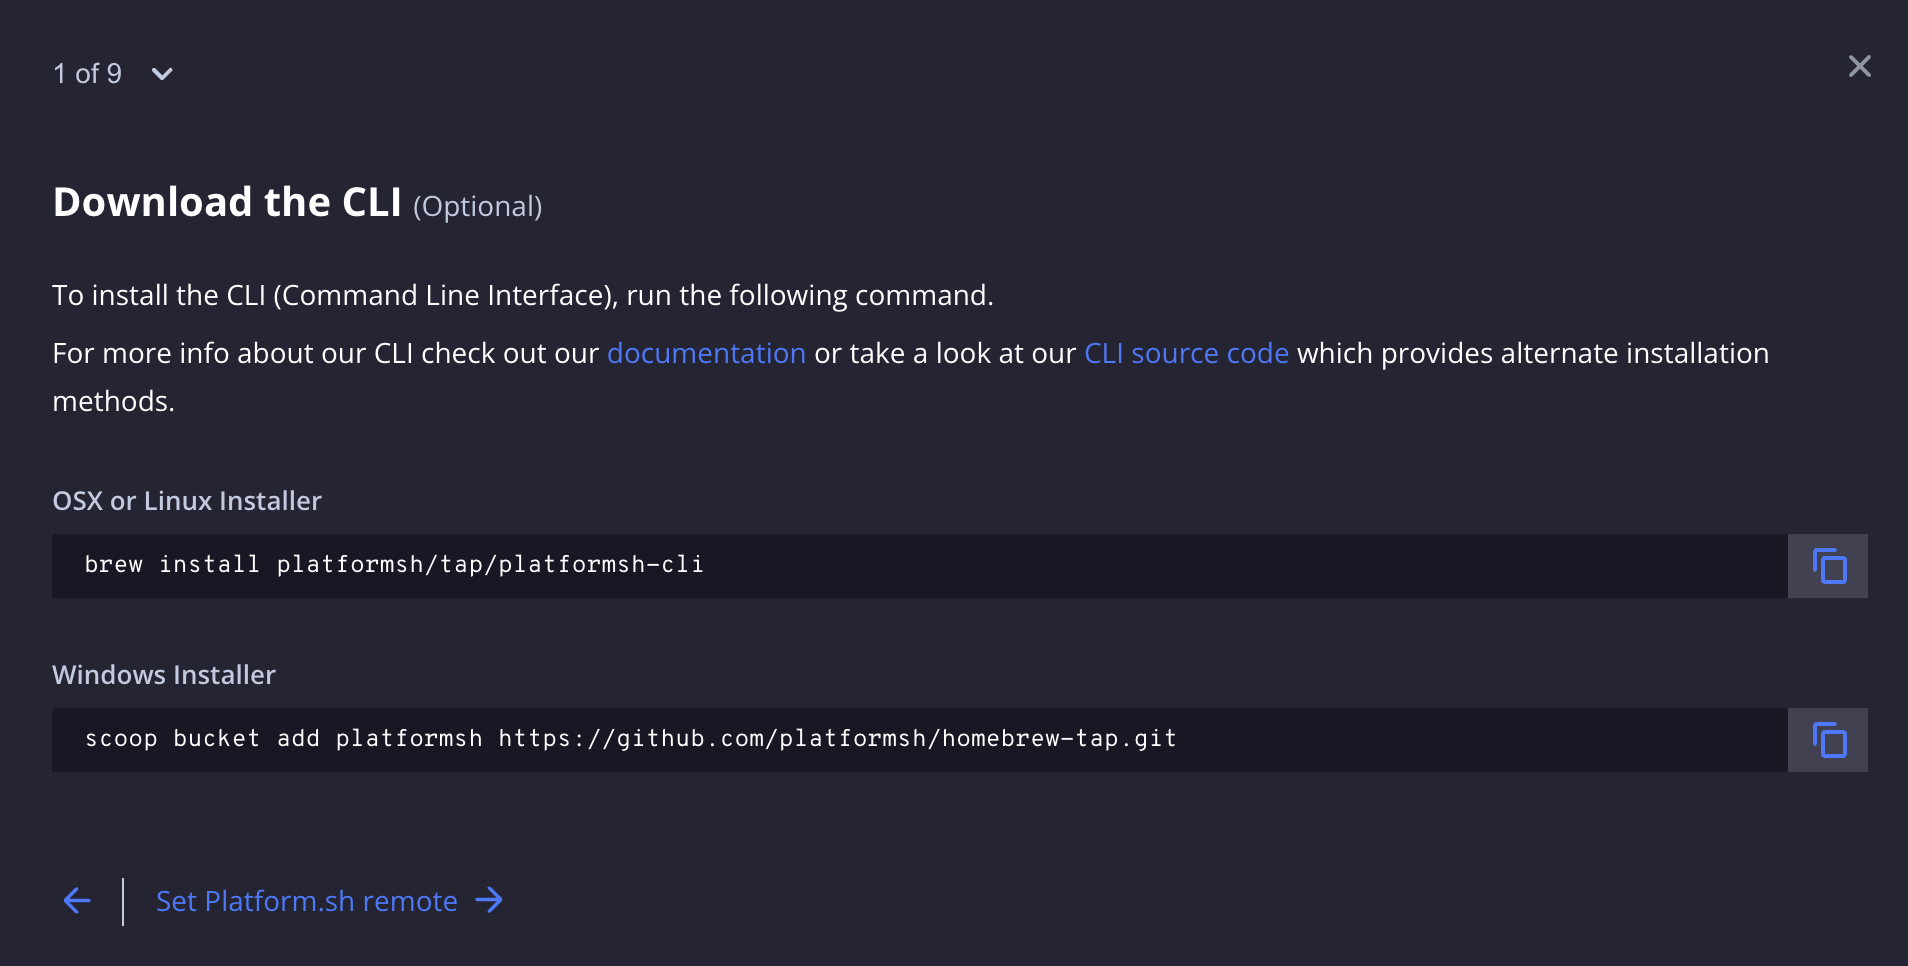
You can easily install the CLI with Homebrew, Curl or Scoop and try out a few basic commands after reading the CLI documentation.
2. Set the Platform.sh Git remote
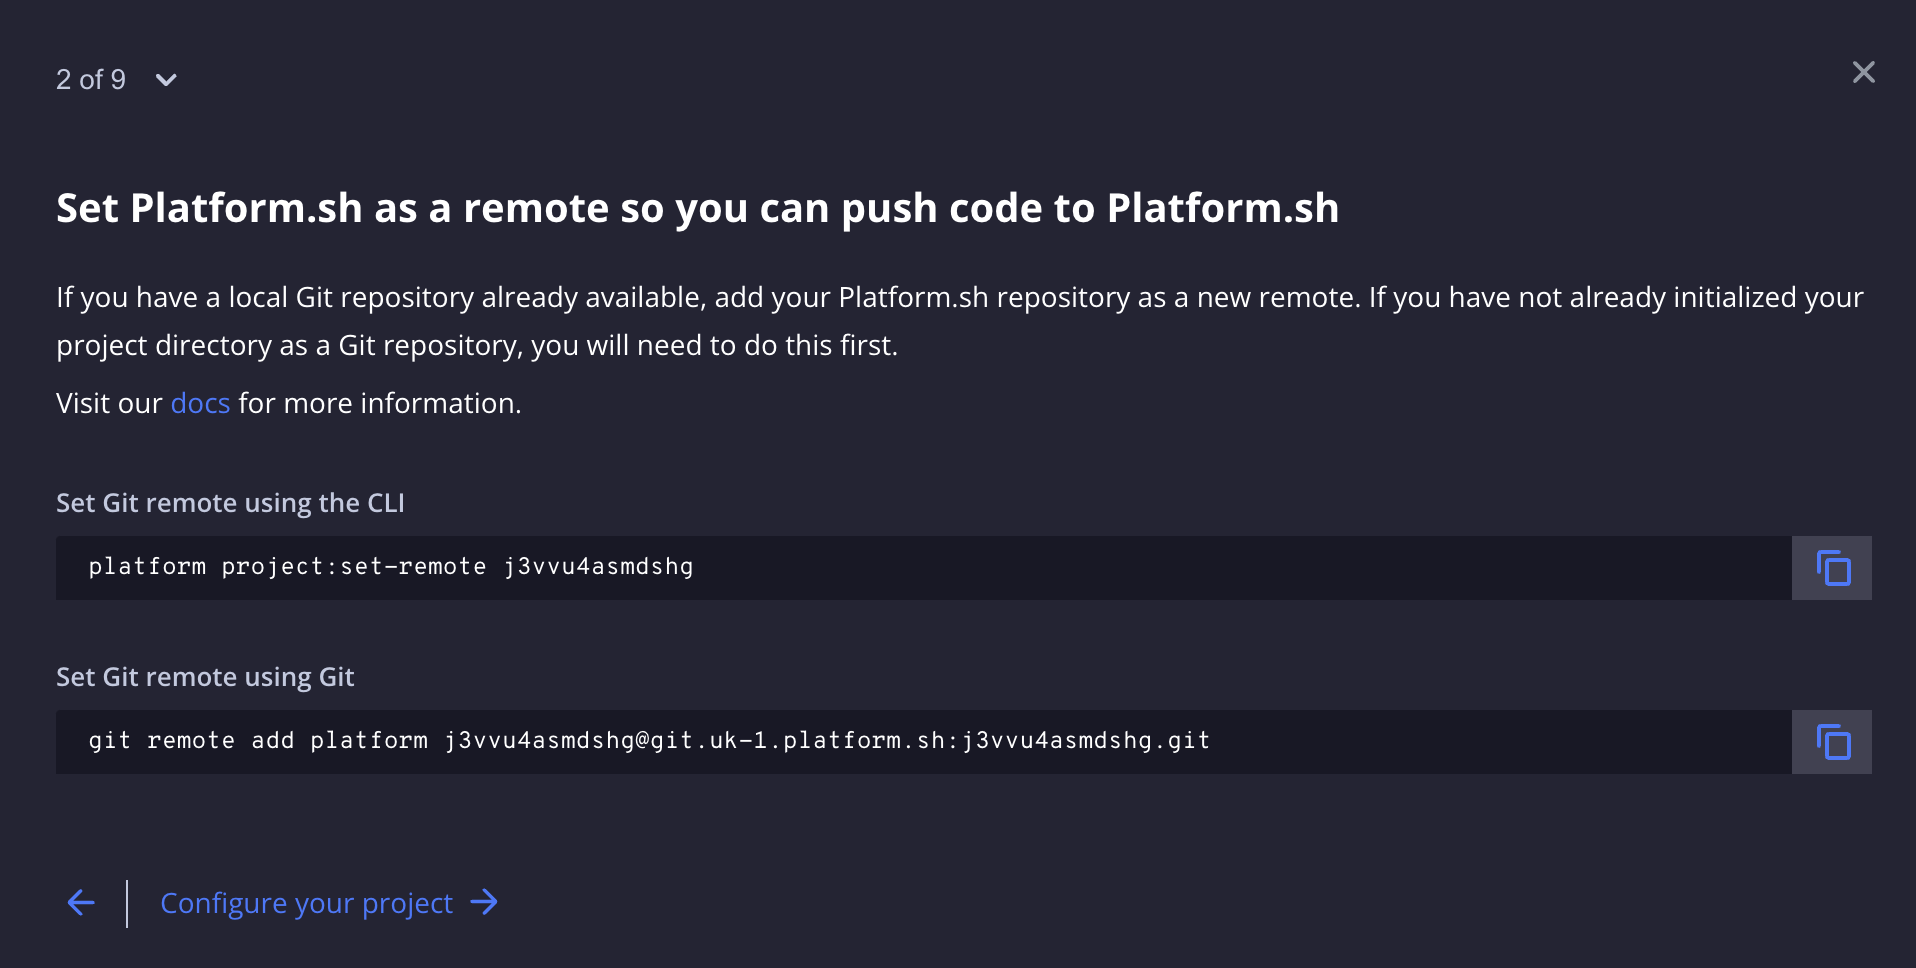
This step allows us to add the Platform.sh repository as remote of our local GIT repository. In our previous tutorial, Version Control and Code Repository Setup, we set up GIT and version control for our Drupal website so make sure you go through those steps if you haven't already initialised your project with GIT.
Let's keep working under the assumption that the name of our project is LGD_DEMO. Open your Terminal/Shell/Command Prompt and Change Directory to your project's root folder (on a Mac, it's common practice to keep web projects inside the Sites directory):
cd ~Sites/LGD_DEMOTo see the list of the project's remote connections to its remote repository, run the following:
git remote -vThis should output something like the following ({YOUR_WORKSPACE_NAME} would be the workspace name of the repository you are using) :
origin    git@bitbucket.org:{YOUR_WORKSPACE_NAME}/lgd_demo.git (fetch)
origin    git@bitbucket.org:{YOUR_WORKSPACE_NAME}/lgd_demo.git (push)
We also need to add the Platform.sh repository as a remote so we simply run the following command as suggested in the screenshot above ({PROJECT_CODE} would be your Platform.sh distinct project code):
git remote add platform {PROJECT_CODE}@git.uk-1.platform.sh:{PROJECT_CODE}.gitThis way, our local GIT "knows" about both remote repositories: The Bitbucket one we set in the previous tutorial and the Platform.sh one. The latter is required so that when we push our code changes Platform.sh will automatically deploy these changes to a web-based environment i.e. accessible via a dedicated URL.
To verify that both remotes are set up on our local repository, we can re-run the command:
git remote -vThis should now output something like the following:
origin    git@bitbucket.org:{YOUR_WORKSPACE_NAME}/lgd_demo.git (fetch)
origin    git@bitbucket.org:{YOUR_WORKSPACE_NAME}/lgd_demo.git (push)
platform    {PROJECT_CODE}@git.uk-1.platform.sh:{PROJECT_CODE}.git (fetch)
platform    {PROJECT_CODE}@git.uk-1.platform.sh:{PROJECT_CODE}.git (push)
As expected, we now have both remotes set up.
3. Configure your project
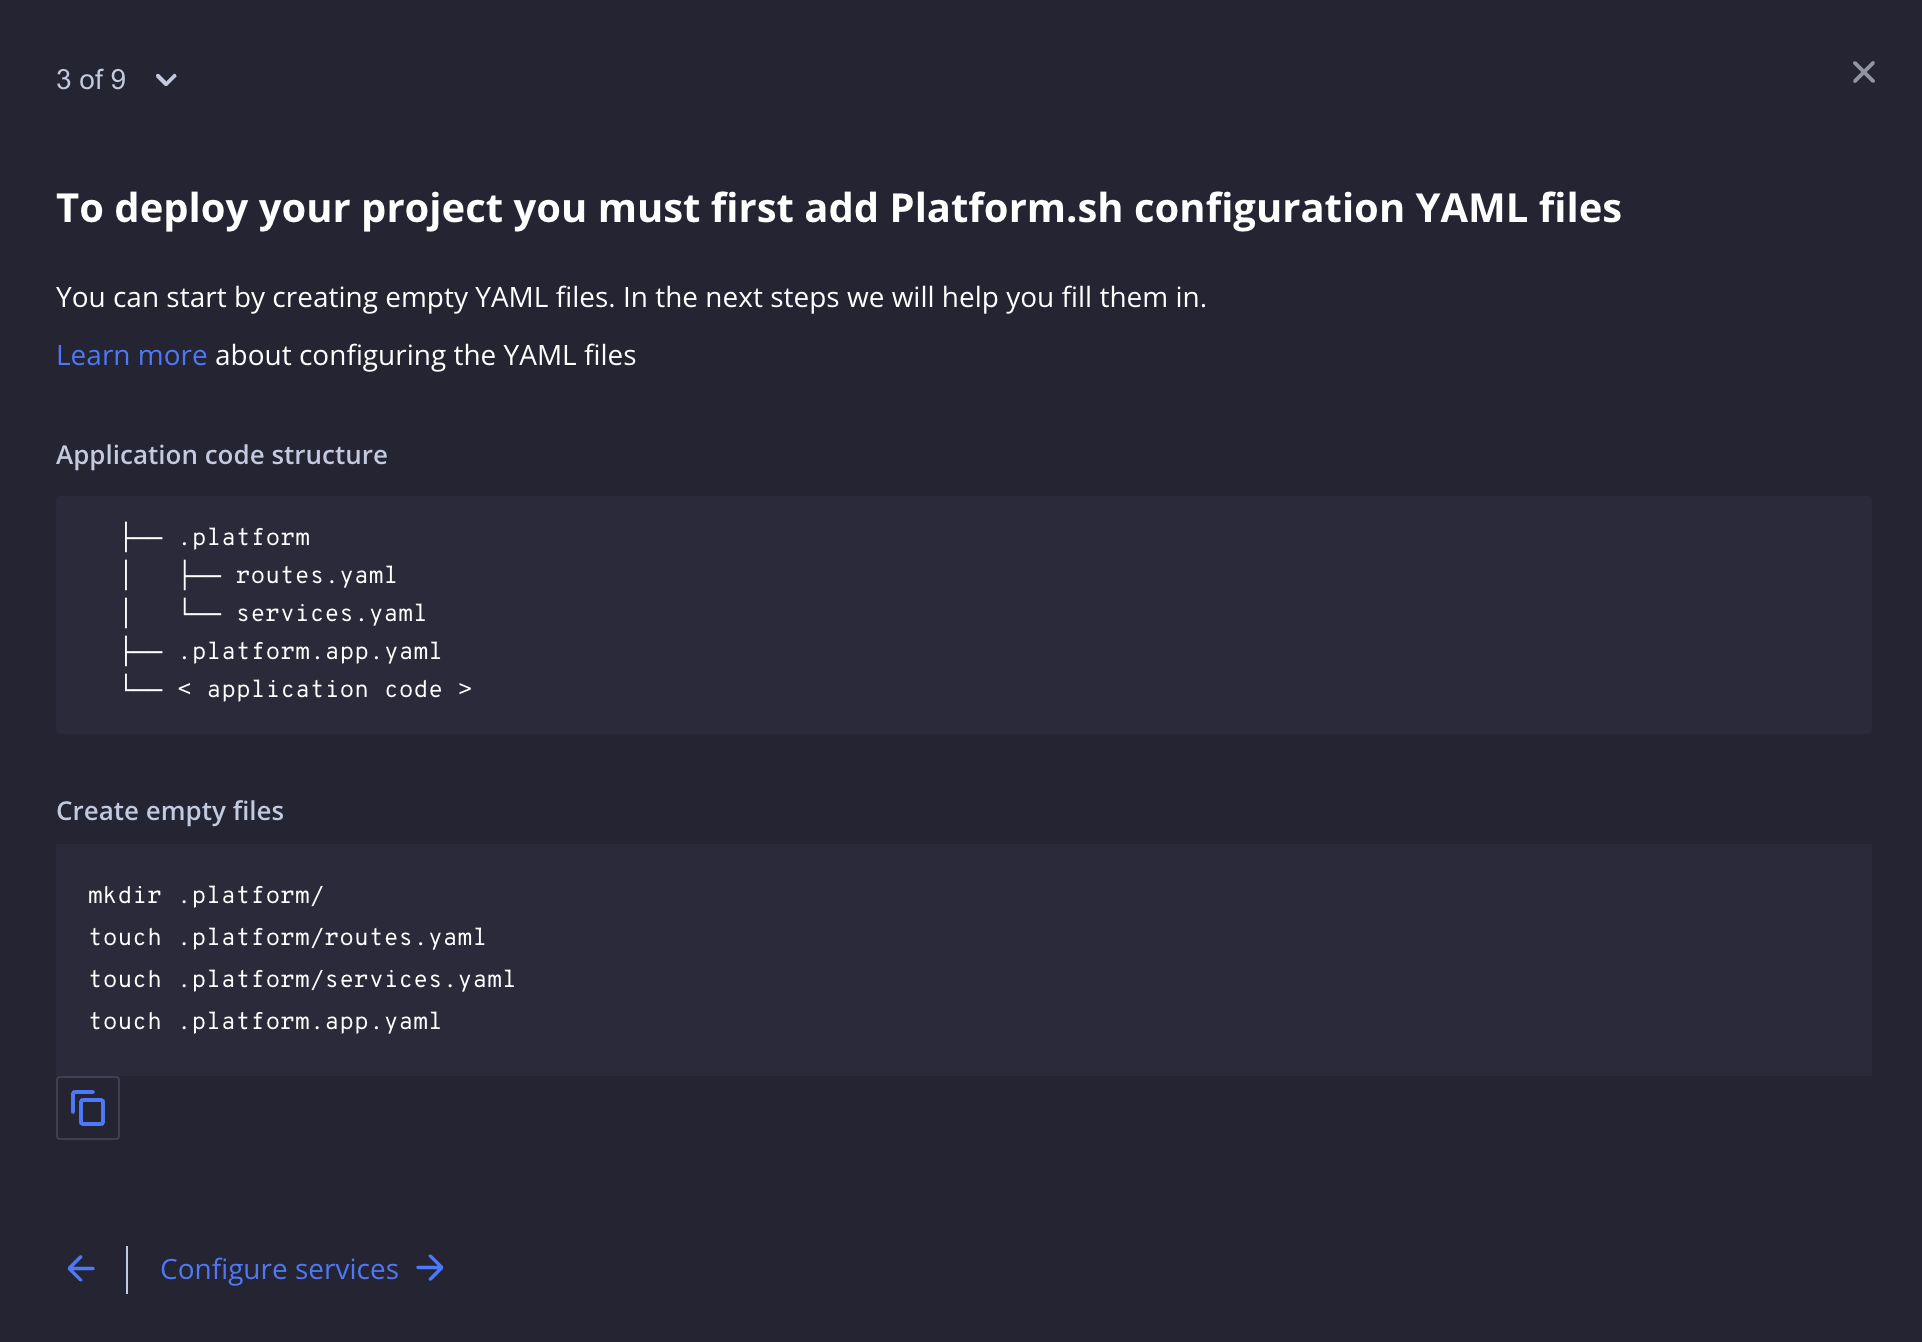
In this step, we simply create two empty YAML files under a new .platform directory and an empty .platform.app.yaml file in the root of our project:
mkdir .platform/
touch .platform/routes.yaml
touch .platform/services.yaml
touch .platform.app.yaml
4. Configure services
In this step, we define the services we want Platform.sh to run on our project. For the needs of this demo project, we are populating the services.yaml file with the following information:
# The services of the project.
#
# Each service listed will be deployed
# to power your Platform.sh project.

db:
    type: mariadb:10.4
    disk: 2048

cache:
    type: redis:6.0
You can read more about the services you can configure in the services.yaml file here.
5. Configure applications
In this step, we populate the .platform.app.yaml file with descriptive information about our application. For this project, we have copied the contents of another project's file with the same technical characteristics as the demo LGD_DEMO project we've been working on:
# This file describes an application. You can have multiple applications
# in the same project.
#
# See https://docs.platform.sh/configuration/app.html

# The name of this app. Must be unique within a project.
name: 'drupal'

# The runtime the application uses.
type: 'php:8.1'

dependencies:
    php:
        composer/composer: '^2'

runtime:
    # Enable the redis extension so Drupal can communicate with the Redis cache.
    extensions:
        - redis
        - sodium
        - apcu
        - blackfire

# The relationships of the application with services or other applications.
#
# The left-hand side is the name of the relationship as it will be exposed
# to the application in the PLATFORM_RELATIONSHIPS variable. The right-hand
# side is in the form `<service name>:<endpoint name>`.
relationships:
    database: 'db:mysql'
    redis: 'cache:redis'

# The size of the persistent disk of the application (in MB).
disk: 2048

# The 'mounts' describe writable, persistent filesystem mounts in the application.
mounts:
    # The default Drupal files directory.
    '/web/sites/default/files':
        source: local
        source_path: 'files'
    # Drupal gets its own dedicated tmp directory. The settings.platformsh.php
    # file will automatically configure Drupal to use this directory.
    '/tmp':
        source: local
        source_path: 'tmp'
    # Private file uploads are stored outside the web root. The settings.platformsh.php
    # file will automatically configure Drupal to use this directory.
    '/private':
        source: local
        source_path: 'private'
    # Drush needs a scratch space for its own caches.
    '/.drush':
        source: local
        source_path: 'drush'
    # Drush will try to save backups to this directory, so it must be
    # writeable even though you will almost never need to use it.
    '/drush-backups':
        source: local
        source_path: 'drush-backups'
    # Drupal Console will try to save backups to this directory, so it must be
    # writeable even though you will almost never need to use it.
    '/.console':
        source: local
        source_path: 'console'

# Configuration of the build of this application.
build:
    flavor: composer

# The hooks executed at various points in the lifecycle of the application.
hooks:
    # The build hook runs after Composer to finish preparing up your code.
    # No services are available but the disk is writeable.
    build: |
        set -e
    # The deploy hook runs after your application has been deployed and started.
    # Code cannot be modified at this point but the database is available.
    # The site is not accepting requests while this script runs so keep it
    # fast.
    deploy: |
        set -e
        php ./drush/platformsh_generate_drush_yml.php
        # if drupal is installed, will call the following drush commands:
        #   - `cache-rebuild`
        #   - `updatedb`
        #   - and if config files are present, `config-import`
        cd web
        $PLATFORM_APP_DIR/drush/platformsh_deploy_drupal.sh

# The configuration of app when it is exposed to the web.
web:
    locations:
        # All requests not otherwise specified follow these rules.
        '/':
            # The folder from which to serve static assets, for this location.
            #
            # This is a filesystem path, relative to the application root.
            root: 'web'

            # How long to allow static assets from this location to be cached.
            #
            # Can be a time in seconds, or -1 for no caching. Times can be
            # suffixed with "s" (seconds), "m" (minutes), "h" (hours), "d"
            # (days), "w" (weeks), "M" (months, as 30 days) or "y" (years, as
            # 365 days).
            expires: 5m

            # Redirect any incoming request to Drupal's front controller.
            passthru: '/index.php'

            # Deny access to all static files, except those specifically allowed below.
            allow: false

            # Rules for specific URI patterns.
            rules:
                # Allow access to common static files.
                '\.(jpe?g|png|gif|svgz?|css|js|map|ico|bmp|eot|woff2?|otf|ttf)$':
                    allow: true
                '^/robots\.txt$':
                    allow: true
                '^/sitemap\.xml$':
                    allow: true

                # Deny direct access to configuration files.
                '^/sites/sites\.php$':
                    scripts: false
                '^/sites/[^/]+/settings.*?\.php$':
                    scripts: false

        # The files directory has its own special configuration rules.
        '/sites/default/files':
            # Allow access to all files in the public files directory.
            allow: true
            expires: 5m
            passthru: '/index.php'
            root: 'web/sites/default/files'

            # Do not execute PHP scripts from the writeable mount.
            scripts: false

            rules:
                # Provide a longer TTL (2 weeks) for aggregated CSS and JS files.
                '^/sites/default/files/(css|js)':
                    expires: 2w

crons:
    # Run Drupal's cron tasks every 19 minutes.
    drupal:
        spec: '*/19 * * * *'
        commands:
            start: 'cd web ; drush core-cron'

source:
  operations:
    auto-update:
      command: |
        curl -fsS https://raw.githubusercontent.com/platformsh/source-operations/main/setup.sh | { bash /dev/fd/3 sop-autoupdate; } 3<&0
You can find valuable information on how this file can be structured on the App reference documentation page.
6. Configure routes
The .platform/routes.yaml file holds information on a project's paths and routes:
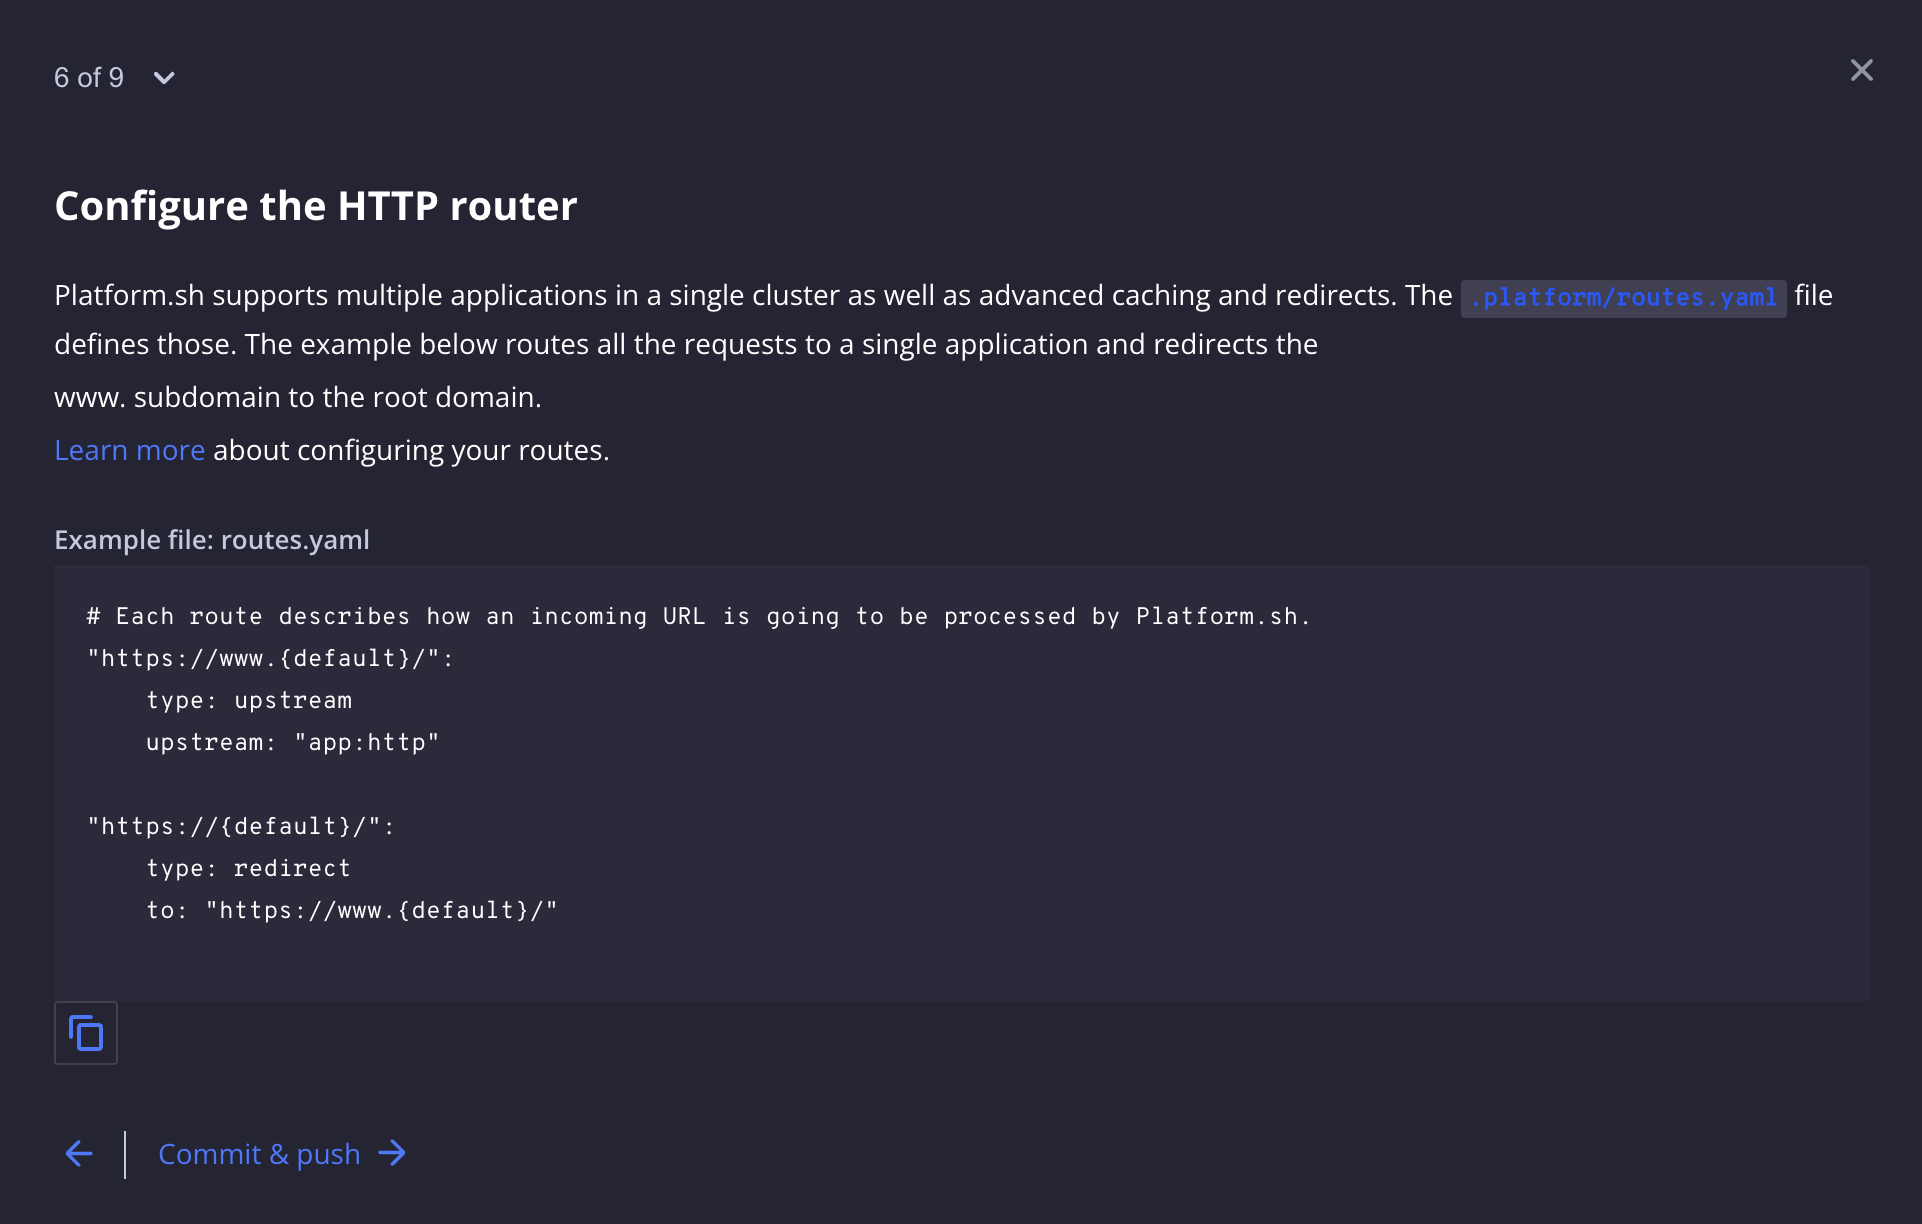
For our project, LGD_DEMO, we populate the routes.yaml file with the following:
# The routes of the project.
#
# Each route describes how an incoming URL is going
# to be processed by Platform.sh.

"https://{default}/":
  type: upstream
  upstream: "drupal:http"

"https://lgddemo.uk/":
  type: redirect
  to: "https://{default}/"
You can read more on how this file can be structured on the Define routes documentation page.
7. Commit & push
We are now ready to push our new code changes to Bitbucket and Platform.sh:
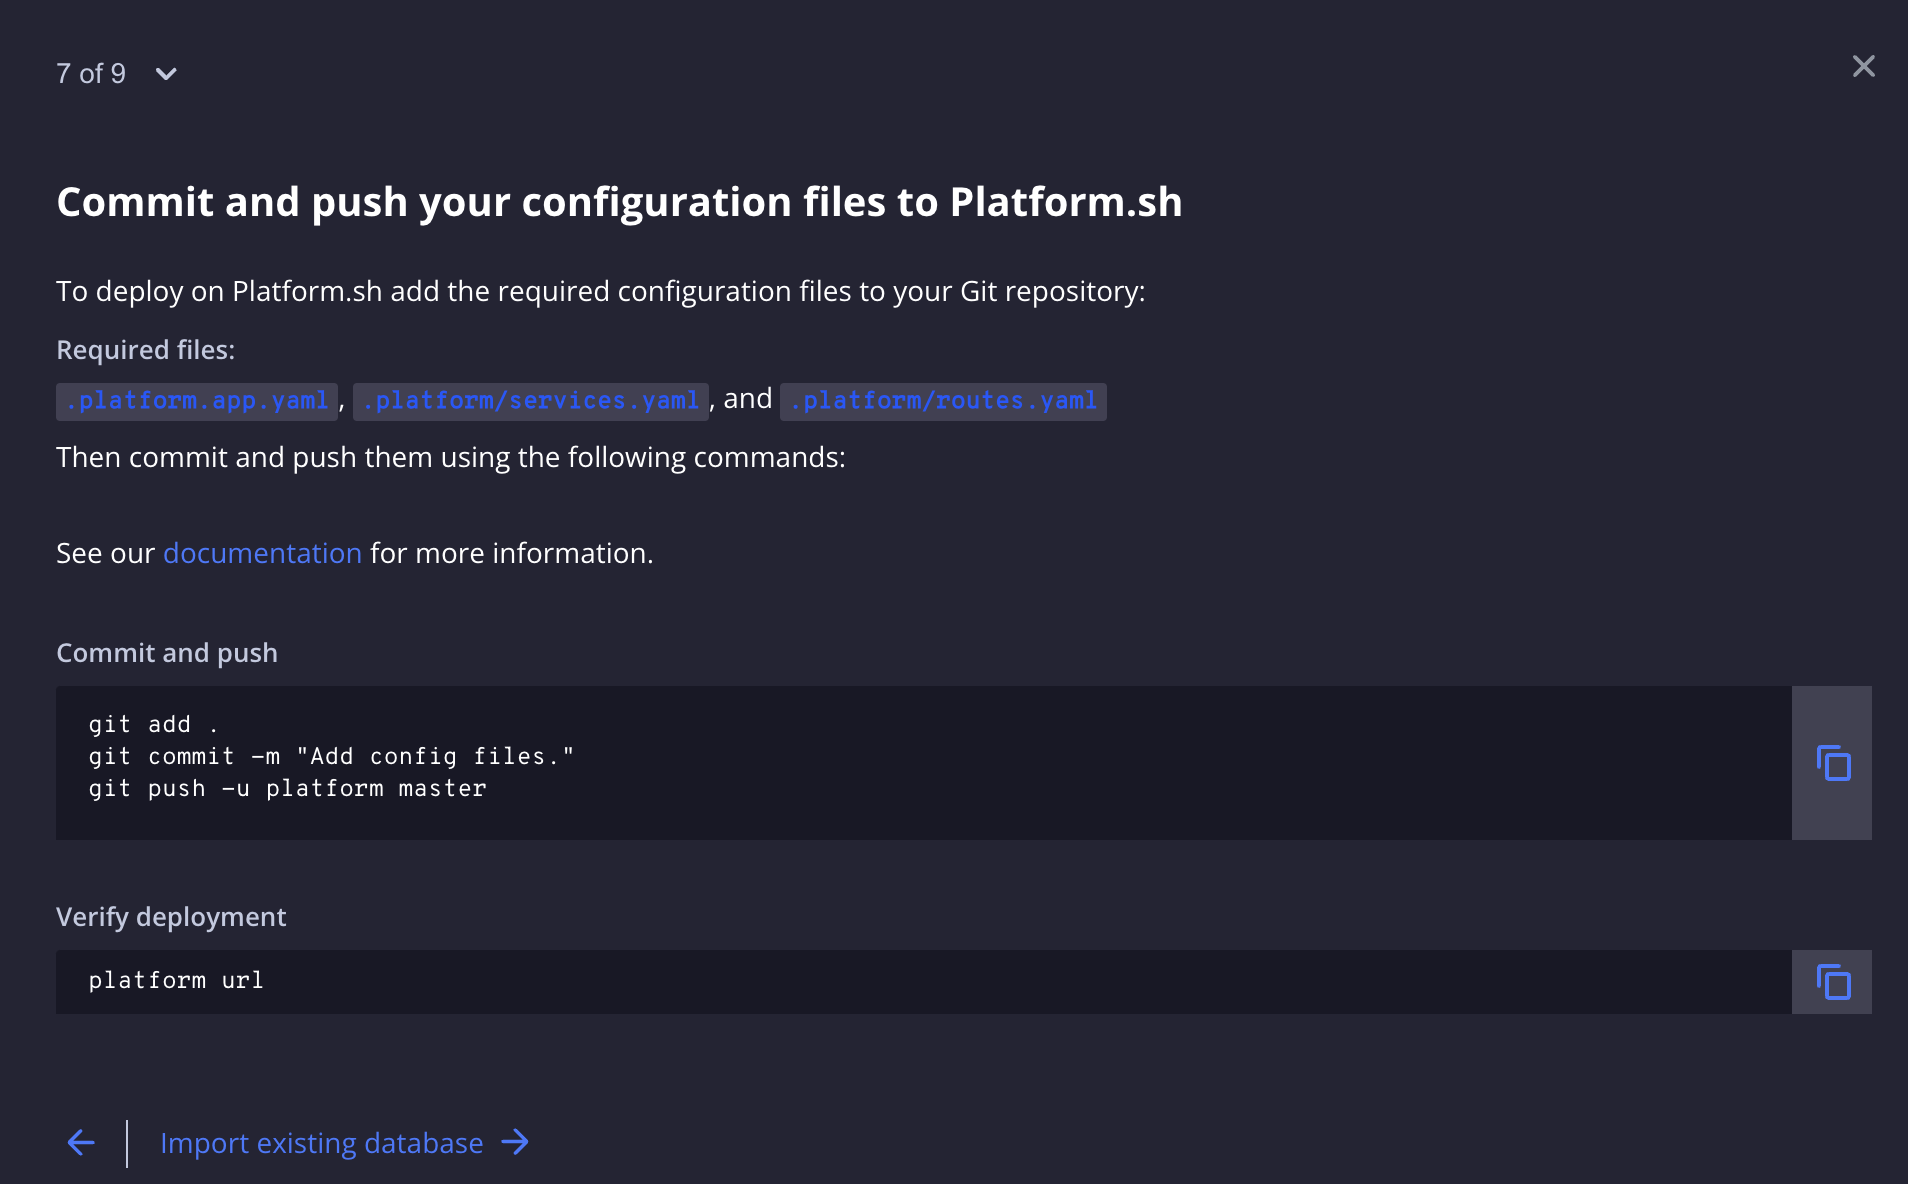
Initially, we stage and commit our local code changes to Git:
git add .
git commit -m "Adding platform configuration files"
Following on, we push our changes to both repositories. First, we simply git push our changes to the remote Bitbucket repository (remember the git remote -v command from above?):
git push origin masterThe output of this command should look like the following:

Finally, using the Platform.sh CLI, we push our changes to the Platform.sh repository too:
git push -u platform masterThis command basically triggers our first Platform.sh environment deployment and builds our LGD_DEMO project on the Cloud. Its output sequence consists of the following main stages (we are not attaching the whole output as it would force you to scroll extensively):
- Building application 'drupal'
- Installing build dependencies
- Provisioning certificates
- Creating environment master
- Environment routes
The last one presents us with a list of URLs which we can use to access our website. The first time we attempt to access any of these URLs, we'll get the following result on our browser:
This is Drupal's installation screen. The deployment put all our Composer packages (modules, themes etc.) together successfully but it used an empty database. To load the same website we've been using locally, we need to import our local database as per step #8 below.
7.5. Manual steps required
Before moving on to the next step, we need to apply some manual changes to our code. Platform.sh offers a wide selection of "templates" i.e. pre-configured installation and deployment profiles for various Content Management Systems and frameworks, including Drupal 9: https://github.com/platformsh-templates/drupal9.
In these templates, there are several Platform.sh-related files and folders that contain configuration directives that connect the Platform.sh environments and deployment triggers with the actual project codebase. Because we are "importing" our codebase into Platform.sh these settings are not present in our codebase and, as a result, we have to manually add them. We also apply some changes to certain files in order to streamline our project even more (e.g. adding the Webform module).
Platform.sh offers some documentation on related changes you'll need/want to add manually here.
7.5.1. Adding and enabling the Webform module:
From the official webform project page on Drupal.org:
The Webform module allows you to build any type of form to collect any type of data, which can be submitted to any application or system. Every single behaviour and aspect of your forms and their inputs are customisable. Whether you need a multi-page form containing a multi-column input layout with conditional logic or a simple contact form that pushes data to a SalesForce/CRM, it is all possible using the Webform module for Drupal.
To add this module to our codebase, we run the following Composer command using DDEV (the latest stable version at the time of writing this is 6.2 - use a higher version if available):
composer require 'drupal/webform:^6.2'Running this command will update our composer.json file to include the "drupal/webform": "^6.2" line within the "require" section:
"require": {
       "composer/installers": "^1.10",
       "cweagans/composer-patches": "^1.6",
       "drupal/core-composer-scaffold": "^9.1",
       "drupal/core-project-message": "^9.1",
       "drupal/core-recommended": "^9.1@stable",
       "drupal/webform": "^6.2",
       "localgovdrupal/localgov": "^2.0",
       "localgovdrupal/localgov_search_solr": "^1.0@alpha"
   },
To enable the module we just added, we use Drush with the help of DDEV (similar commands exist for Lando):
ddev drush en webformThere are numerous Webform sub-modules that you can also enable. You can have a look on the /admin/modules page in the back office and enable the ones you'd like to use/experiment with.
7.5.2. Adding the Platform.sh configuration reader library:
This library provides a streamlined and easy-to-use way to interact with a Platform.sh environment. It offers utility methods to access routes and relationships more cleanly than reading the raw environment variables yourself. To add this library to our codebase, we run the following Composer command using DDEV:
ddev composer require platformsh/config-readerRunning this command will update our composer.json file to include the "platformsh/config-reader": "^2.4" line within the "require" section:
"require": {
       "composer/installers": "^1.10",
       "cweagans/composer-patches": "^1.6",
       "drupal/core-composer-scaffold": "^9.1",
       "drupal/core-project-message": "^9.1",
       "drupal/core-recommended": "^9.1@stable",
       "drupal/webform": "^6.2",
       "localgovdrupal/localgov": "^2.0",
       "localgovdrupal/localgov_search_solr": "^1.0@alpha",
       "platformsh/config-reader": "^2.4"
   },
7.5.3. Adding some Drush magic:
In the official drupal9 template Platform.sh maintains there is a drush folder which we need to include in our project's codebase: https://github.com/platformsh-templates/drupal9/tree/master/drush .Simply create a new folder called drush in your project root directory and two empty files named platformsh_deploy_drupal.sh and platformsh_generate_drush_yml.php in that folder. Then copy and paste each file's contents from the GitHub repository to your codebase.
We also need to add a platformsh_deploy_drush.sh file in the root of the project. Simply create a new empty file with this name and then copy its contents from the Platform.sh drupal project template: https://github.com/platformsh-templates/drupal9/blob/master/platformsh_deploy_drush.sh .
7.5.4. Updating settings.php:
There are a few extra things that need to be added to our project's settings.php file located inside the web/sites/default directory. This file is already up-to-date as we initially used the LocalGov Drupal Composer template for this project (see https://docs.localgovdrupal.org/devs/getting-started/working-with-ddev.html#ddev-prerequisites or our DDEV installation tutorial for more on this) but we still need to include some sections related to Platform.sh:
<?php
/**
 * @file
 * Platform.sh example settings.php file for Drupal 9.
 */

// Default Drupal settings.
//
// These are already explained with detailed comments in Drupal's
// default.settings.php file.
//
// See https://api.drupal.org/api/drupal/sites!default!default.settings.php/9
$databases = [];
$config_directories = [];
$settings['update_free_access'] = FALSE;
$settings['container_yamls'][] = $app_root . '/' . $site_path . '/services.yml';
$settings['file_scan_ignore_directories'] = [
  'node_modules',
  'bower_components',
];

// The hash_salt should be a unique random value for each application.
// If left unset, the settings.platformsh.php file will attempt to provide one.
// You can also provide a specific value here if you prefer and it will be used
// instead. In most cases it's best to leave this blank on Platform.sh. You
// can configure a separate hash_salt in your settings.local.php file for
// local development.
// $settings['hash_salt'] = 'change_me';

// Set up a config sync directory.
//
// This is defined inside the read-only "config" directory, deployed via Git.
$settings['config_sync_directory'] = '../config/sync';

// Automatic Platform.sh settings.
if (file_exists($app_root . '/' . $site_path . '/settings.platformsh.php')) {
  include $app_root . '/' . $site_path . '/settings.platformsh.php';
}

// Local settings. These come last so that they can override anything.
if (file_exists($app_root . '/' . $site_path . '/settings.local.php')) {
  include $app_root . '/' . $site_path . '/settings.local.php';
}
The most important section we definitely need to add to our settings.php file is the following:
// Automatic Platform.sh settings.
if (file_exists($app_root . '/' . $site_path . '/settings.platformsh.php')) {
  include $app_root . '/' . $site_path . '/settings.platformsh.php';
}
7.5.5. Adding the Platform.sh settings file:
In addition to settings.php, we have to add a settings.platformsh.php file under web/sites/default. Create this file in your codebase and copy its contents from https://github.com/platformsh-templates/drupal9/blob/master/web/sites/default/settings.platformsh.php .
7.5.6. Updating our .gitignore file:
There are certain file extensions and directories that need to be GIT-ignored i.e. not included in our code repository. The default .gitignore files in the LocalGov Drupal Composer as well as the Platform.sh Composer templates don't usually require any changes but we will remove the composer.lock file from our .gitignore file (if it's present):
# Ignore composer.lock
/composer.lock
Remove these two lines from your .gitignore file and save. Now let's move on to the next step.
7.5.7. Updating our Composer lock file:
The composer.lock file keeps track of every package (and its dependencies) installed in our project. As mentioned on the official Composer documentation page:
Committing this file to version control is important because it will cause anyone who sets up the project to use the exact same versions of the dependencies that you are using. Your CI server, production machines, other developers in your team, everything and everyone runs on the same dependencies, which mitigates the potential for bugs affecting only some parts of the deployments. Even if you develop alone, in six months when reinstalling the project you can feel confident the dependencies installed are still working even if your dependencies released many new versions since then.
After the changes we've previously applied to composer.json, it's time to update our composer.lock file:
ddev composer update --lockThis command will update our Composer lock file and we'll also be able to push these changes to our repos, as the file is no longer ignored by Git.
7.5.8. Enable the LocalGov Demo Content module:
If the LGD content demo module is not already enabled, you can either enable it using the back office UI (under /admin/modules) or with the help of Drush:
ddev drush en localgov_demo7.5.9. Export the active configuration into code:
Now that we have enabled a few modules, we need these changes to be preserved in the codebase. Missing this step will result in deployment, which automatically imports our code configuration, overwriting the configuration with an older version that doesn't include our recent changes. This would, in turn, result in these modules not being enabled.
To export the active configuration into code, we run the following Drush command using DDEV:
ddev drush cex7.5.10. Commit and push to Bitbucket and Platform.sh:
Following all the code changes we've applied in the previous steps, it's time to push them to our repositories. We simply re-run the same commands as in the "7. Commit & push" section above:
git add -Agit commit -m "Additional changes and updates from Platform.sh template"git push origin mastergit push -u platform masterThe last command triggers a deployment of our PROD environment (which is tied to the master branch on Platform.sh).
8. Import existing database to Platform.sh

To generate a database dump of our local project's database, we can run the following drush command using DDEV (we can run the same drush command with Lando, depending on our preferences):
ddev drush sql-dump > ~/Downloads/lgddemo.sqlThen, we use the following Platform.sh CLI command to pipe our local database dump file onto the Platform.sh environment database:
platform sql < ~/Downloads/lgddemo.sqlAs soon as this process is completed, the database on the PROD environment will be identical to our local one.
9. Import additional files
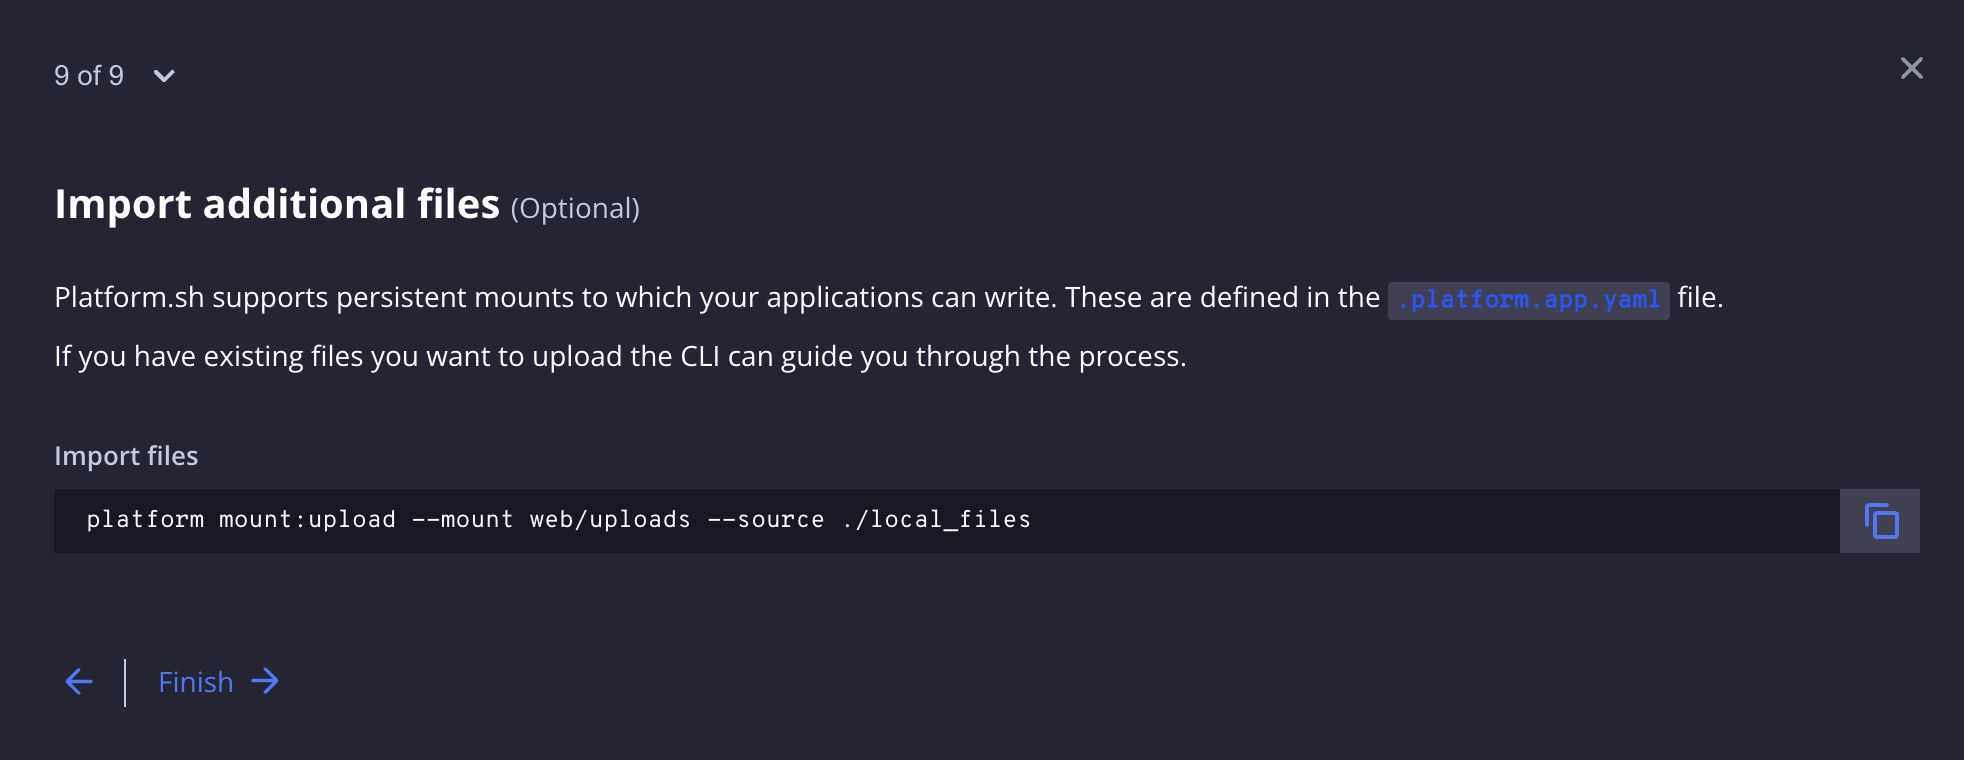
This last step allows us to push our local files to the PROD file file system. We need to slightly adjust the suggested command to match our file system paths:
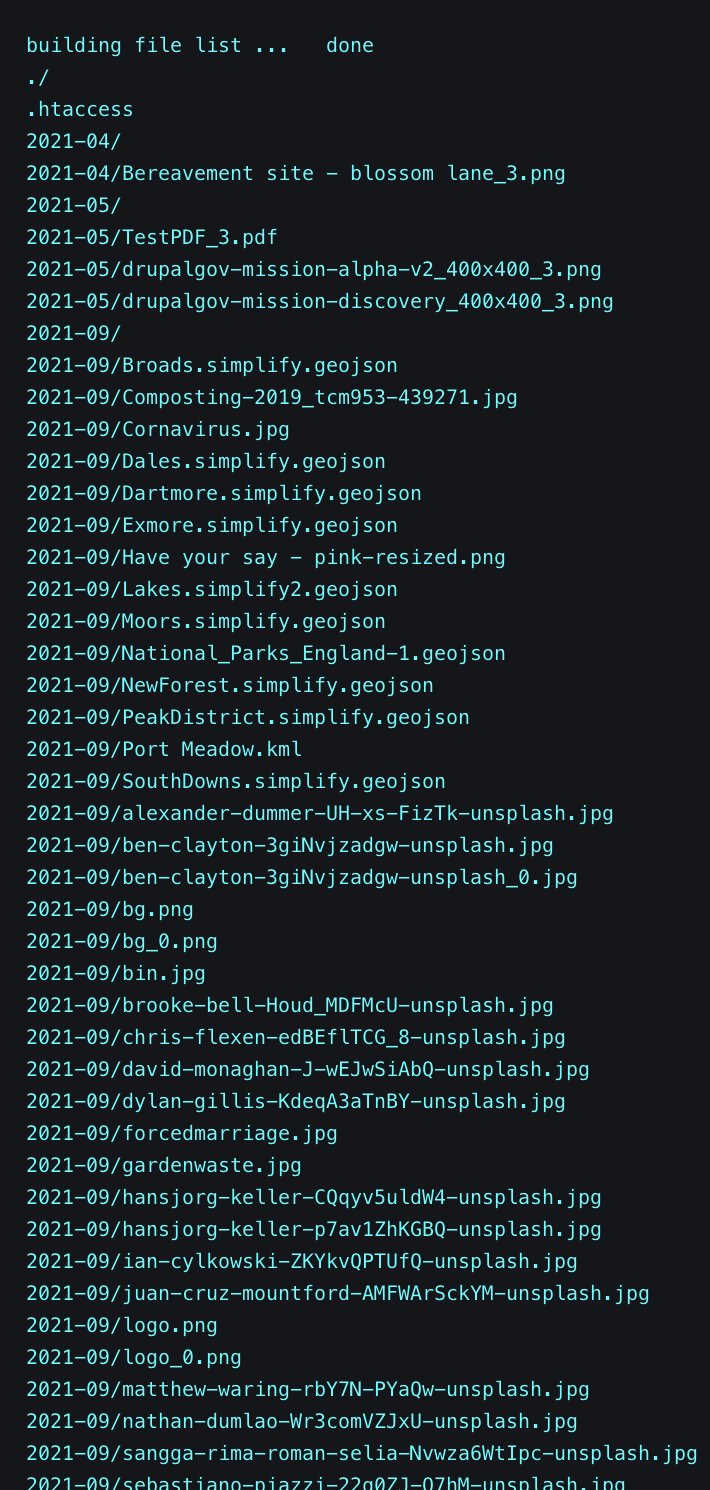
platform mount:upload --mount web/sites/default/files --source web/sites/default/filesRunning this command will trigger a prompt asking us if we want to continue and upon accepting, the file transfer begins:
Project Deployed!
We have successfully deployed our first Drupal project on Platform.sh! You can explore the Platform.sh UI further and discover a plethora of configuration settings, options and metrics:
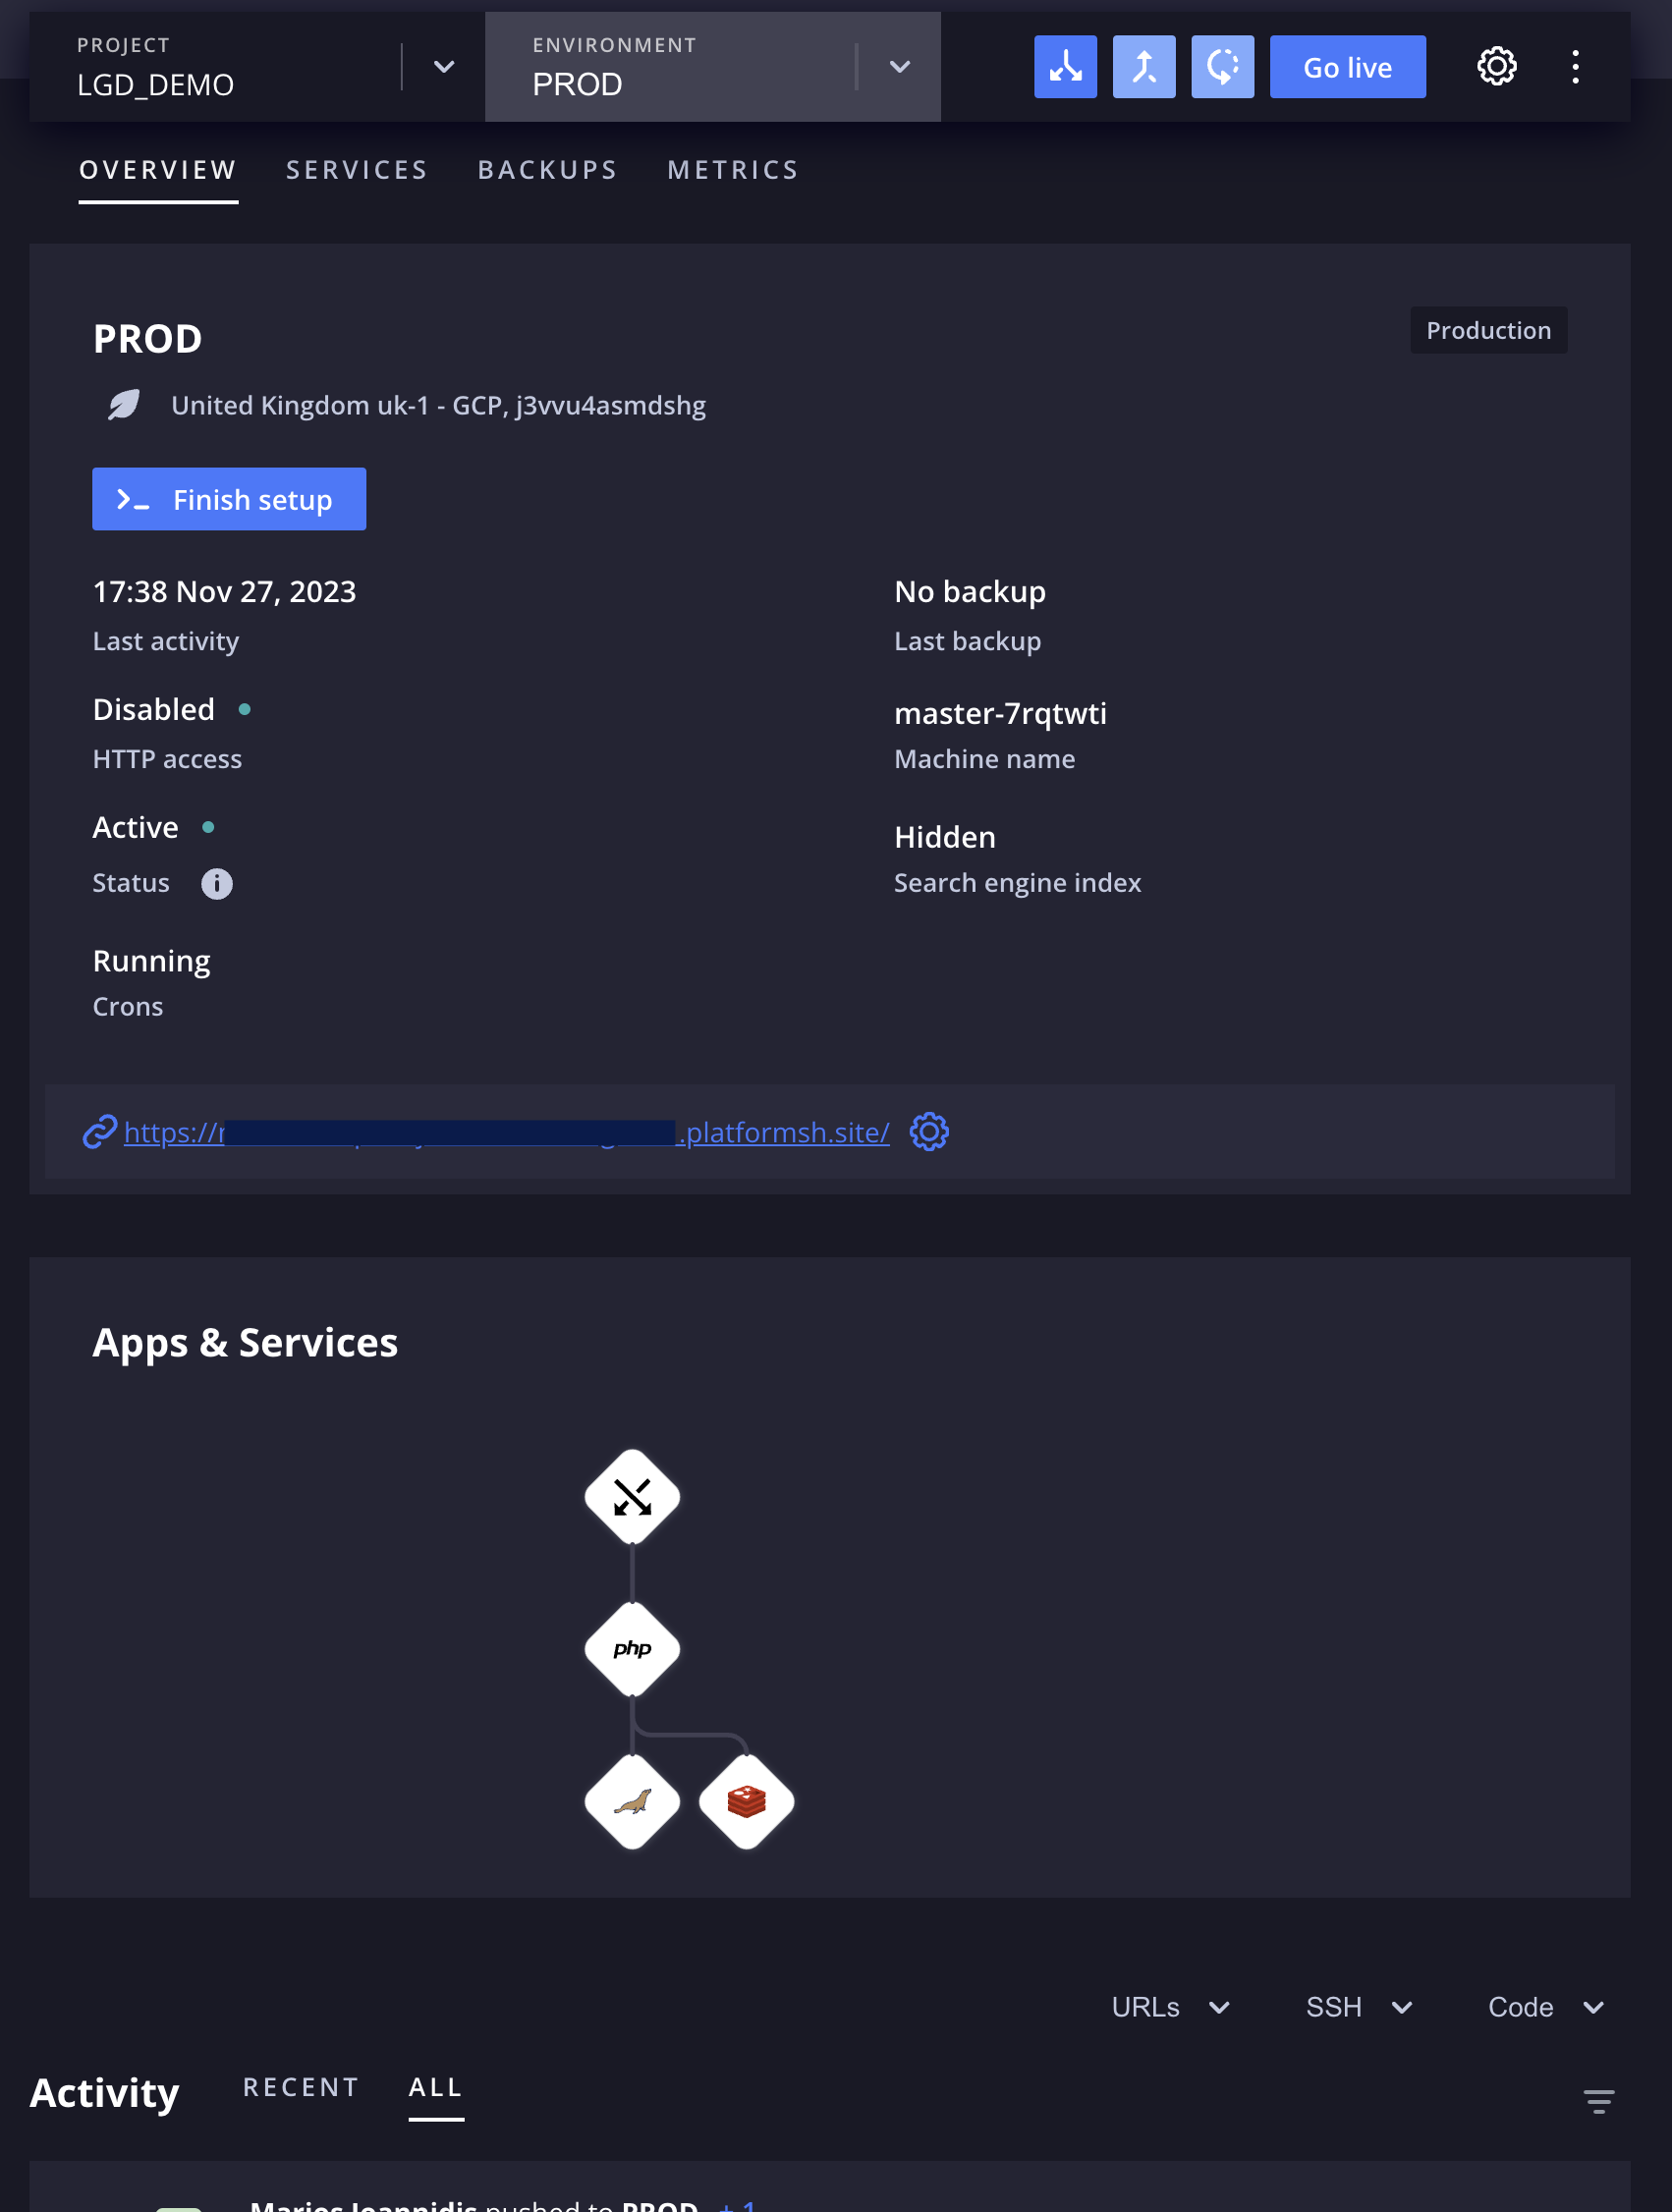
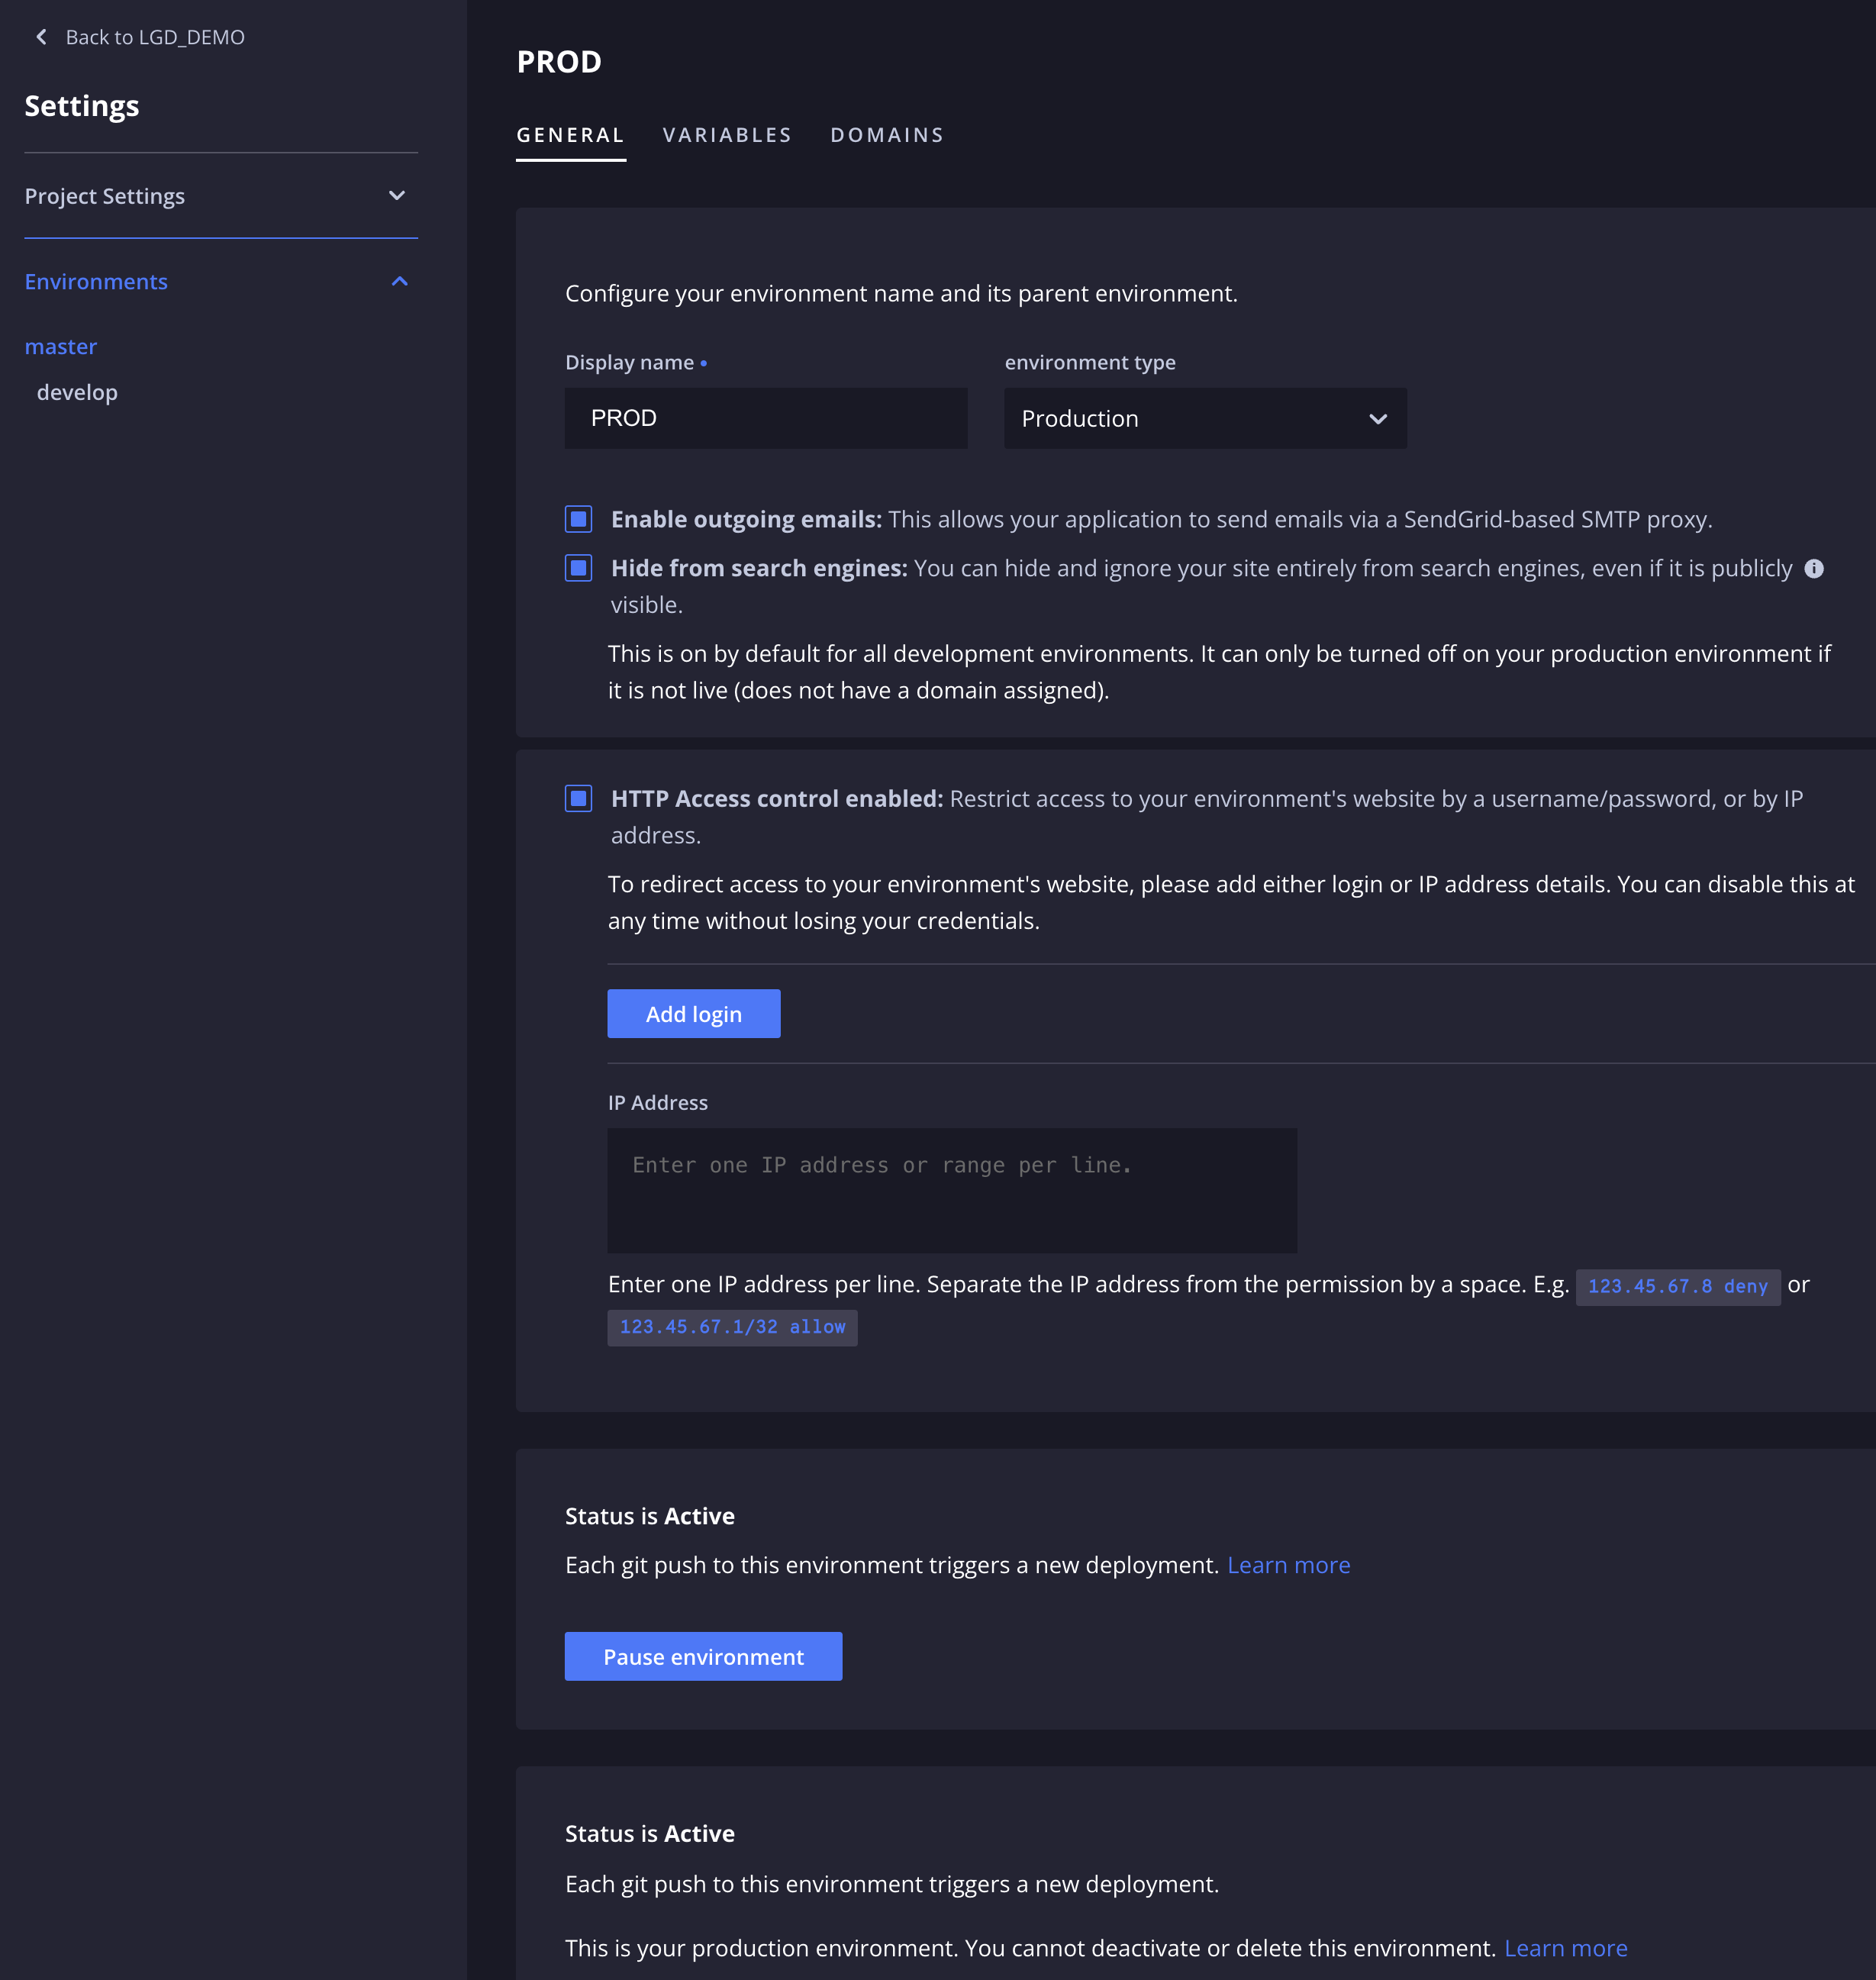
The environment's URL is publicly accessible but not indexable by Google. If you want to add a login screen or even an IP wall in front of your web application, you can do that through your project's settings and under the Environments tab:
Using the URL link displayed on the Overview page, you can visit your now-Cloud-based (!) environment and navigate through the LocalGov Drupal demo content:
You should also be able to login into your Drupal user account under the /user path, using the same exact credentials as on your local site.
From here, you can further develop your Cloud-hosted application, create testing environments, add SSL certificate(s), domains and many more.
ORION WEB can help your Council design and build its brand-new Local Government website or microsite, as well as migrate your legacy site to the LGD platform. Contact us for a free demo of LGD's features - we'd love to discuss your Council's digital strategy!