

We are continuing on from our previous Drupal Feeds Module tutorial and diving into building our own automated OpenAI ChatGPT-powered news aggregator site. We've already learned how to periodically and automatically import content from remote RSS feeds. In this edition, we'll learn how to automatically rewrite/enhance the imported content to add some more unique character to it, using OpenAI's chatGPT and the powerful ECA (Events-Conditions-Actions) module.
OpenAI / ChatGPT Integration module - Introduction
The OpenAI module provides a suite of modules and an API for OpenAI integration with Drupal for generating text and images, performing content analysis and more. OpenAI is the company behind artificial generational intelligence products that powers applications like ChatGPT, GPT-4, GPT-3, DALL-E etc.. The goal of this module's maintenance team is to find ways of augmenting and adding assistive AI tech leveraging OpenAI API services in Drupal CMS, transforming content management and maintenance tasks.
Main features overview
The ChatGPT module comes with an abundance of sub-modules with each one of them targeting a specific area:
- openai_audio: Adds the ability to interact with the OpenAI audio (speech to text) endpoints.
- openai_chatgpt: Enables interaction with the ChatGPT API.
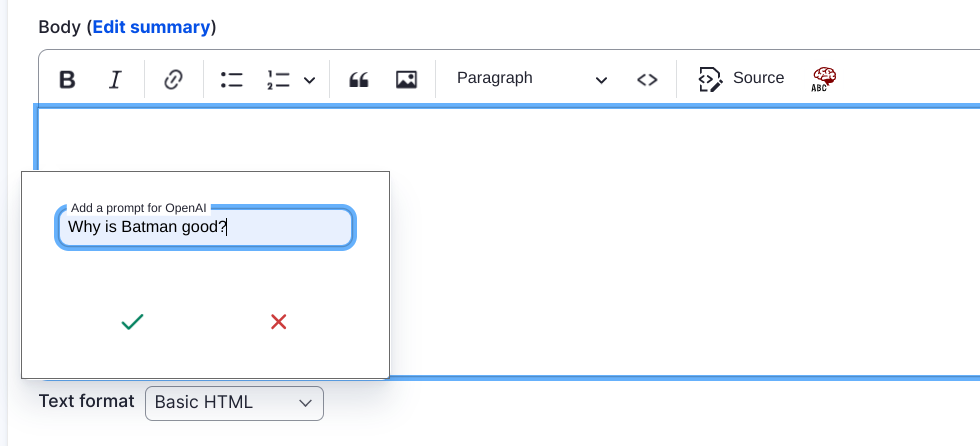
- openai_ckeditor: Provides a CKEditor 5 button that enables sending a prompt to OpenAI and getting generated text back.
- openai_content: Adds assistive tools for different areas of content editing; It adds functionality to adjust the tone of the content, summarise the body text and suggest taxonomy terms for content. It also checks content for moderation violations.
- openai_dalle: Adds capability to interact with DALL·E, OpenAI's image generation service (using either the new DALL·E 3 model or DALL·E 2 model).
- openai_eca: Integrates with the popular ECA module, allowing you to build your own custom workflows.
- openai_devel: Adds GPT capabilities to Devel Generate. This provides Devel a way of generating realistic non-lorem ipsum content using GPT and ChatGPT models. Users can generate sample content either from the Drupal UI or via Drush commands. This is useful if you want to fill out your website with realistic content for purposes such as client demonstration, layout previewing, theming or QA testing.
- openai_dblog: This module provides log analysis using OpenAI to find potential solutions/explanations for error logs. OpenAI responses will persist for common error messages so you can review them anytime.
- openai_prompt: Adds a prompt interaction area in the back office so you can directly interact with ChatGPT.
- openai_embeddings: Analyses nodes and generates vectors and text embeddings of your nodes, taxonomy, media, and paragraph entities. The responses from OpenAI are saved and could augment search, ranking, automatically suggest taxonomy terms for content, and improve search relevancy without expensive search backends. Content personalisation and recommendation may also be possible with this approach.
- openai_tts: Adds the ability to interact with the OpenAI TTS (text-to-speech) endpoints.
Installing the OpenAI / ChatGPT Integration module
To install the OpenAI ChatGPT module, we need to get its latest stable version from the project's official page on drupal.org: https://www.drupal.org/project/openai. Towards the bottom of the page, we can see the following information about the module:
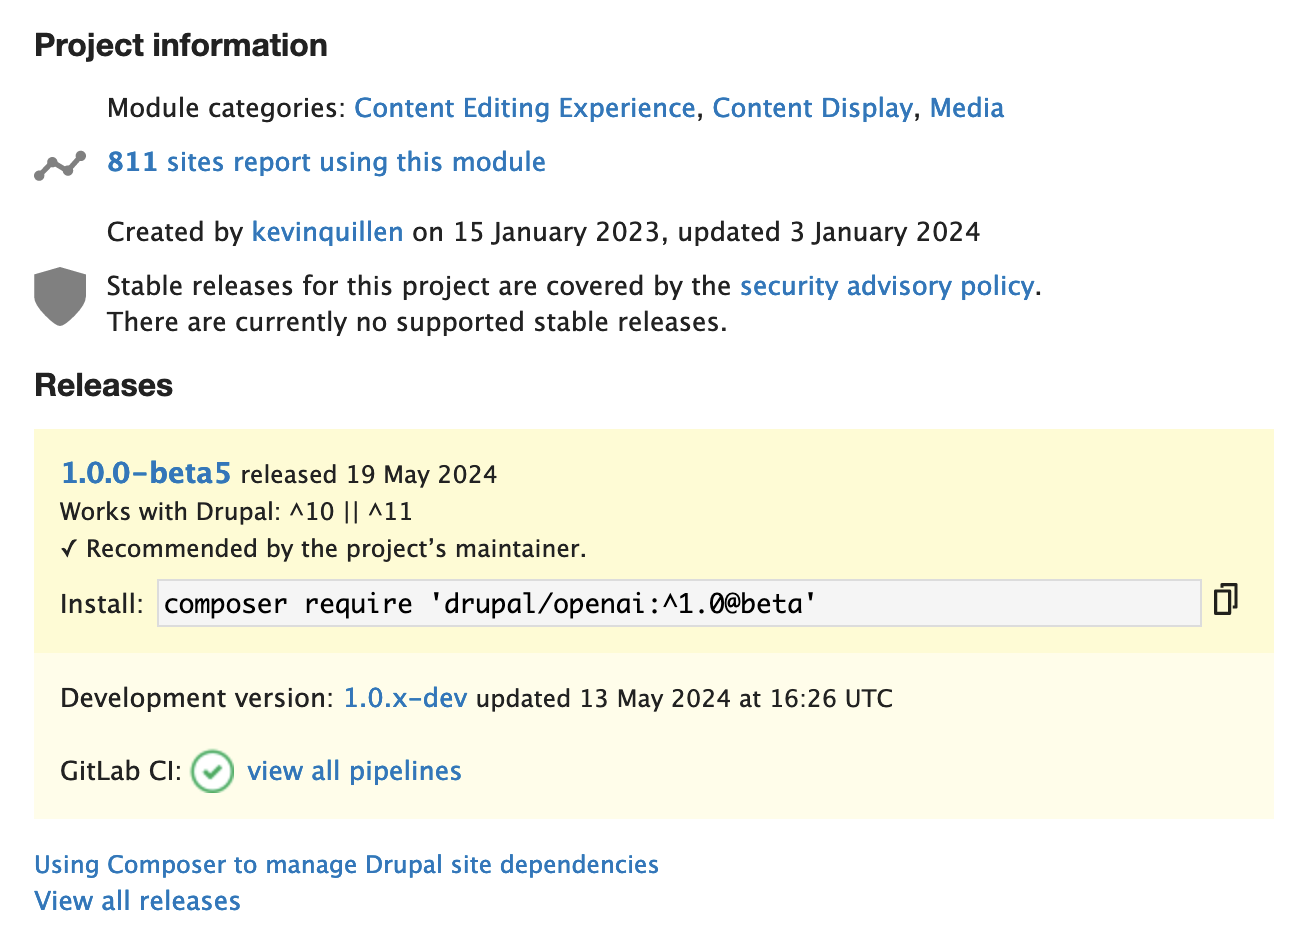
There's currently a beta version available (which, for the most part, worked without issues during our testing) but an even more stable release might be available when you get to read this tutorial.
To install the module, run the corresponding command on your Terminal / Command Line / Shell, in your project's directory:
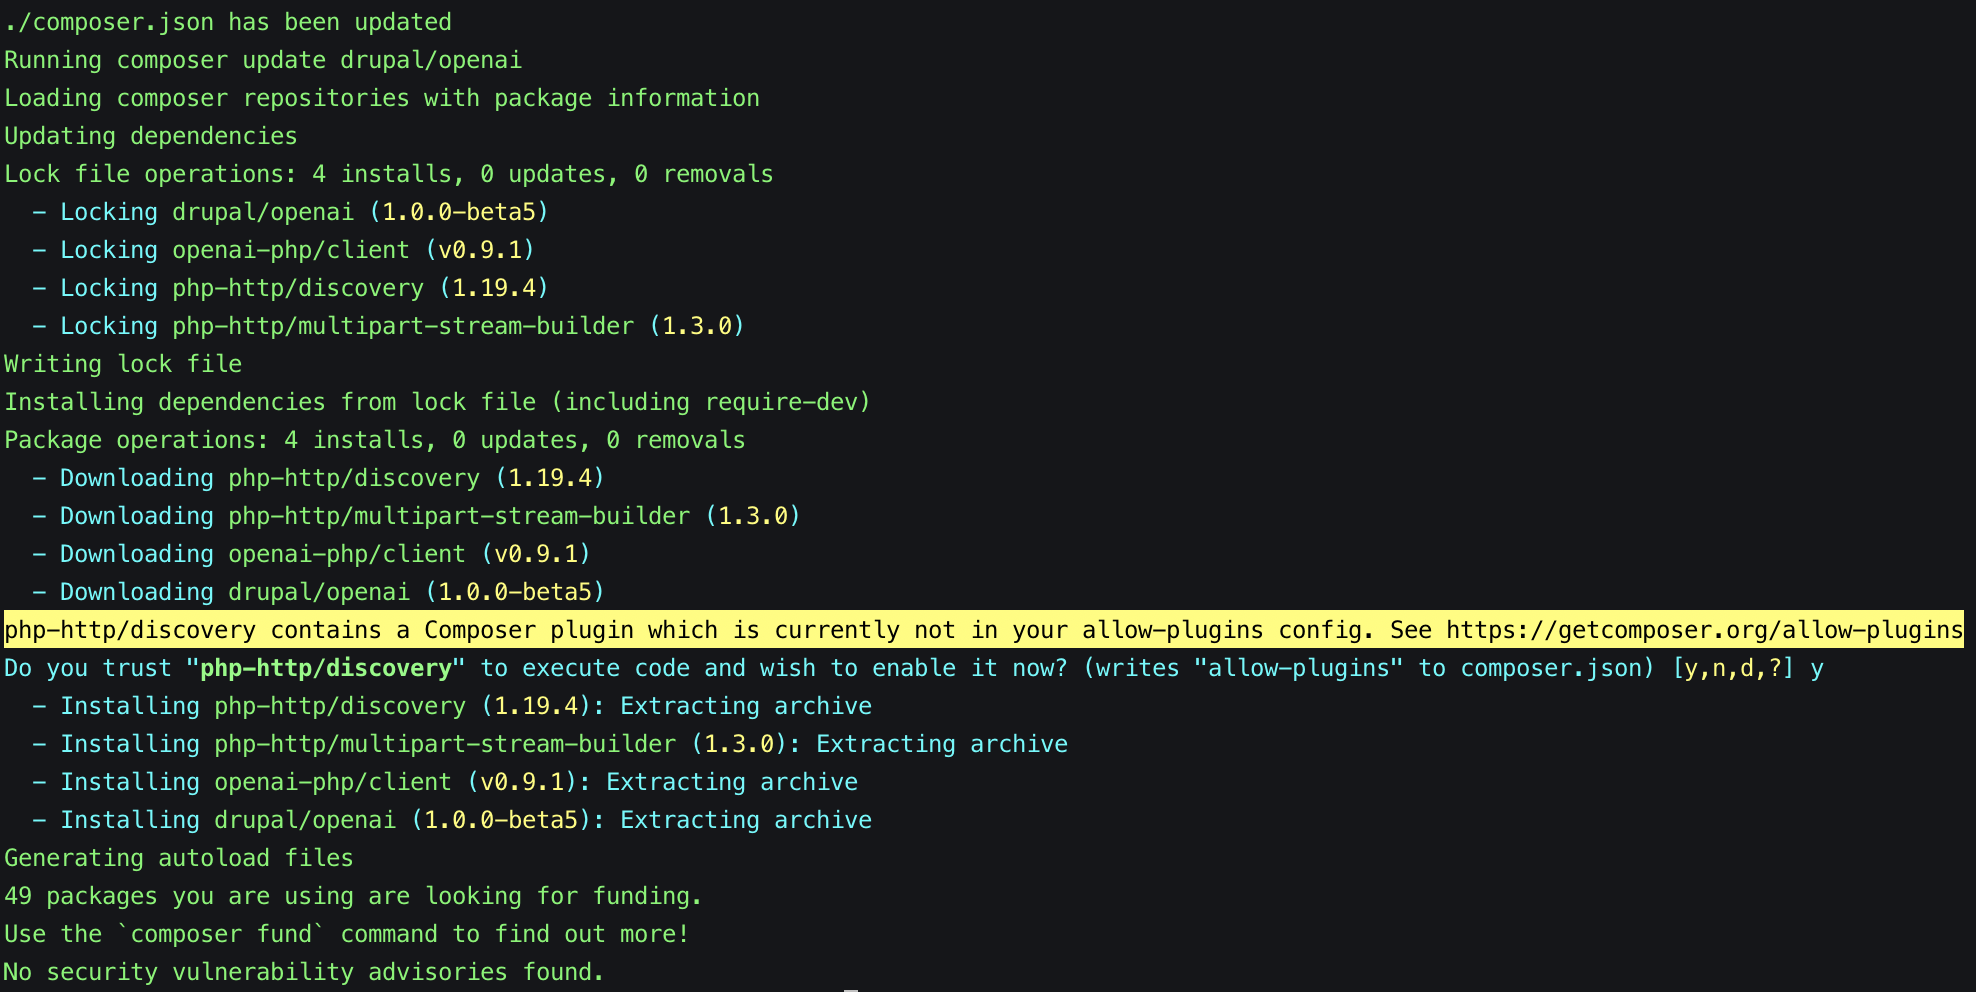
composer require 'drupal/openai:^1.0@beta'Here's how the output from the above command looks like on our screen; you can see the additional libraries installed as dependencies for the module we're adding:
Enabling additional required OpenAI sub-modules
Then, on the Extend screen /admin/modules, we can see all the modules available to us:
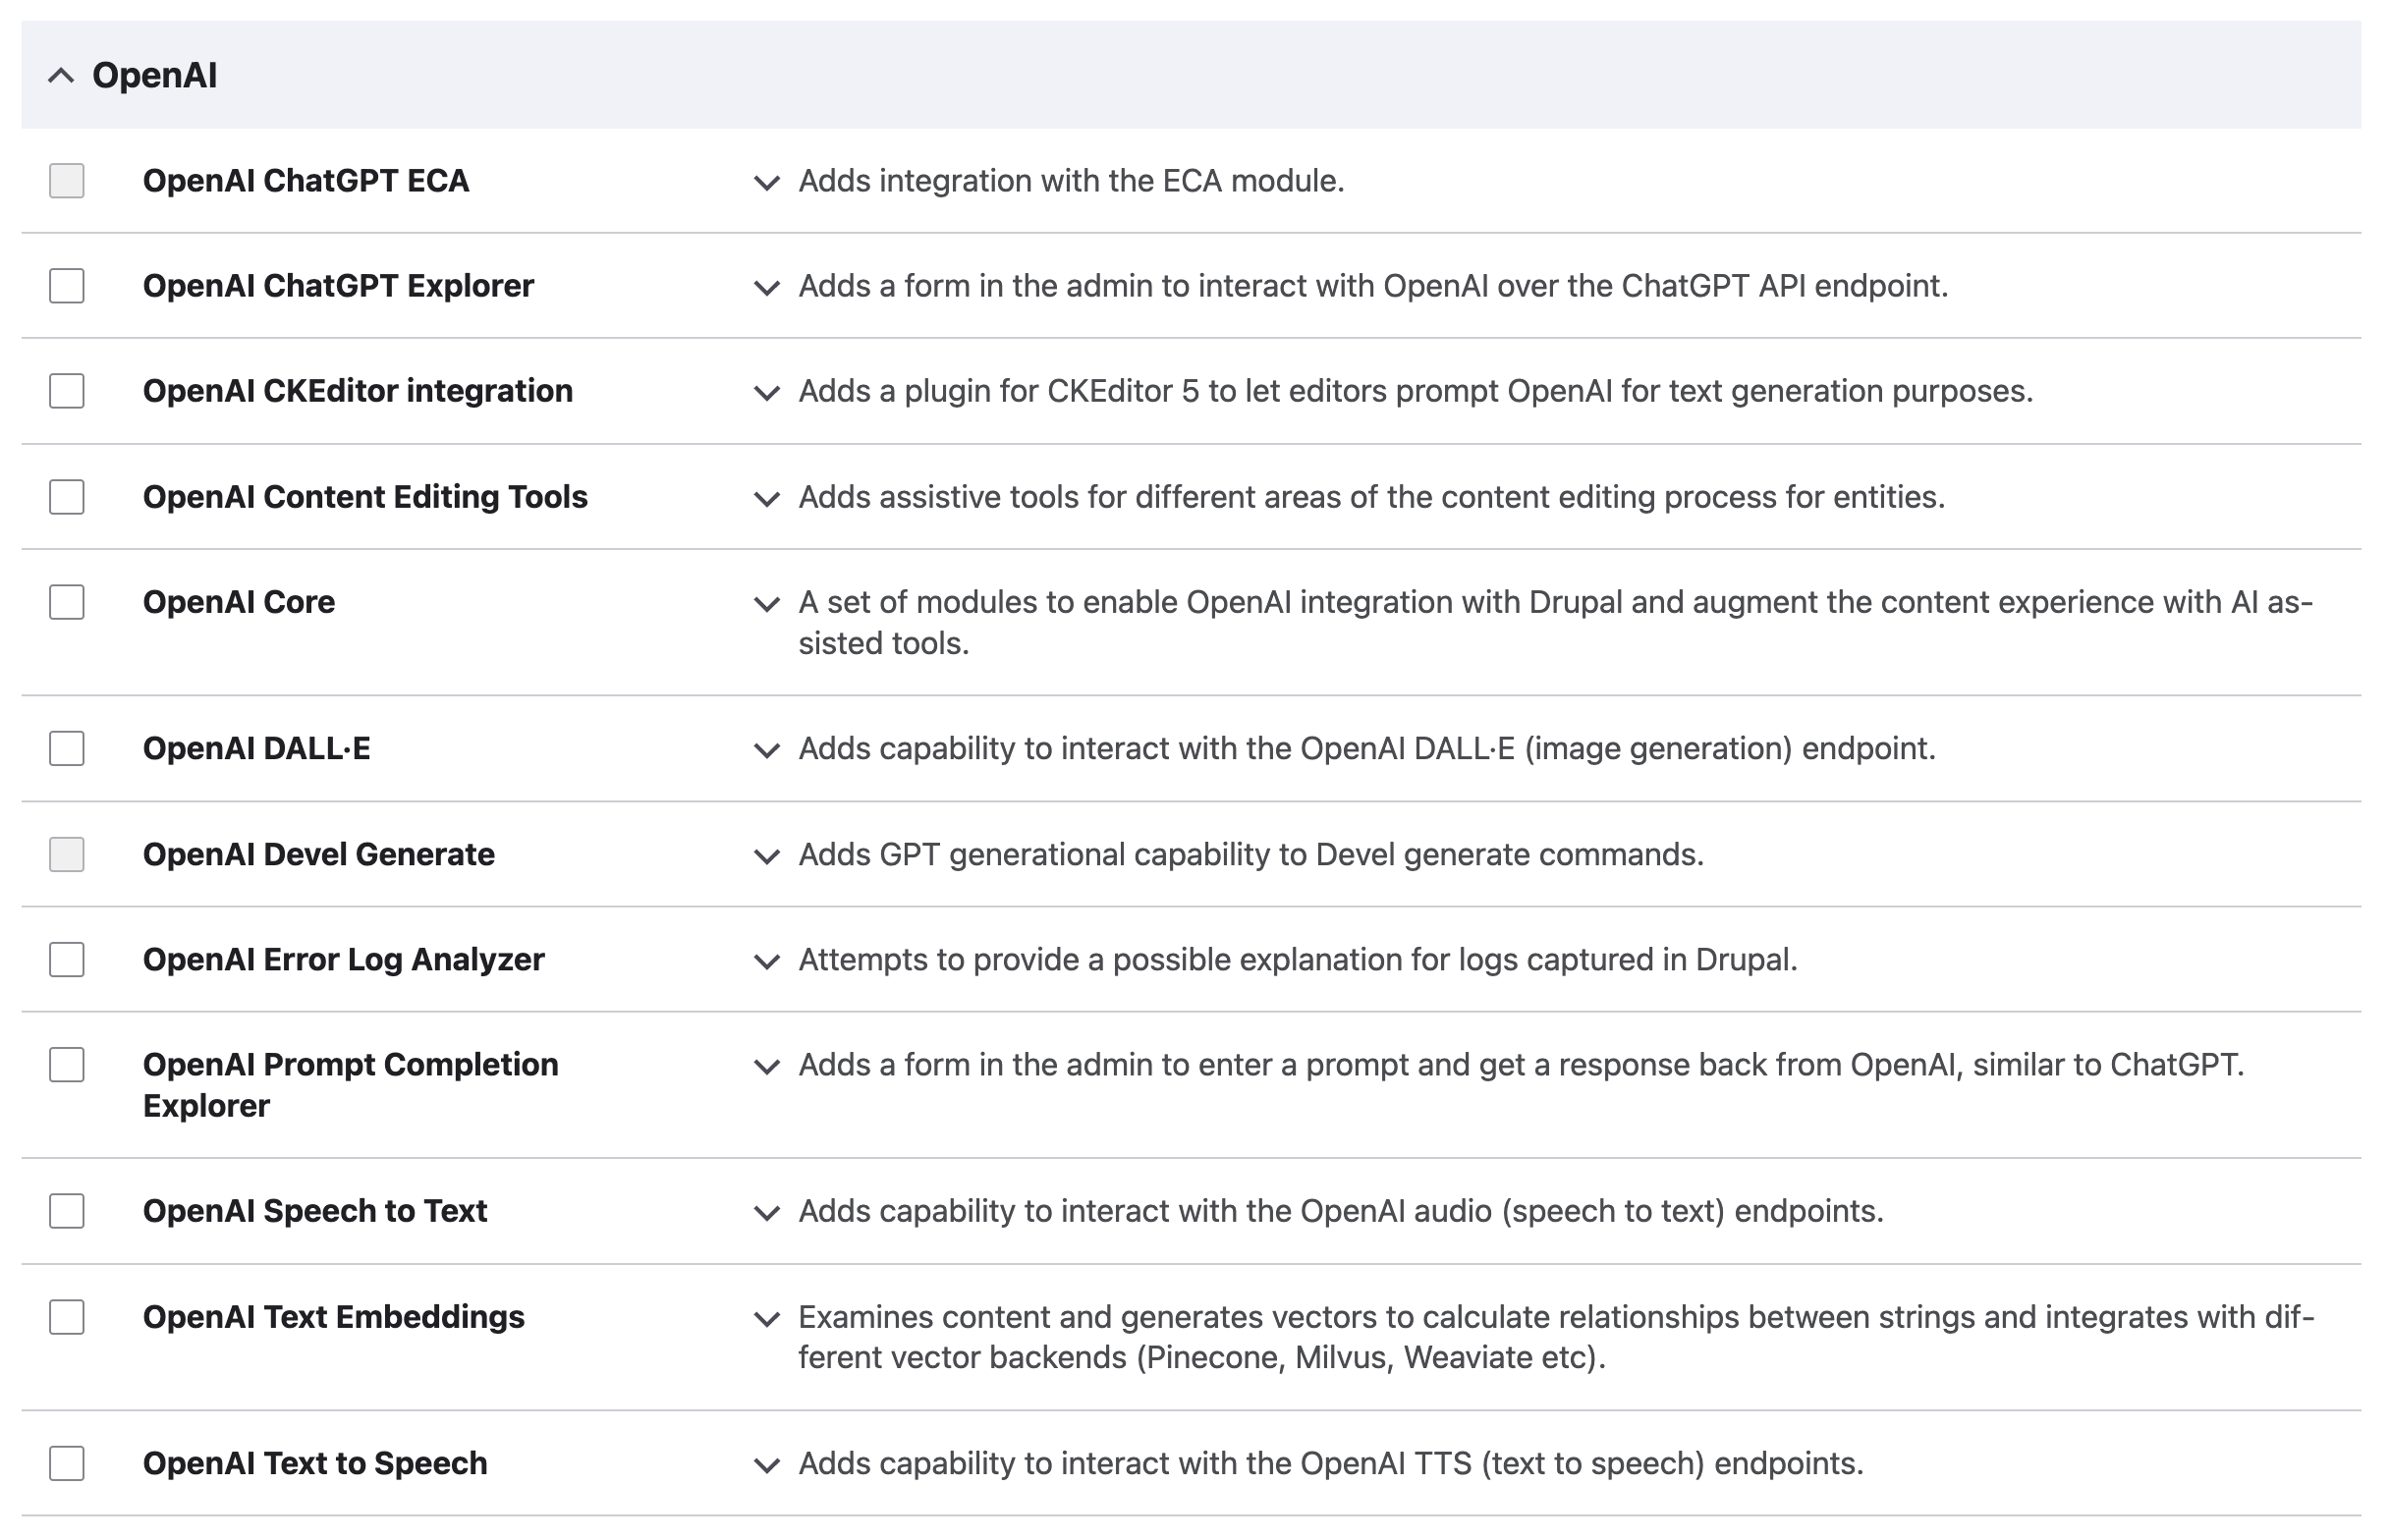
The only modules that we can't currently enable are the ECA and Devel Generate integrations which makes sense because the corresponding dependencies are not currently enabled on our website.
Installing the ECA module
Because we want to automate the process of editing our imported content in order to enhance it with chatGPT, we'll also install and enable the ECA module. ECA ("Events Conditions Actions") provides automation i.e. actions that get triggered when certain events occur.
The Rules module used to be the go-to solution for workflow automation tasks but only an alpha version of the module released on 3 October 2023 is available for Drupal 10 at the time of writing, whereas ECA is ahead with an increasing adoption rate as well as a beta version that's also more recent (released 19 May 2024).
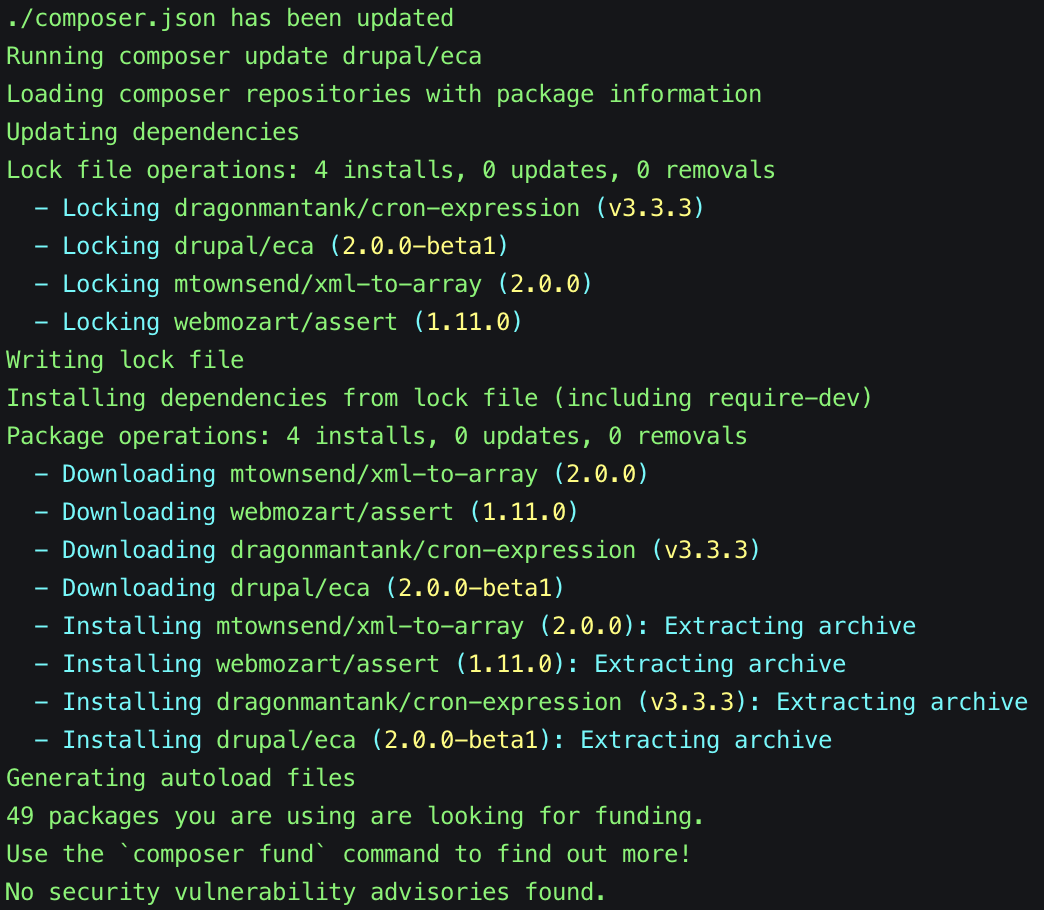
To install the ECA module, we run the following command (keep in mind that a newer/more stable version might be available at the time of reading this):
composer require 'drupal/eca:^2.0@beta'The output from the above should look something like the following:
Enabling additional required ECA sub-modules
After installing the ECA module, you'll find numerous sub-modules available on the Extend (/admin/modules) screen. For now, we only need to enable the ECA Core (required by all other ECA modules), ECA Content and ECA UI:
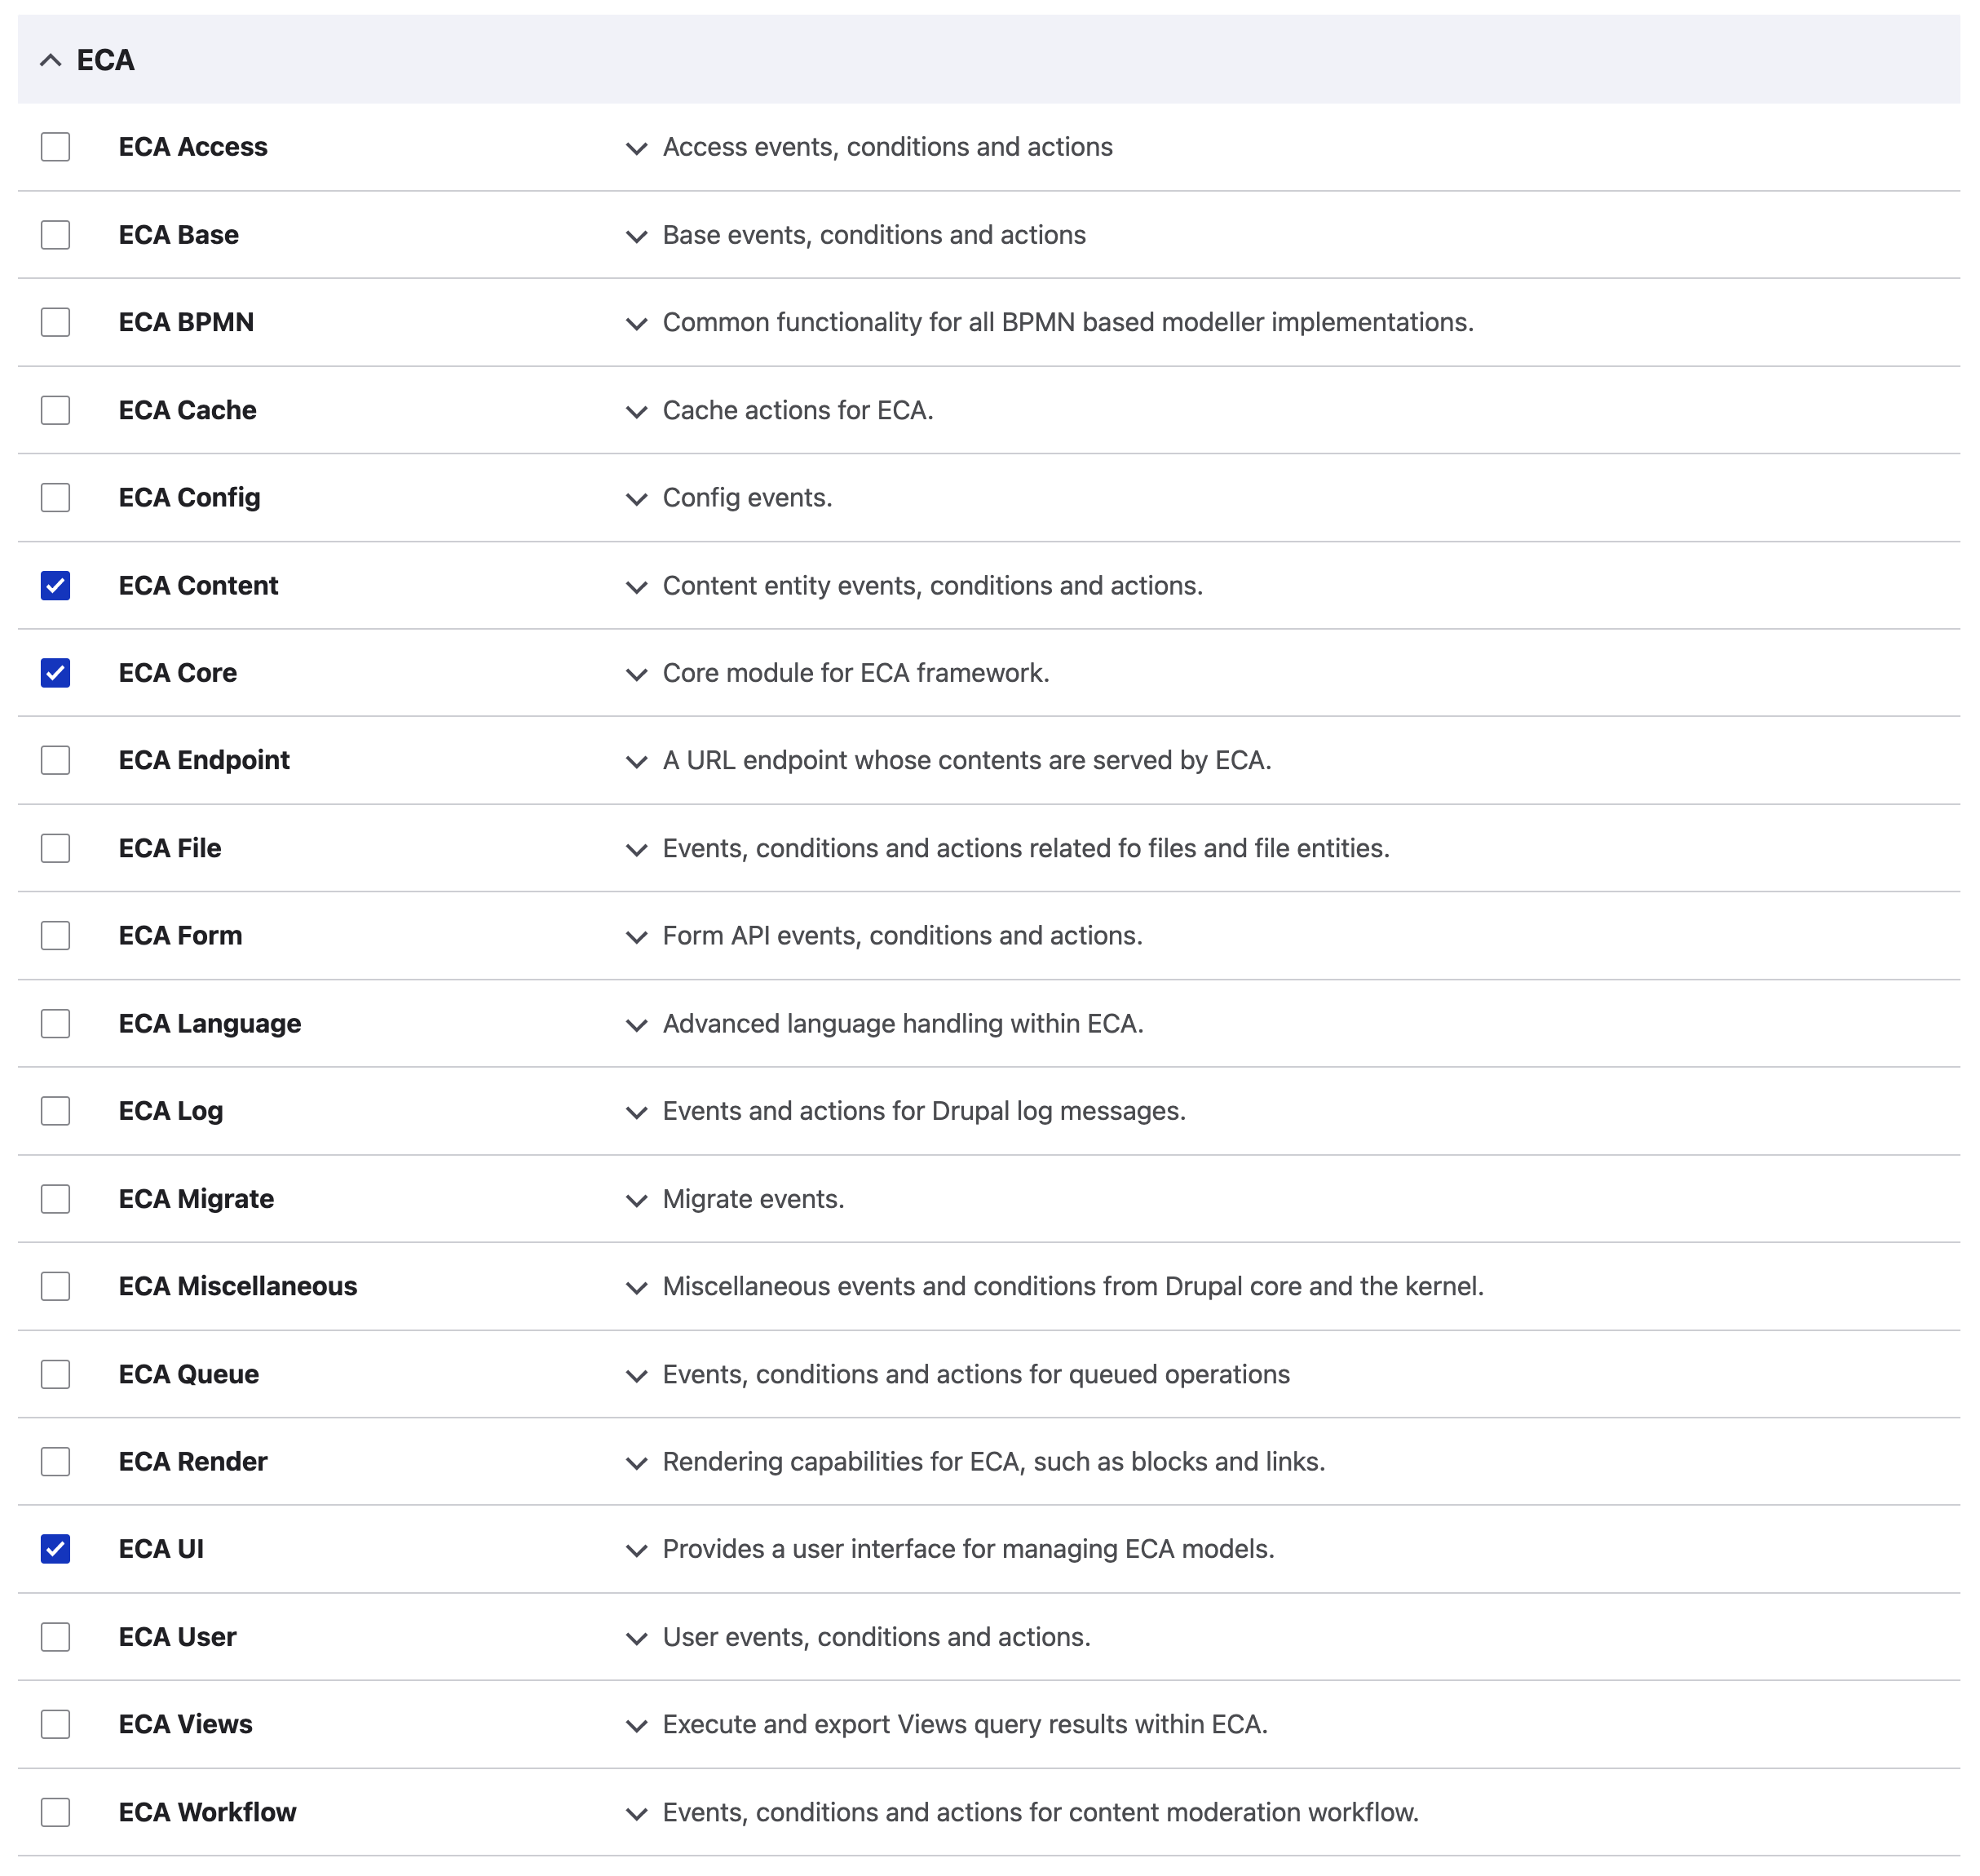
At the same time, we also tick the checkboxes for OpenAI Core (required by all other OpenAI modules) and OpenAI ChatGPT ECA and hit Install to enabled the selected modules.
Adding an ECA modeller
From the project page: ECA Core is a processing engine that runs in the background. It needs an integrated modeller – a front-end tool with which you define event-condition-action models (a.k.a. rules). ECA provides a plugin manager with an interface to easily integrate existing tools that already provide that capability. And if the modeller supports templates for events, conditions and actions, ECA will provide them for all the plugins that are available on the current Drupal site.
In other words, it's necessary to add a modeller in order to be able to create, and visually inspect, an ECA workflow using the Drupal back office's UI. For the purposes of this tutorial, we'll use the most powerful of the three modellers available under https://www.drupal.org/project/bpmn_io. To install the module, we run the following Terminal command:
composer require 'drupal/bpmn_io:^2.0@beta'This should output something like the following:
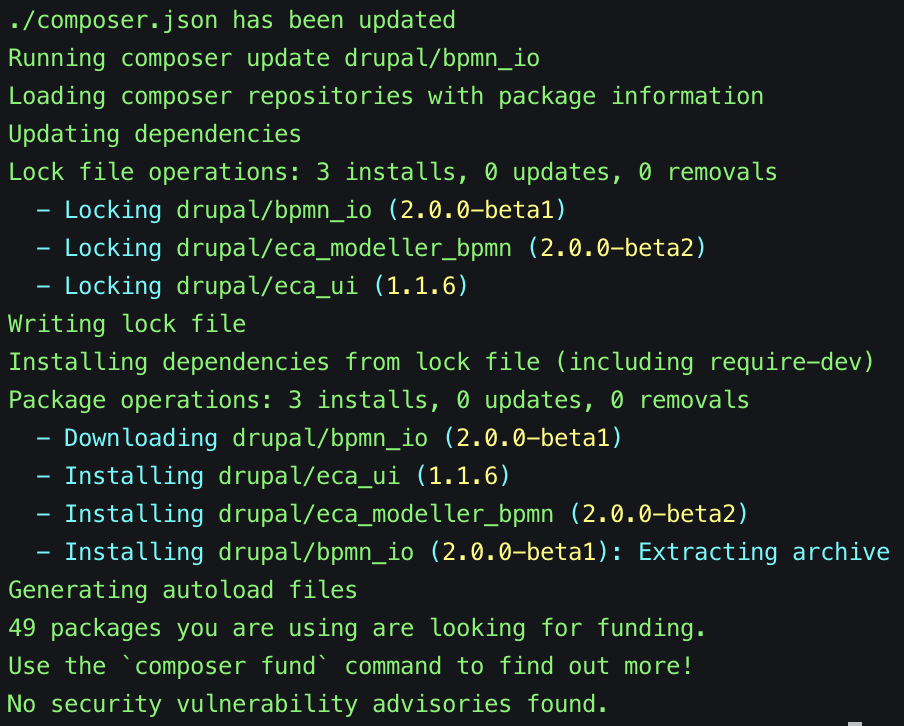
Now that we've added the BPMN Modeller module, we need to enable the following two modules that are now available on the Extend screen:
- BPMN.iO for ECA: BPMN modeller for ECA, integrated into Drupal's admin UI
- ECA BPMN: Common functionality for all BPMN-based modeller implementations
Performing pending Drupal database updates
In order to add and enable the latest version of the OpenAI module, we also needed to update the version of Drupal Core on our website to 10.3.0-beta1 as well as update some module dependencies in our Composer JSON file. It's always good practice, but also essential when we update modules and Core, to run the following Drush command in order to perform all pending database updates:
drush updbThis ensures that our database schemata are always up-to-date, clean and in sync with our configuration in code.
Setting up an OpenAI API key
After enabling the necessary modules, we need to add our unique OpenAI API and organisation keys on the corresponding settings page under /admin/config/openai/settings:
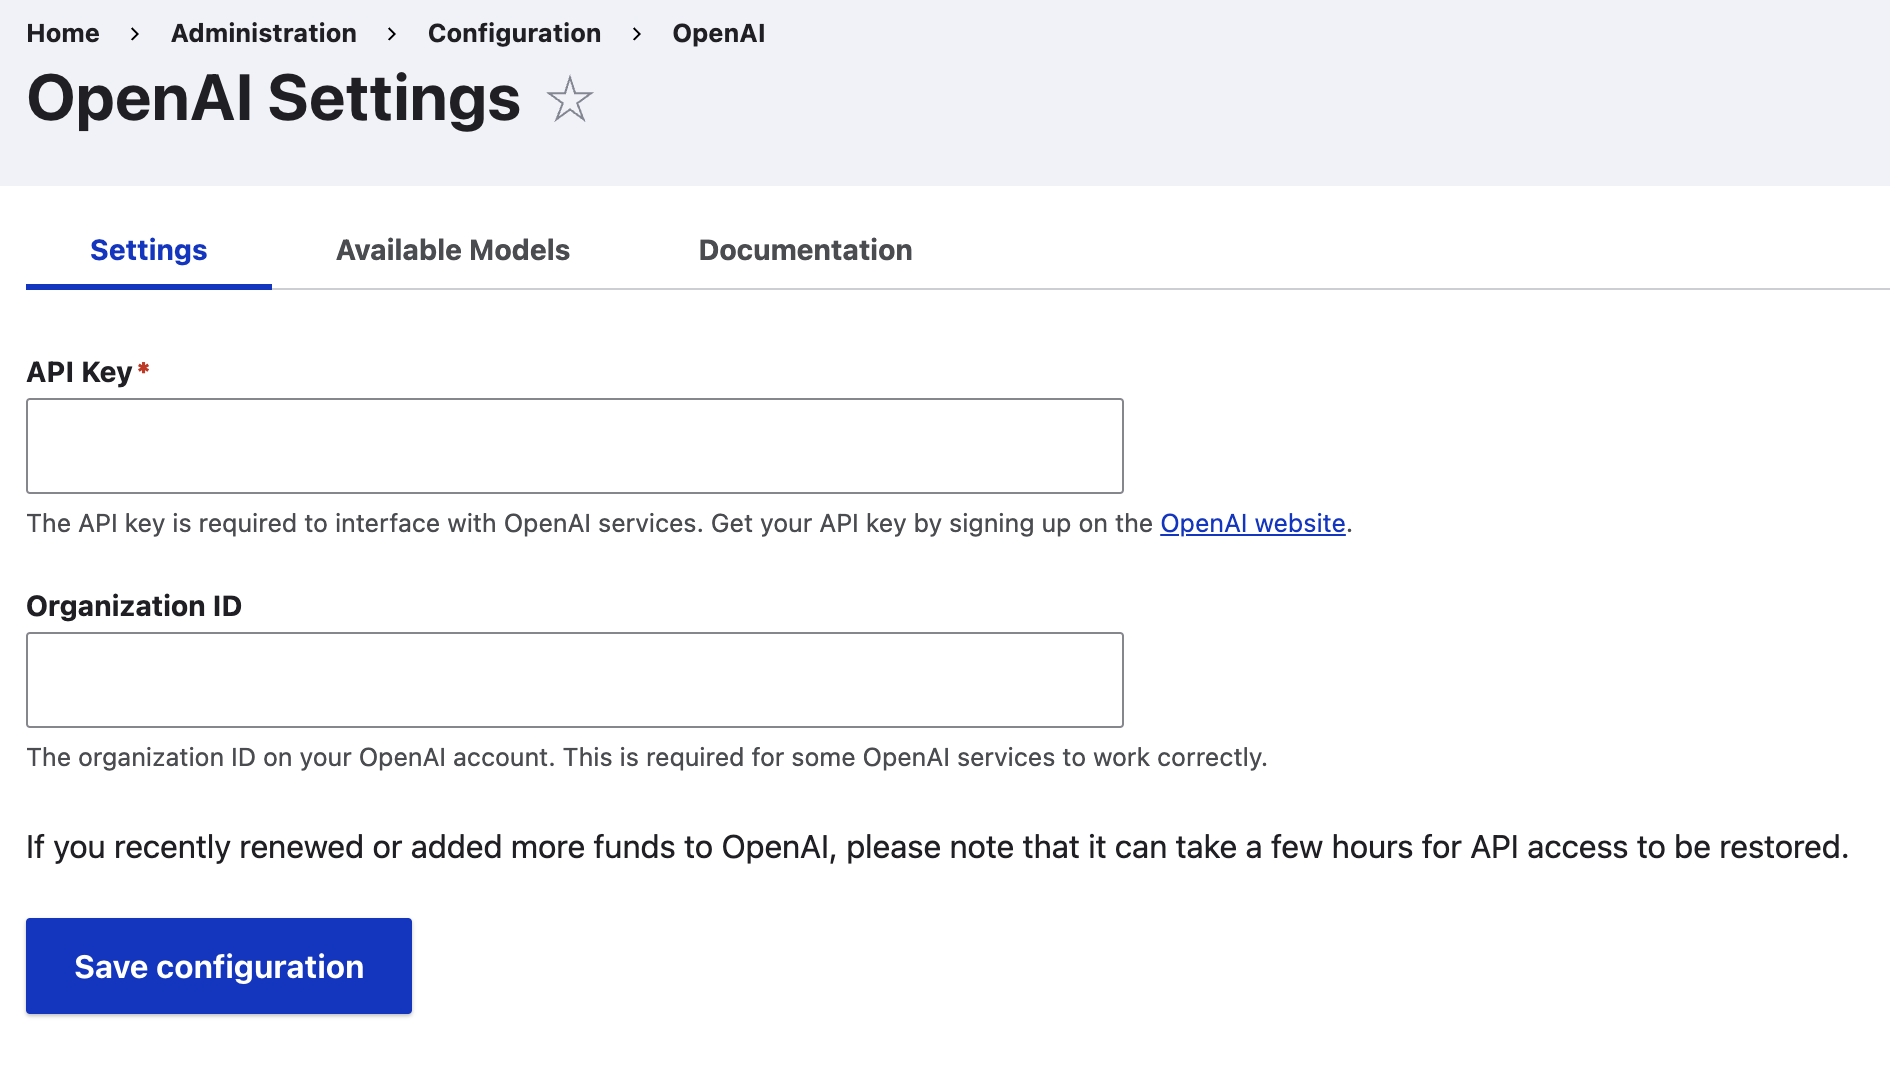
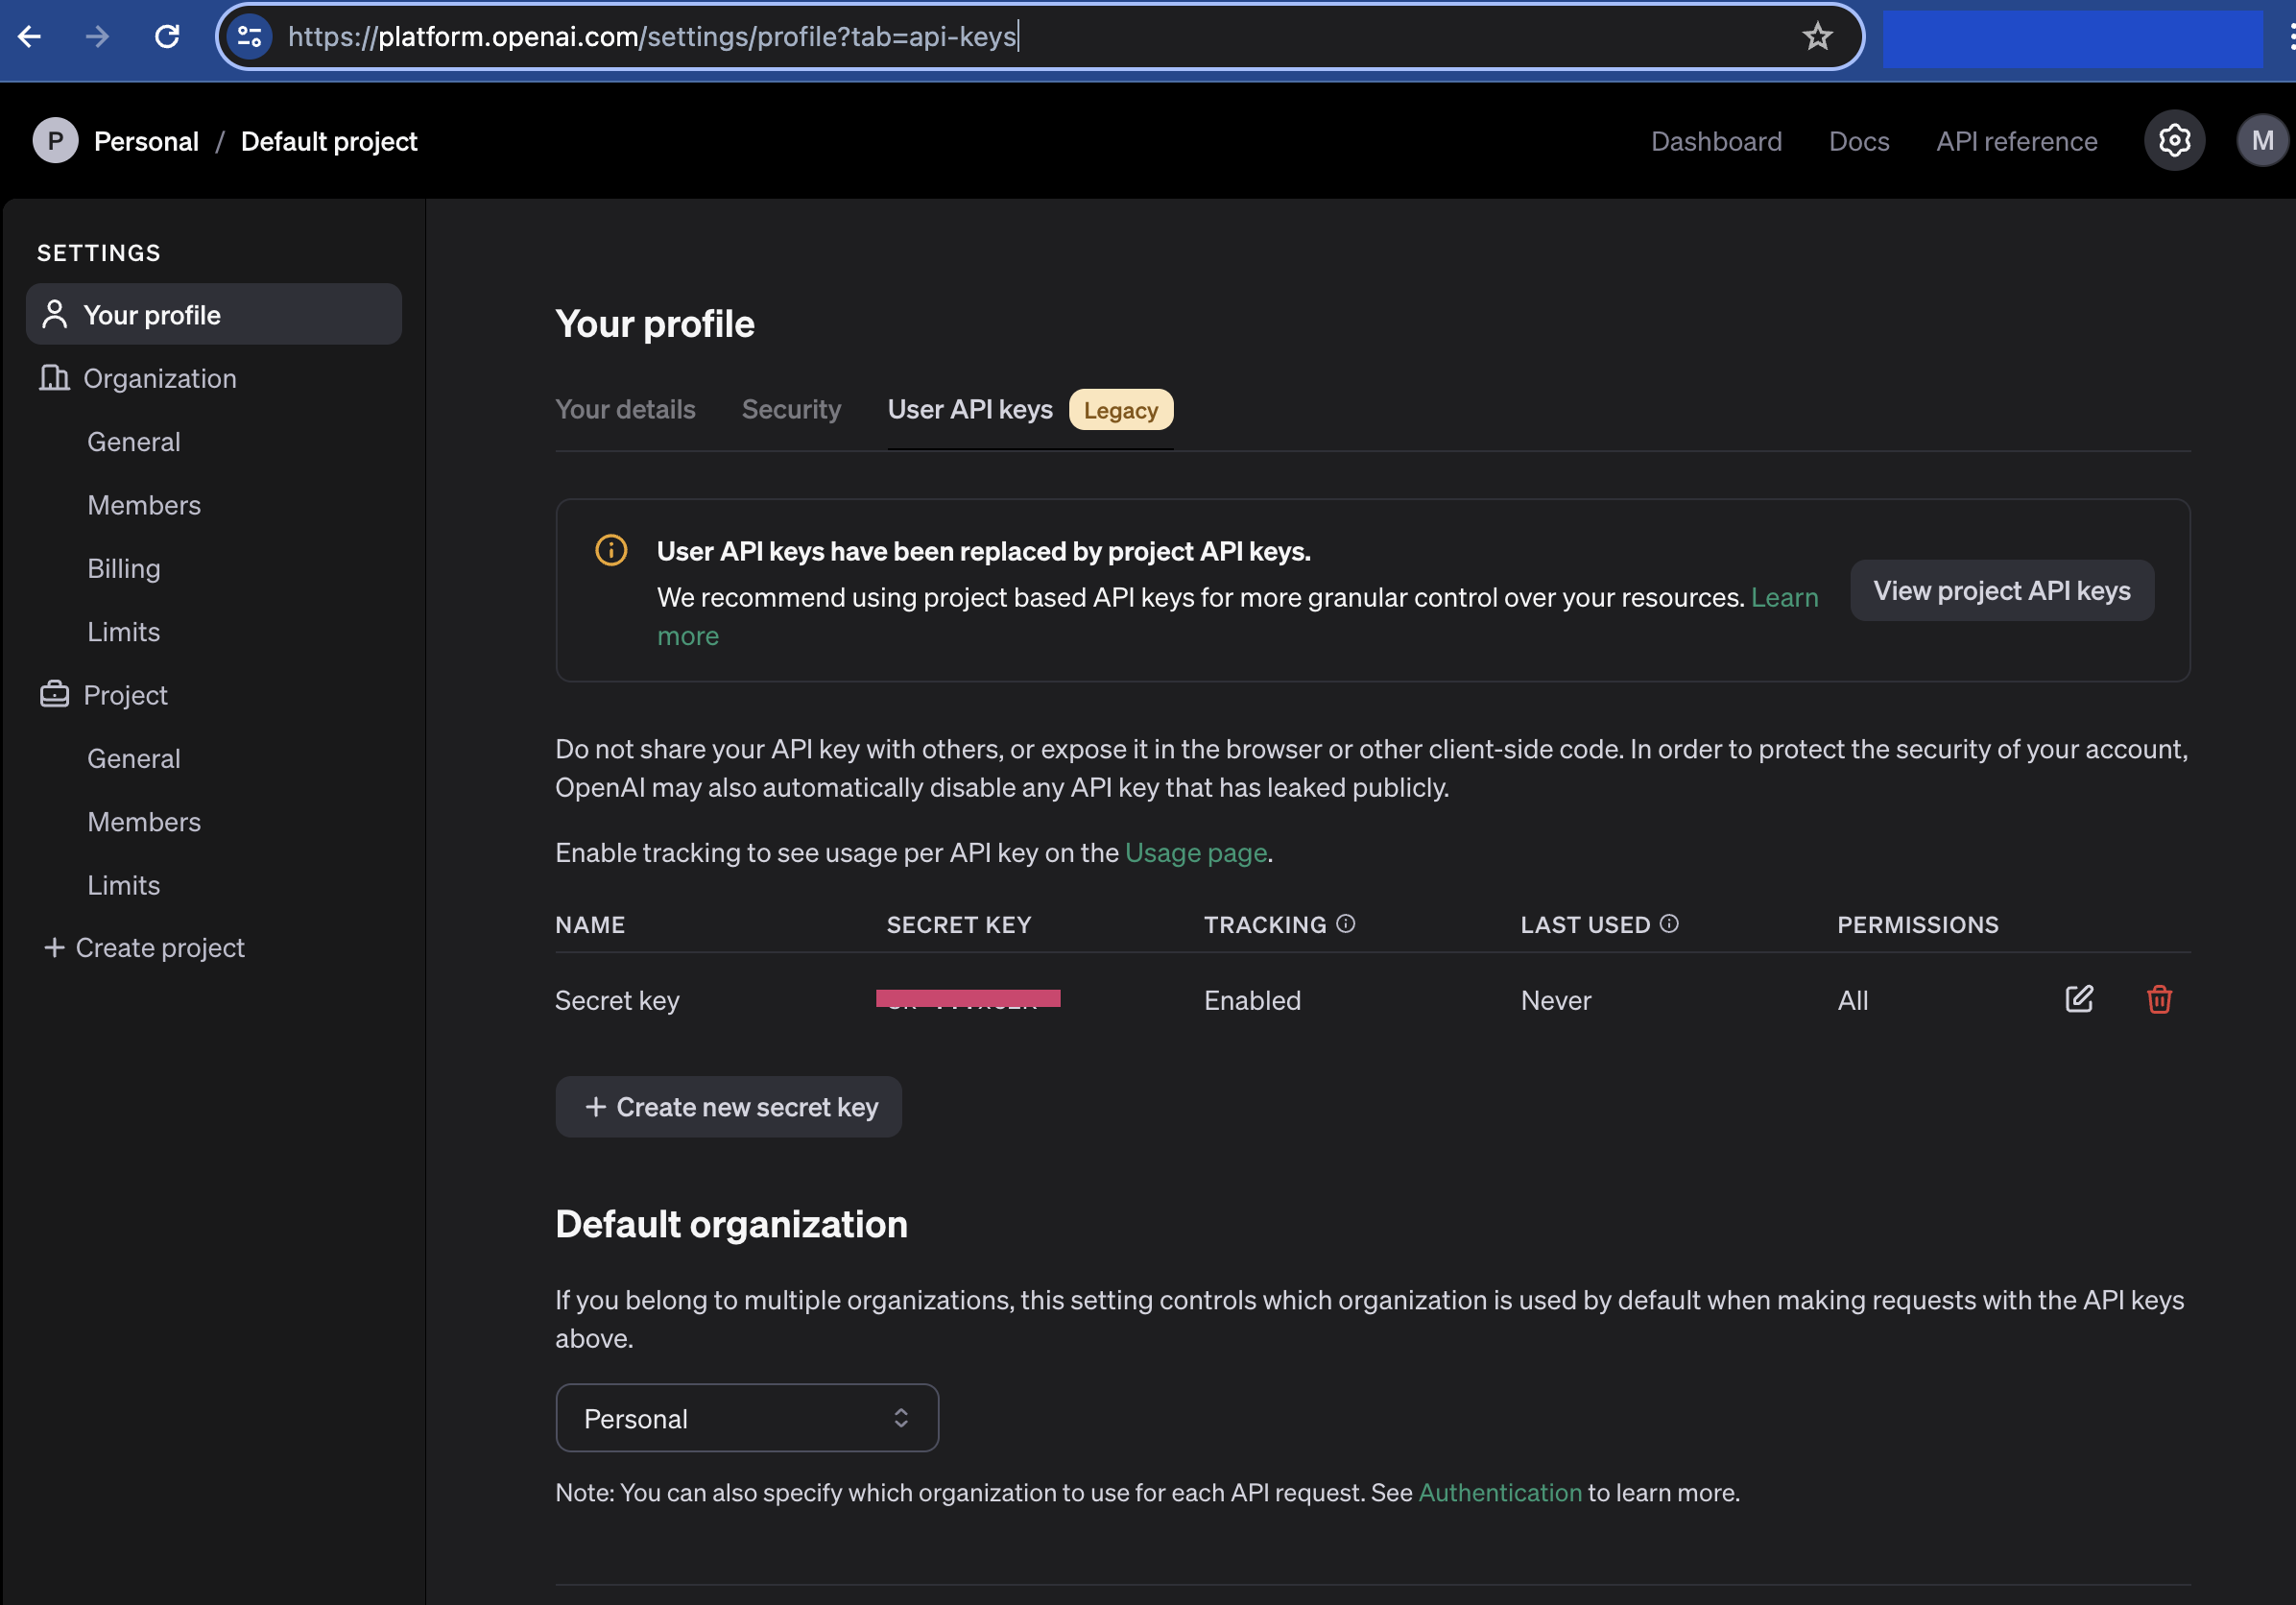
You can create an OpenAI account for free and also add a new API key under https://platform.openai.com/settings/profile?tab=api-keys:
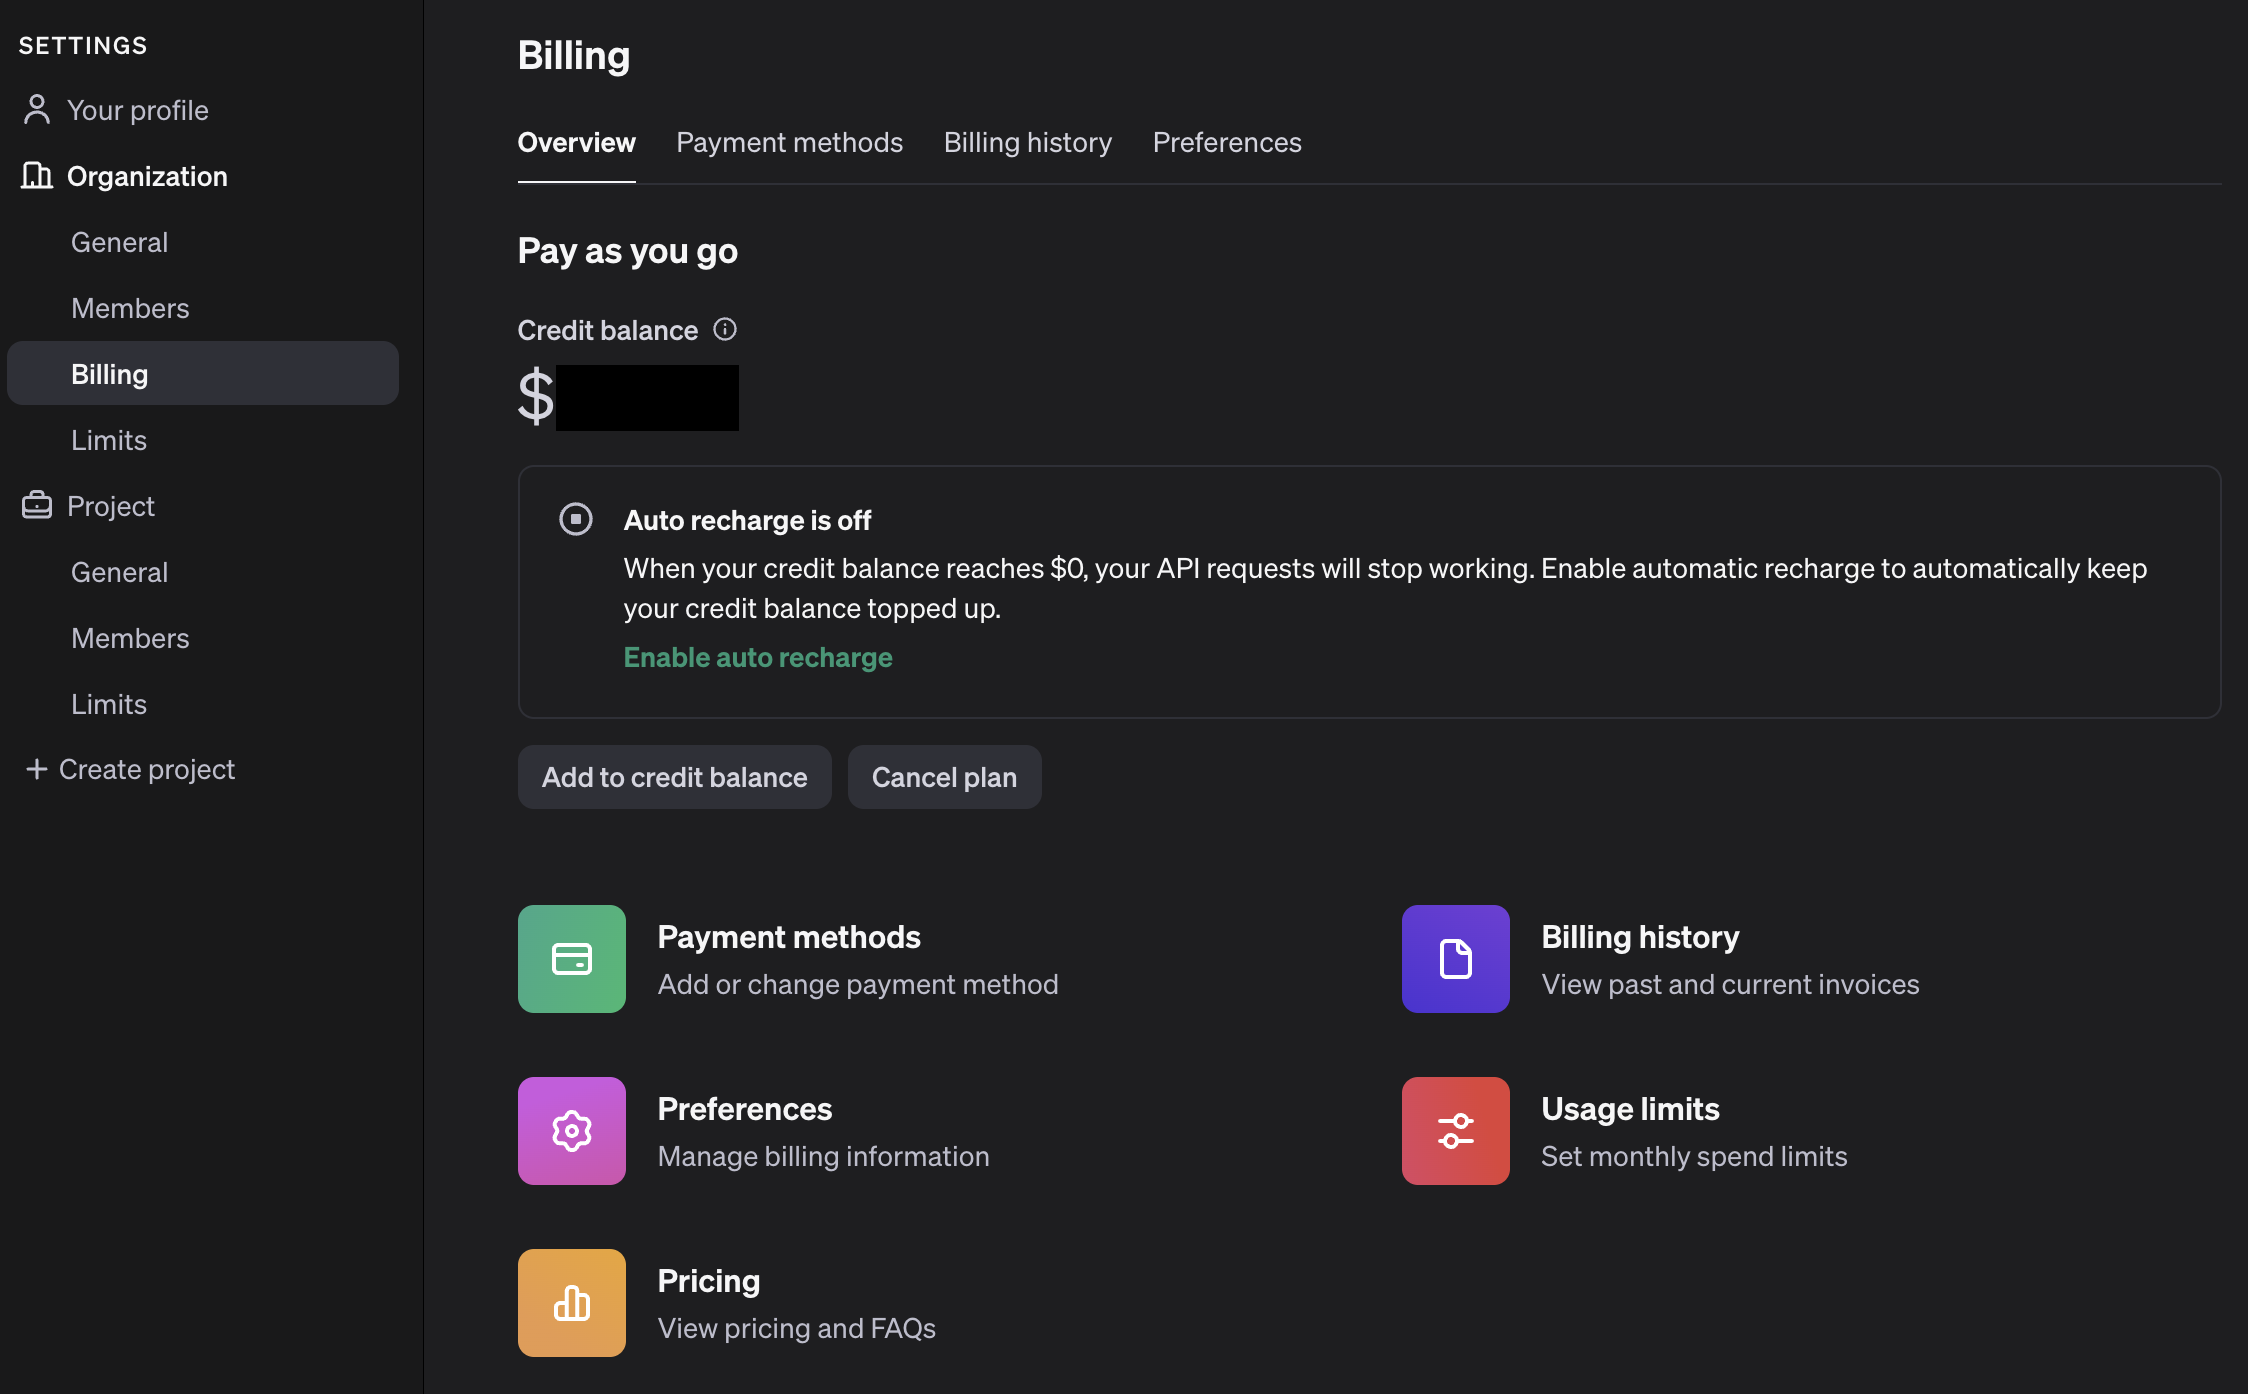
Adding credit to our OpenAI account
Because our ECA model will be sending data to ChatGPT via OpenAI's API, we need to add some credit to our OpenAI account. The openai_eca sub-module will let you know if your OpenAI balance is not enough by throwing an error in the Drupal logs:
There was an issue obtaining a response from OpenAI. The error was You exceeded your current quota, please check your plan and billing details. For more information on this error, read the docs: https://platform.openai.com/docs/guides/error-codes/api-errors.
Your OpenAI account balance just needs to be above zero for the requests to go through so you can simply add the minimum amount of $5. To give you an idea of how fast this amount gets spent, we've seen our balance going down by $0.01 with five API requests. You can visit your OpenAI account's billing overview page under https://platform.openai.com/settings/organization/billing/overview to add some credit:
Building our ECA automation workflow
1. Adding a new ECA model
Now that we've installed, enabled and configured all the necessary modules, it's time to build the automation workflow that will transform the content of our imported Article nodes. On the main configuration screen for ECA titled "Configure ECA - Events, Conditions, Actions Add to Default shortcuts":
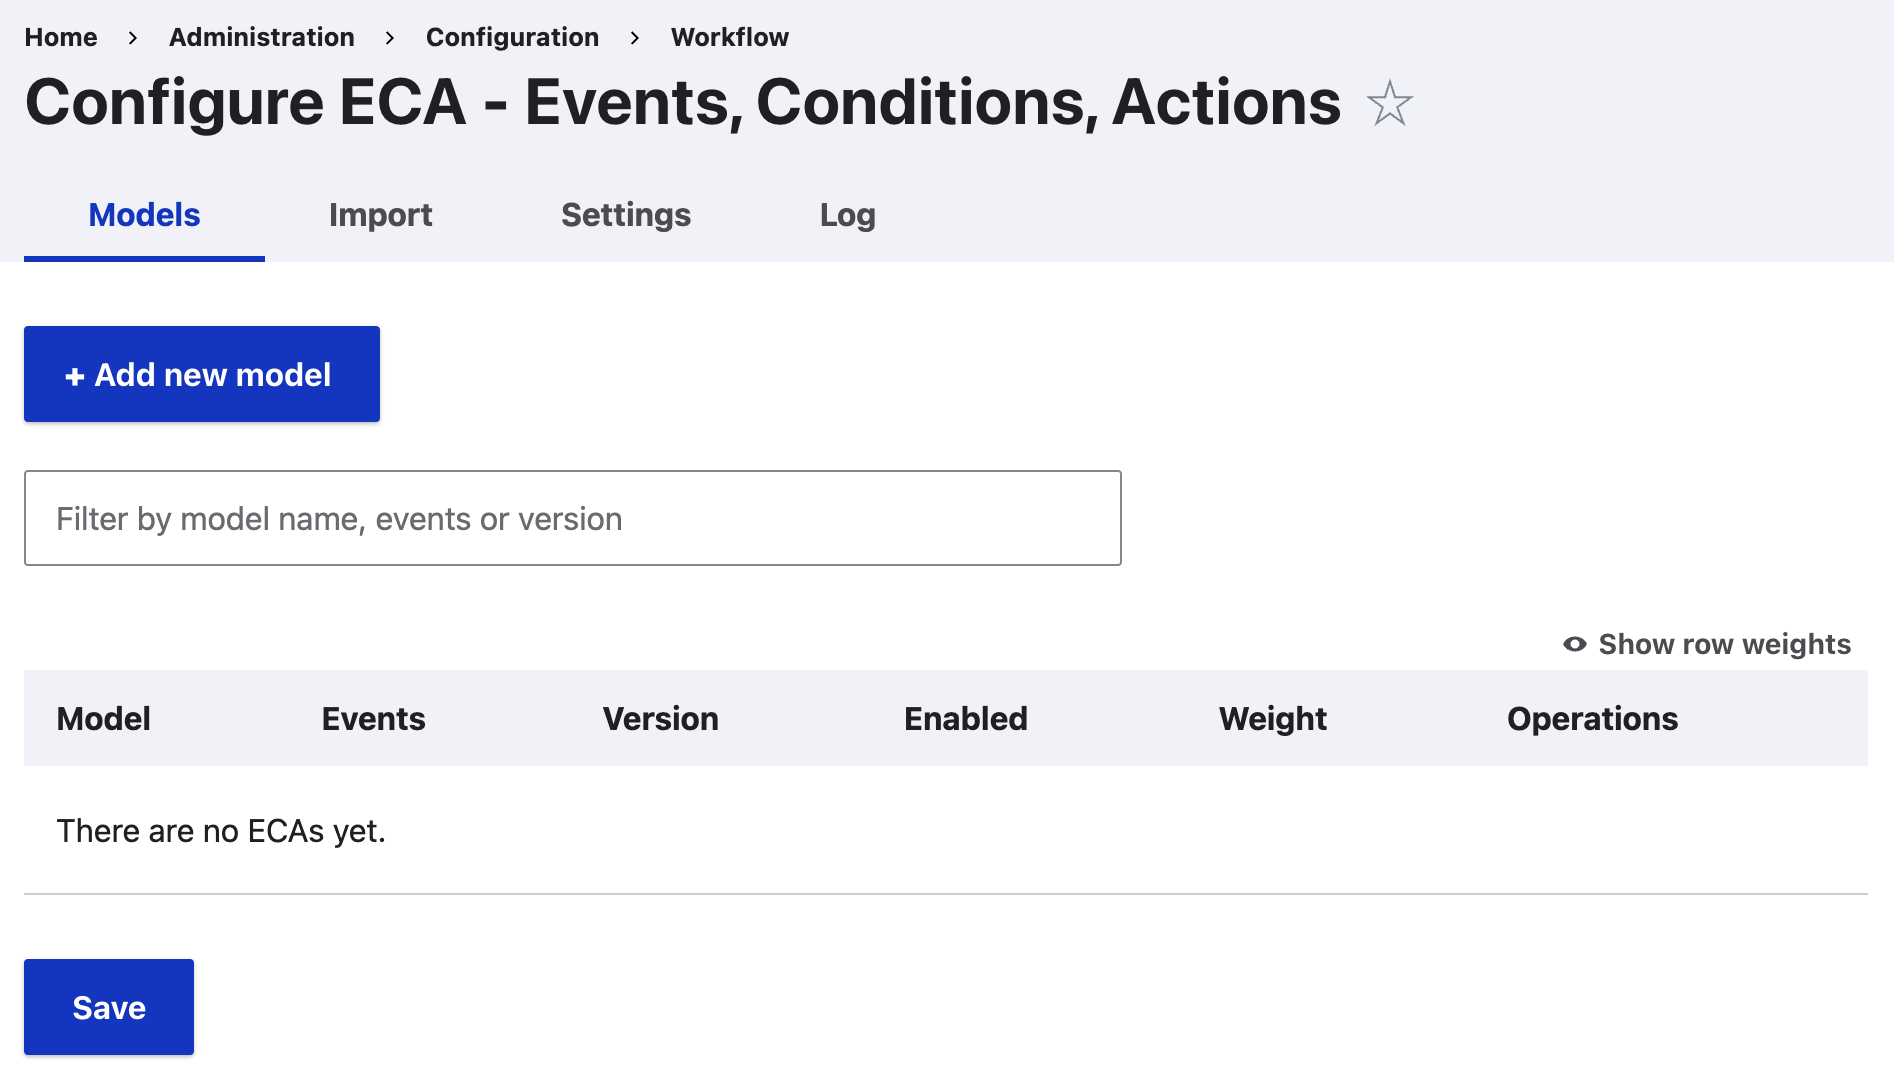
...click on the "+ Add new model" button to add a new model using the BPMN modeller we've already installed:
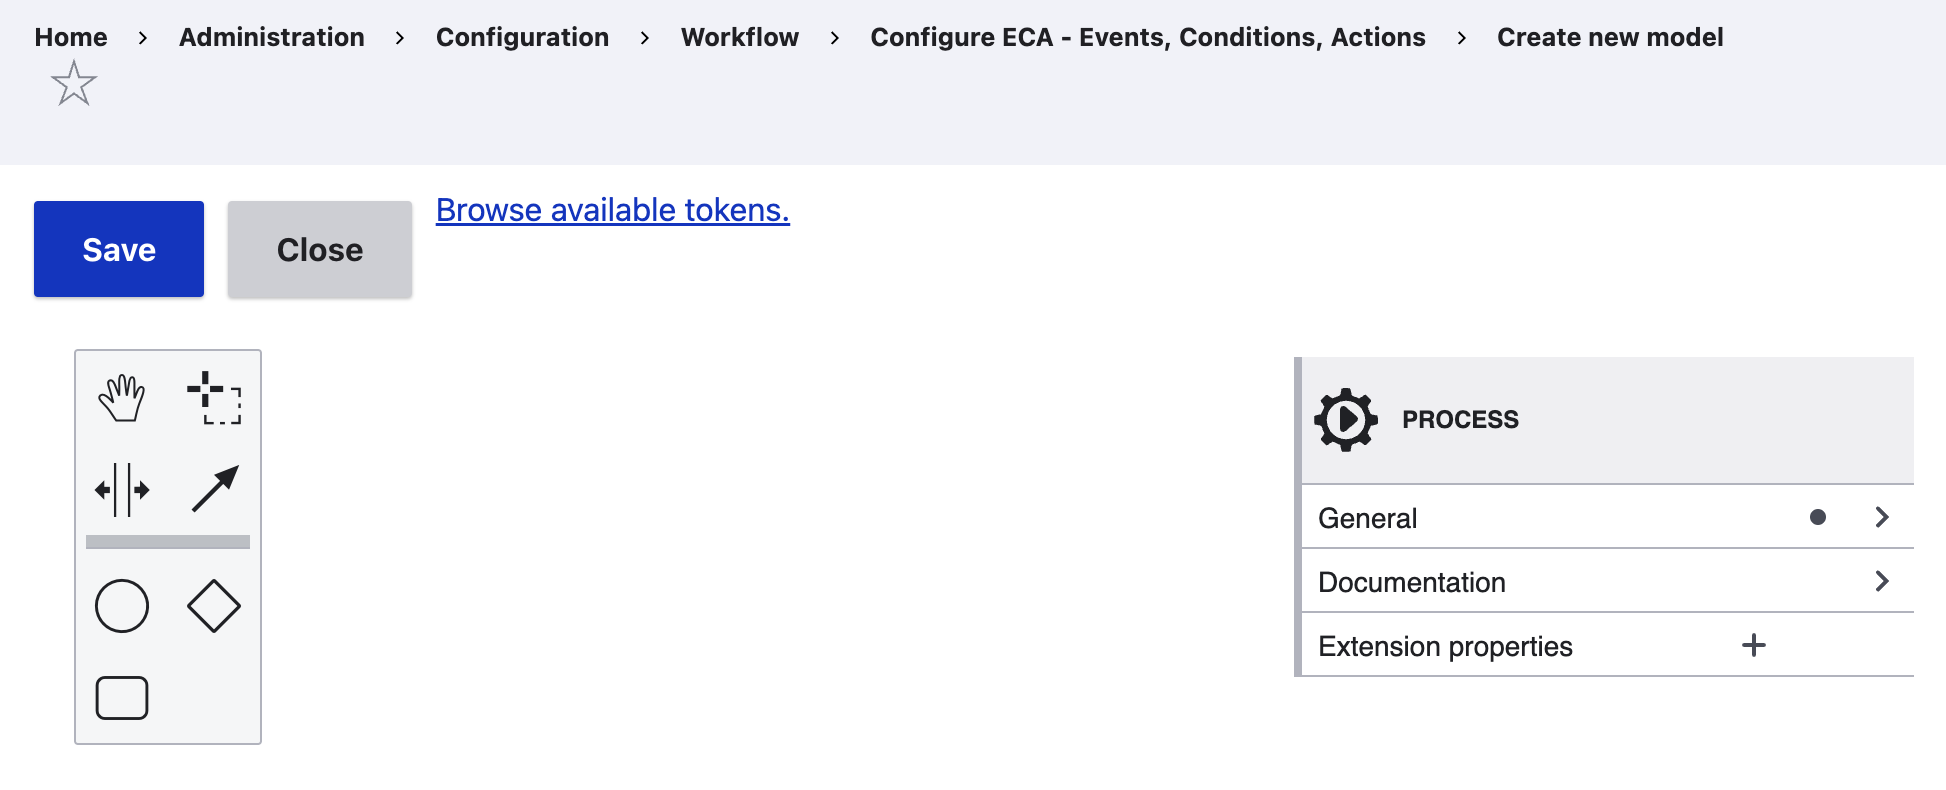
Clicking on General allows us to set a name for our model. We'll name this one "Rewrite Article node body upon creation" and we'll also change the default ID to something more human-friendly - "rewrite_article_body_upon_creation".
2. Adding a start event
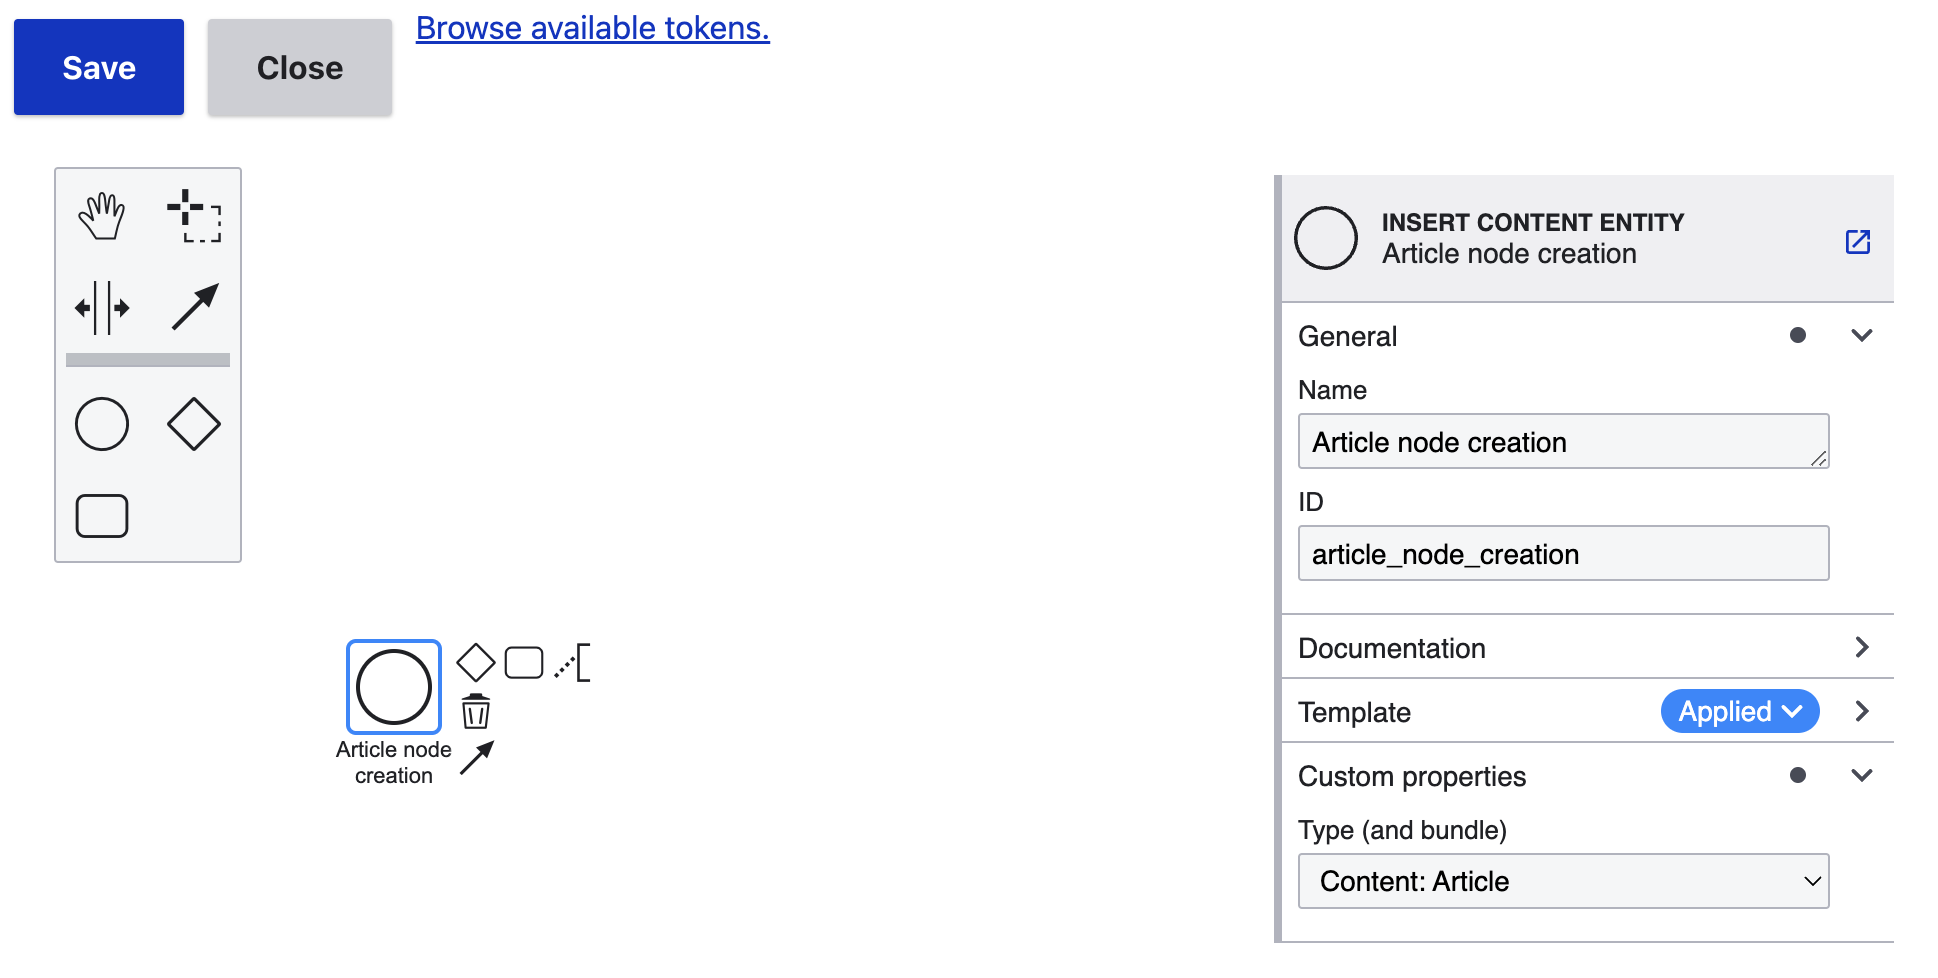
Using the symbols toolbar on the left side of the screen, we drag the circle object onto the canvas to create our Start Event. This is the beginning of our ECA flow; think of it as the Event that triggers our sequence of actions that follow. Click on the start event you've added (if not in focus already) and:
- Set a name for it, for example: "Save Article node"
- Set a human-friendly ID for it, for example: "save_article_node"
- In the Template section, click on the "+Select" button and choose "Presave content entity" from the listed templates. That way, our ECA model will kick in when events of this type occur. Note that we haven't selected the entity creation event because that's too early for our field values (used below) to be present.
- In the Custom Properties section, set the type to "Content: Article". That way, we're only affecting nodes of the Article content type and only when they're created.
3. ECA tasks
Here's how our ECA model flow will look like after we've added the following three tasks:
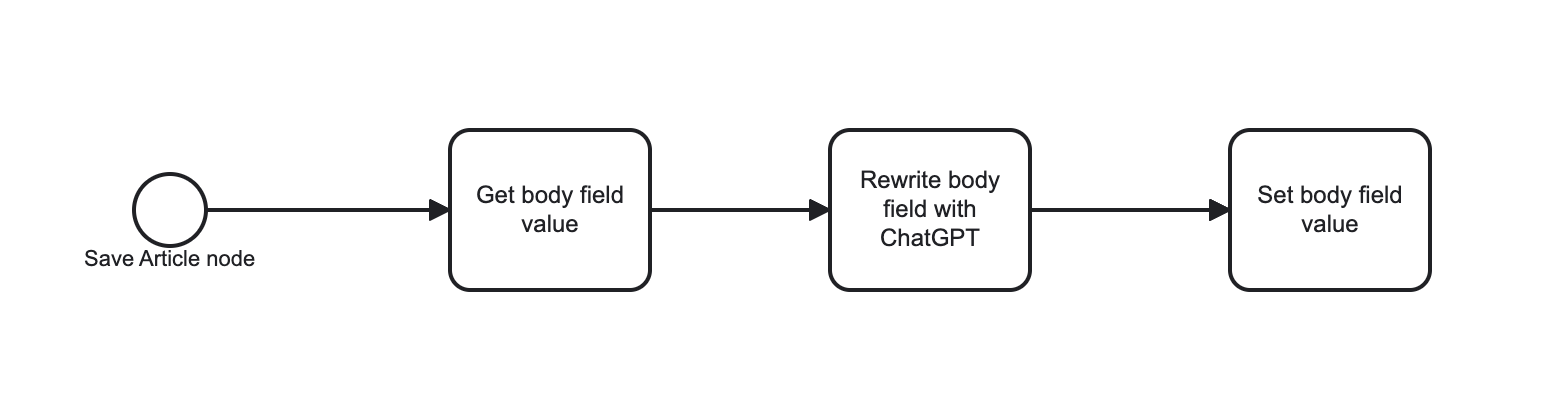
Task 1/3: Get the value of the node's Body field
To add a reaction to the start event from above, click on the rectangle object next to the start event circle ("Append task") and:
- Set its name to "Get body field value"
- Set its ID to "get_body_field_value"
- Select the "Entity: get field value" template
- Set the field name we need the value of to "Body"
- Define the name of the token that will hold the value of the Body field, for example, "body-value"
- Fill in the "Entity" field with "node" as it's only Article nodes that we want to work with
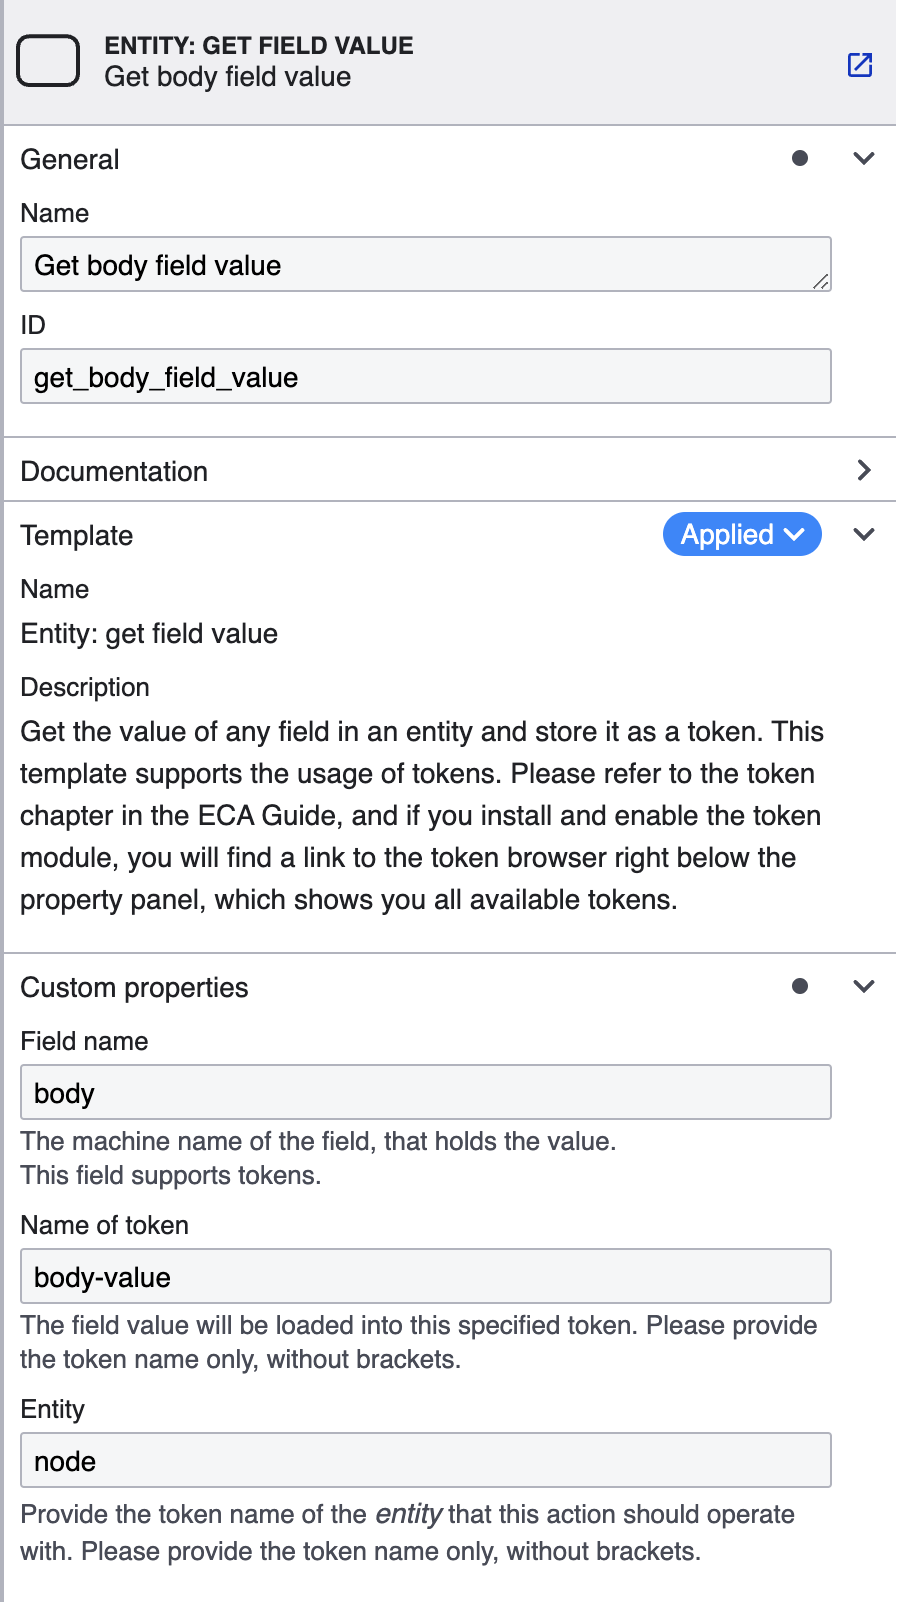
This task will go into any Article node just before it gets saved and it'll get the value of its Body field.
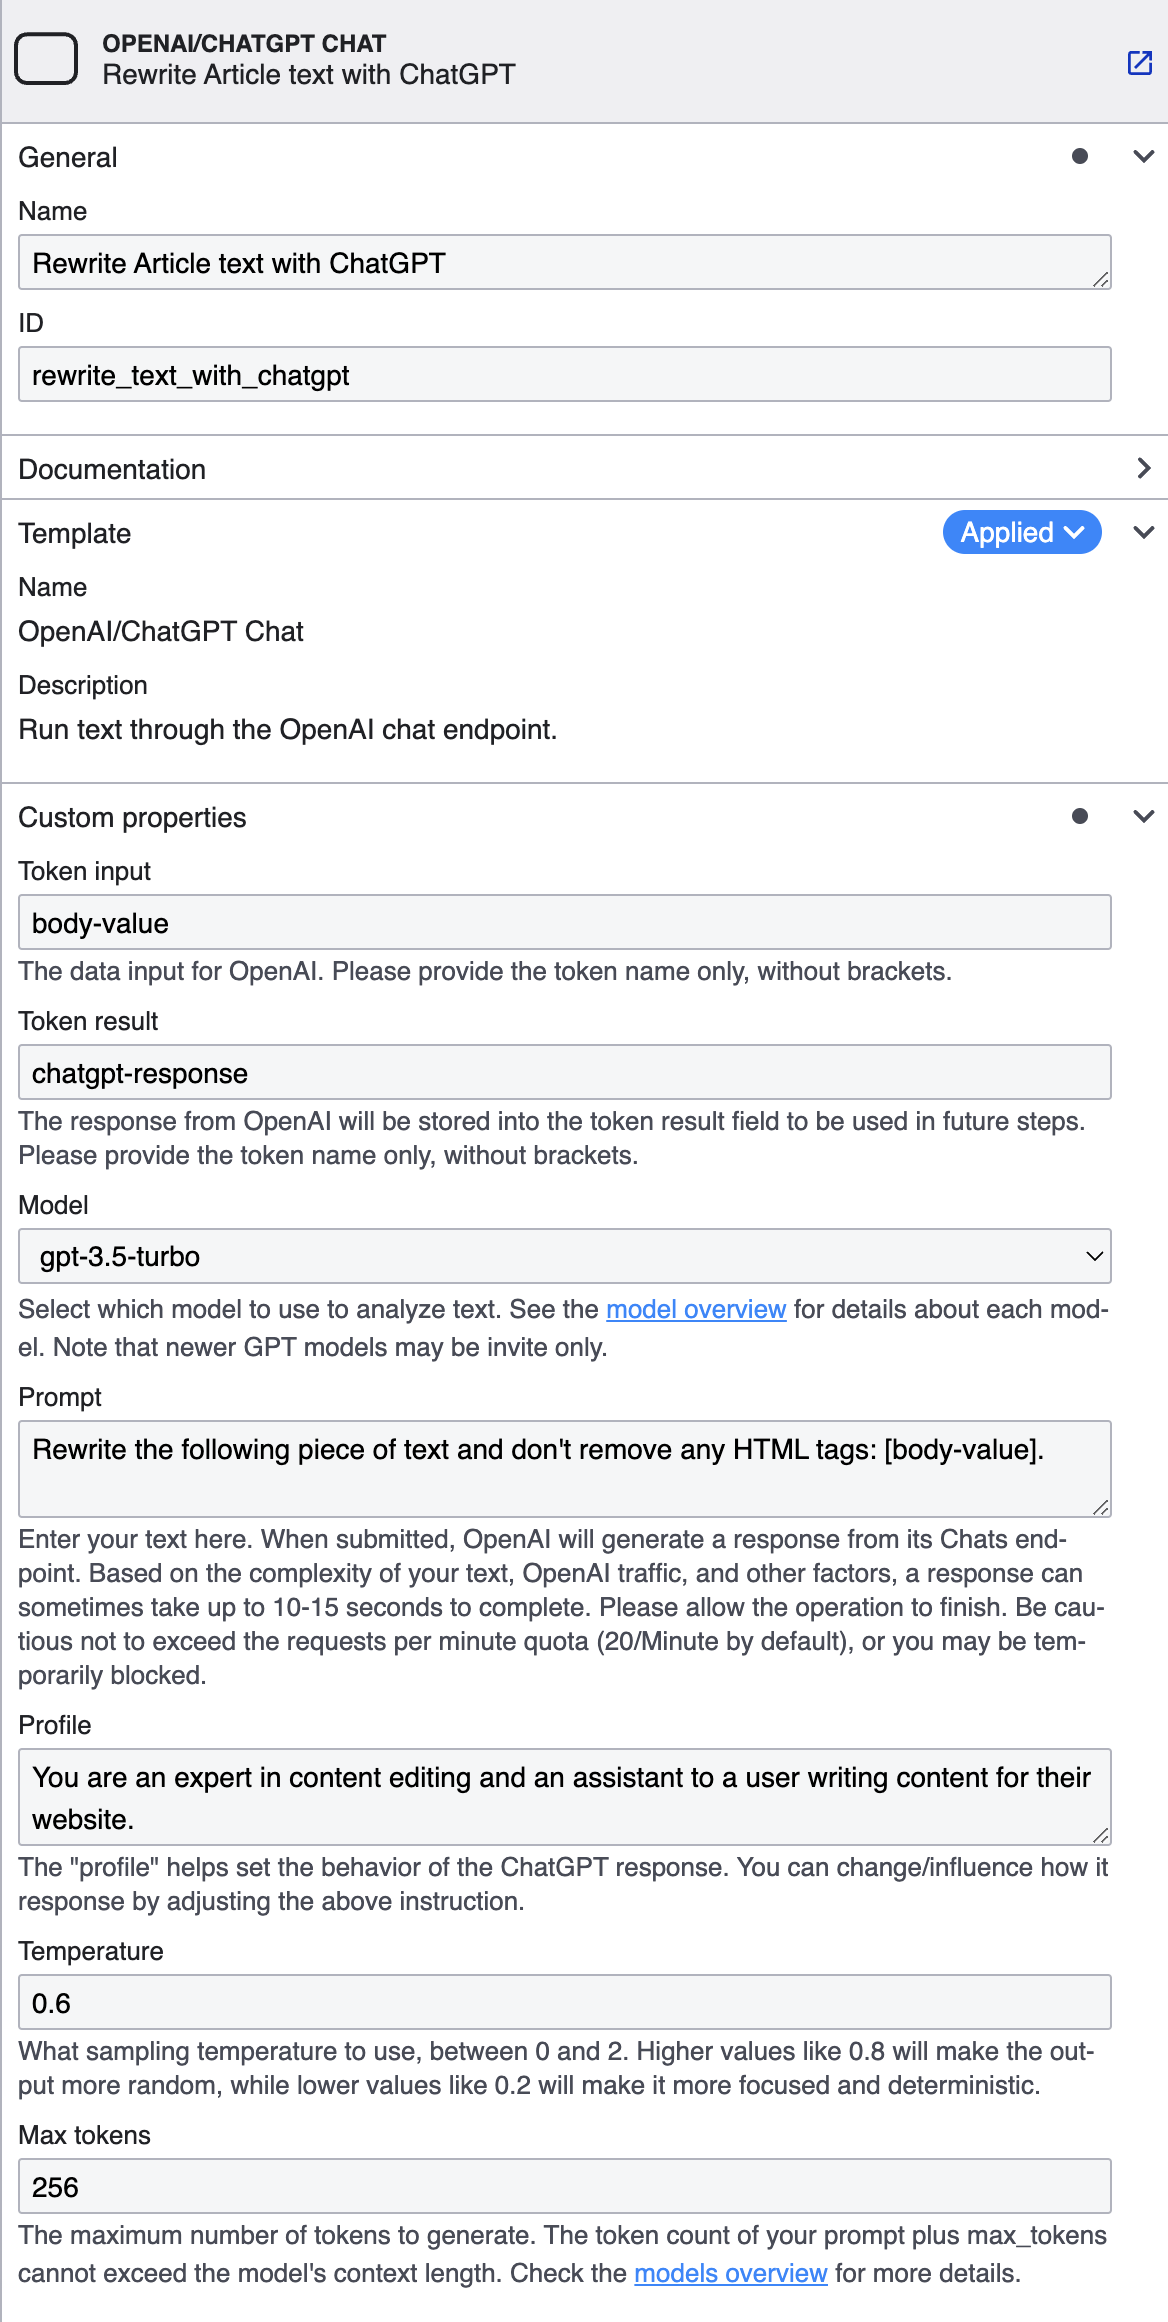
Task 2/3: Run the text through the OpenAI chat endpoint
Similarly to our first task, we use the "Append task" feature to add our second task:
- Set its name to "Rewrite Article text with ChatGPT"
- Set its ID to "rewrite_text_with_chatgpt"
- Select the "OpenAI/ChatGPT Chat" template
- Set the token input value to "body-value" (we are using the token we set in the previous task)
- Define the name of the token that will hold ChatGPT's response, for example, "chatgpt-response"
- Choose a ChatGPT model, for example "gpt-3.5-turbo" you can read more about ChatGPT's models here).
- Add the ChatGPT prompt, for example, "Rewrite the following piece of text and don't remove any HTML tags: [body-value].". Here, we ask ChatGPT to rewrite the content of the Article node. Note that we specifically ask ChatGPT not to remove any tags found in the Body field value (we've found that it does that by default!). With this prompt, we'll receive a slightly altered version of the initial article but the prompt can be anything! For example, you can ask ChatGPT to only keep a portion of the node's content based on certain criteria, or you can ask it to come up with new taxonomy tags based on the content of the Article and, as part of the ECA model flow, assign these tags to the node.
- You can leave the remaining fields unchanged
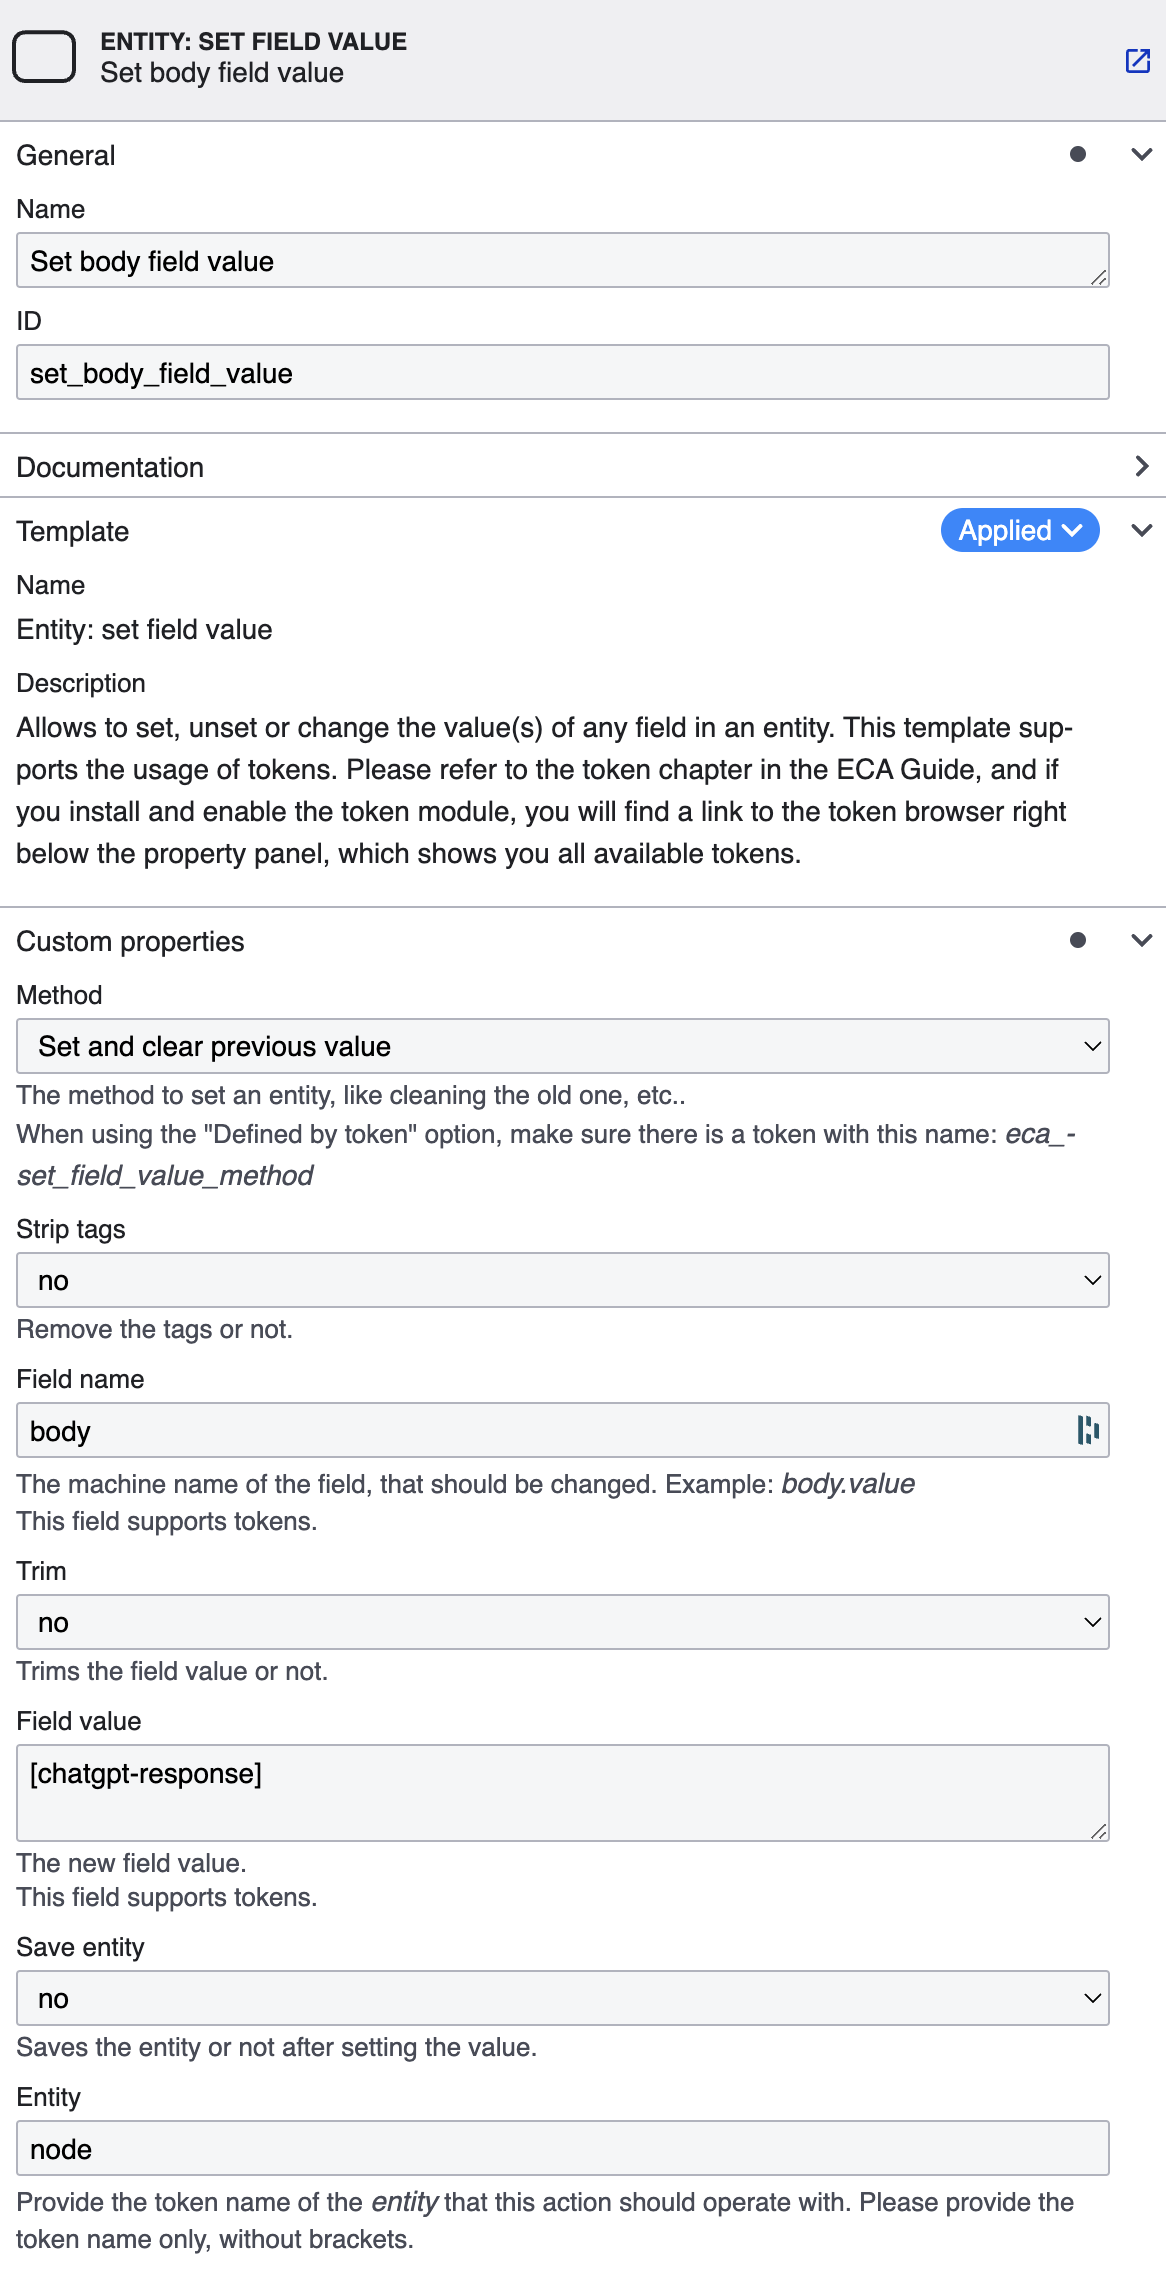
Task 3/3: Set the value of the node's Body field
We can now add the final task to our ECA model chain:
- Set its name to "Set body field value"
- Set its ID to "set_body_field_value"
- Select the "Entity: set field value" template
- Set the field name to "Body"
- Set the field value to "[chatgpt-response]" - this is basically the token we defined in the previous step and it holds ChatGPT's response
- Configure the remaining fields according to your preferred settings:
Testing our ECA-ChatGPT model
To test our model, we'll first delete the previously imported Article nodes and re-import a fresh batch of Articles, using the RSS Feed we previously developed.
Here's how an imported Article node looks like (before deletion):

And here's the same article's Body text, as imported using our RSS Feed ("Save and import" button on the RSS Feed Edit screen) and with our ECA model above in place:
As you can see, ChatGPT successfully altered the text of the article while maintaining its meaning, as well as its HTML structure and tags!
Conclusion
We've managed to create a fully automated content import and publishing workflow that:
- Periodically imports items based on selected RSS Feeds
- Automatically generates content from the imported RSS Feeds on our Drupal website
- Automatically alters the Body text of the imported Article nodes using ChatGPT and a relatively short ECA Model chain, to create and maintain unique content on our Drupal website
It's now obvious how powerful the combination of ChatGPT and ECA is. You can create your own models with even more complex ECA flows and also delve into Speech-to-Text, Text-to-Speech or even image manipulation and/or generation using Dall-E - the sky is the limit!
Stay tuned for our next tutorials!
ORION WEB can help you design, build and configure beautiful user journeys. Contact us for a free consultation - we'd love to discuss your organisation's digital strategy!